Showing posts with label watercolour. Show all posts

Monday, 22 May 2023

Don't Stop Believing...

Hello friends...

It's time for the brand new Simon Says Stamp Monday Challenge to begin and this week we are encouraging you to get out your paints, or pencils and do some water-colouring with our fun challenge theme. So whether you choose to create your own piece of artwork or use a stamp and watercolour between the lines, then we hope you'll join us and play along.

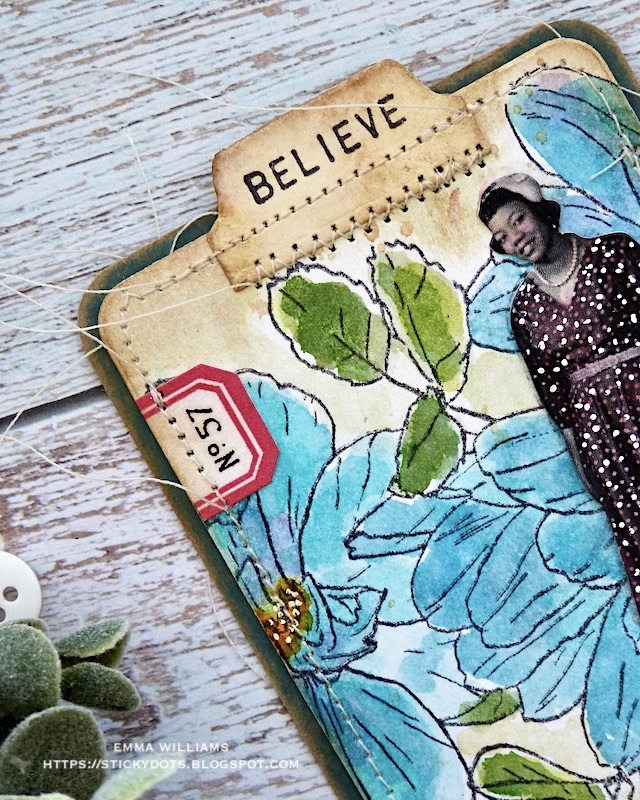
For my make, I created some mini motivational pocket cards that are packed full of encouragement and positivity. I think everybody has 'one of those moments' when they need some encouragement and I thought these would be perfect to send out to those that are struggling right now, just to say hello and let them know I'm thinking of them. 

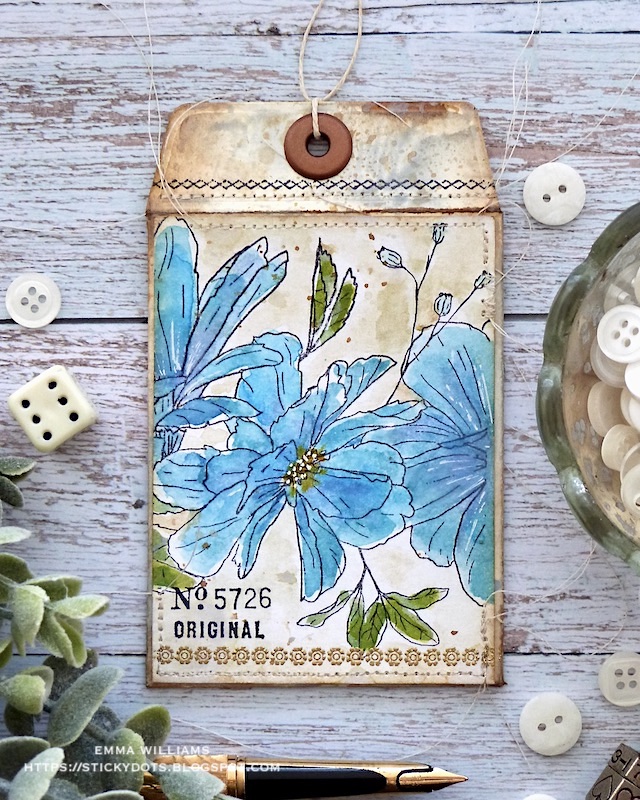
I made two sets to begin with and on each of these pieces, I used the Stampers Anonymous Floral Trim stamp set by Tim Holtz and watercolored the backgrounds with Distress Inks and Distress Watercolour Pencils.


So let's get started and here's how I created this set....

MAKING THE BASE ENVELOPES

I began by die cutting my two pocket envelopes from Mixed Media Heavystock card, using the Sizzix Collector Die Set by Tim.

I spritzed each envelope with a combination of Speckled Egg, Old Paper and Frayed Burlap and once dry, I inked along every edge with Walnut Stain Distress Ink, before folding along the scorelines to assemble the envelope. I adhered the joins with red line double sided tape.

On the envelope flap, I machine stitched a line across the flap, then added a stamped decorative trim using one of the border stamps from the Ornate Trims stamp set. To complete the envelope I punched a hole using my Crop-A-Dile before adding and securing the eyelet into position and threading some twine through. The twine is cut long enough to act as a wrap around the envelope to keep it closed.

The envelopes are now ready to decorate.

WATERCOLOURED PANELS

For the watercolored panels, I chose to use a very loose style of watercolouring, not too precise, just going with the sketchy look of the stamps themselves. I began by cutting two pieces of watercolour cardstock, slightly larger than the stamp I was using from the Floral Trim set and after stamping the whole of the stamp outline onto my panels using Black Soot Archival Ink, I coloured the image using the following colours by 'squidging' Distress Inks onto my glass mat. I used a waterbrush to apply Broken China for the flowers, and Mustard Seed for their centres and for the leaves, Bundled Sage, Mowed Lawn and Rustic Wilderness.

I always heat dry the colour between applications and once I was happy with the blends, I took my Distress Pencils to add shading. I used Villainous Potion, Black Soot, Salty Ocean and Faded Jeans to add the depth and shading I needed, all applied by touching the nib of the pencil with my waterbrush and laying down each individual colour.

I dried each of the panels thoroughly before adding the shading to the background. For this I used Old Paper and Frayed Burlap Distress Ink, again smooshed onto my craft mat and picking up the ink with a waterbrush to apply direct to paper, filling in all those little areas between the petals and leaves. After flicking some of the darker distress ink across my panels, I dried both panels.

With my Floral Trim coloured, I took one of the panels and cut the image down to make two mats that are slightly smaller than the envelopes from one panel.

We're now ready to bring each set to life....

SET 1

Taking one cut panel and one assembled die cut envelope, I machine stitched a border around the panel and then added some more details, including stamping the word 'Perfection" from the Eccentric stamp set in the bottom left hand corner and added a remnant rub in the top left hand corner.

I mounted the finished panel onto the front to complete the envelope, ready for the card to be placed inside.

Moving onto the next stage, and this is where we use the second stamped image and cut this panel into two pieces using the Mini Card die, with the rounded edges, from the Collector Set.

Once again, I machine stitched a border around the outside and then added some detail to the card including the number 3 Snippet Ephemera piece in the top left hand corner.
Along the bottom of the mini card, I applied a piece of Photographic Collage Paper that I had on my desk after I tore it away from the roll and never used it. I adhered this into place using Matte Collage Medium. Finally, I stamped the Hello Friend sentiment beneath that, which is from the Tiny Text stamp set.
On each card I used a Mini Paper Doll. This set features the group of girls, and I used a waterbrush to watercolour the image with Distress Crayons before adding white pen highlights. 
I adhered the girls directly onto the panel with Matte Collage Medium.
I finished the panel by mounting it onto some of Tim's kraft card from the Cool Set and added a Tiny Clip that I clipped to the top edge.

QUOTE CARD

The final card for this motivational card set is the encouragement sentiment and I began by cutting a base of watercolour card, using the Label die from the Collector Die Set.

Using the Note Quotes stamp set by Tim Holtz, I began by stamping the circle in the centre of the label using Black Soot Archival Ink.

I then created a mask by stamping the circle again but this time on a post it note. I cut around the outline of the stamped image, laid it over the top of the image on the card, then inked up my Floral Trim and stamped over the top of the card panel.

Once I removed the mask, I stamped my 'shine bright' quote inside the circle using Prize Ribbon Archival ink and then watercoloured the image and the background using the same colours and same technique as I used for the envelope and the mini card.

After I machine stitched a border around the outside, I also machine stitched around the stamped circle outline before I mounted the artwork onto a piece of cool kraft stock card.

SET 2

The second set is created exactly the same as the first...
...the only differences are that this time, I stamped a second Decorative Trim along the bottom of the panel attached to the envelope which I then embossed with gold embossing powder.
...and in the bottom left hand corner of this envelope, I added a number which is from the Eccentric Stamp Set.

The mini card features another mini paper doll and she is standing on a Handle With Care label from the Eccentric set, and this was stamped in Fired Brick Archival Ink.
On this mini card, I added the tab at the top. This was cut from Mixed Media Heavystock card, inked with Walnut Stain and Old Paper Distress Ink and has the word "Believe" stamped onto it. I then stitched the tab into position.
I attached a label to the left hand side of the card, complete with a number that I applied using a Remnant Rub.
The card is mounted onto some more of the Cool Kraft Stock, cut slightly larger than the card itself.

Finally, I made the second motivational card but this time stamped the quote in Rustic Wilderness Archival Ink, before I looped and attached a piece of velvet ribbon to the top of the card.

So that's my project for this week completed and I hope you feel inspired by this set of motivational cards and the techniques I've used to make them. They are so much fun to make and now ready to send out to all those friends who need a little boost in their lives.
...and before I go, I just wanted to leave you with a message for the week ahead!

As always, if you make anything, or if you've been inspired by anything that you've seen here on my blog ~ then please, let me know by tagging me on social media or leaving a comment here and I will be right over to take a look!

Don't forget that every week, one lucky random participant has the chance to win a $25 gift voucher from Simon Says Stamp and you can join in up to 5 times, which means you could have 5 chances to winYou have until next Monday at 8am Ohio time. 1pm UK time, 2 pm CET to join in and good luck....


Thank you so much for taking the time to stop by today...see you all again very soon!

Love Emma xx


Recipe for project:

Tim Holtz for Stampers Anonymous: Floral Trim, Eccentric, Note Quotes, Tiny Text, Ornate Trims
Distress InksVillainous Potion, Black Soot, Salty Ocean, Faded Jeans, Mustard Seed, Walnut Stain, Bundled Sage, Mowed Lawn and Rustic Wilderness
Distress Spray Stains: Speckled Egg, Frayed Burlap and Antique Linen
Black Soot Archival Ink, Rustic Wilderness, and Prize Ribbon

Saturday, 20 May 2023

Simon Says Stamp Dear Friend Blog Hop Day 1

Hello friends and welcome to Day 1 of the Simon Says Stamp Dear Friend Blog Hop.

I'm so excited to be joining so many of my talented friends and designers on this hop and if you've arrived here from, Tina's blog ~ then hello, but if not, and you want to catch up with everyone who is participating in this hop, then don't worry because you can head back to the beginning by clicking HERE.

There are so many fabulous new products in this release and I can guarantee you’ll be spoilt for choice when you pop on over to see all the products in this amazing release HERE, including the gorgeous Peony Background stamp that I used to make my card.


So let's get this stop on the blog hop started and here's how I made my vintage style card.

For this make, I used a 15 x 20.5cm black card blank which I created using SSS Black Card and I applied Tim Holtz Tape Trim vertically down each side of the card blank, top to bottom, attaching it approx 0.5cm from each edge.

I had this particular tape in my stash but unfortunately, Simon Says Stamp haven't got this design in stock at the moment, but don't worry as that isn't a problem, just click here to see all the tapes you can choose from to use that will create a similar effect to the tape I've used.

PEONY BACKGROUND

I began by cutting a panel of Tim Holtz Distress black Heavystock card measuring 10 x 18.5cm, and gave the surface a dusting with the Anti Static Brush Powder Tool. I then inked the Peony Background stamp with clear embossing ink and stamped the right hand section of the stamp onto the top section of my card panel. After sprinkling gold embossing powder over the ink, I tapped away the excess and heat embossed until shiny and molten.

Now to watercolour the image, and I used Distress Watercolor Pencils from Tim Holtz in the following colours...

FLOWERS: Picked Raspberry, Villainous Potion

LEAVES: Peeled Paint, Rustic Wilderness, Twisted Citron

I laid down the colours with a waterbrush, starting with the palest colour first and adding shading with the darker colours, heat drying between each layer. Because I’ve used black card, Picked Raspberry does alter in colour and as you can see, it turns into this beautiful lilac shade, with Villainous Potion creating deeper shaded areas.

Along the bottom of my stamped card panel, I added a gold trim from the Stampers Anonymous Ornate Trim Stamp Set by Tim Holtz. I once again used the Anti Static Dusting Powder and then inked the stamp with clear embossing ink, before applying gold embossing powder and embossing with my heat tool.

Once I was happy I machine stitched a border around the outside of the art panel, and then matted this onto gold matte cardstock, followed by a layer of Tim Holtz black kraft card.

To add some texture to my card, I used a Mummy Cloth wrap around the panels. I cut a strip of Mummy cloth and then dyed it using Villainous Potion and Antique Linen Distress Spray Stains. 

Once the cloth was thoroughly dry, I wrapped it around the panels, placing it just beneath the end of the stamped section and tied it in a knot on the left hand side to secure the wrap, attaching a Mini Pin to the knot.

Using foam pads, I mounted the layers onto my a further panel of black card, cut slightly larger than the layered panels. I then adhered the matted layers onto my card blank, placing them centrally between the two strips of design tape that I'd placed down either side.

SENTIMENT

We're nearly there and all that was left is a few tiny details beginning with a sentiment. I took "All My Love" sentiment from the Rose Corner stamp set that was part of a previous Simon Says Stamp release and inked the stamp with clear embossing ink.

As before, I used Ultrafine Gold Embossing Powder to emboss the sentiment and then cut the card down to size before matting it onto a piece of burlap. I adhered the sentiment to my card blank with foam pads.

Finally, I placed three different sized gold metallic droplets down the left hand side of the card, placing them underneath the mummy cloth trim, and directly opposite the sentiment.

So that's my card finished and I hope you love this make using the gorgeous background stamp as my main focal image.

Simon Says Stamp is giving away a $25 coupon to every stop on the blog hop from the blog comment section! So, this means you can leave a comment here and on every stop along the way to increase your chances. Winners will be notified and they will be posted on the Simon Says Stamp blog on Wednesday, 24th May and all winners will need to contact/email Simon Says Stamp to claim their prize.

Thank you so much for stopping by today and hope you enjoy this fun hop....see you soon, Emma x

BLOG HOP ORDER

Emma Williams YOU ARE HERE

Powered By Blogger

Total Pageviews