Hello everyone and welcome to Day 1 of the You Are My Favorite Blog Hop!
I'm so excited to be joining this hop, and you might have arrived here from Emily Midgett’s blog, but if not, and you want to catch up with everyone who is participating in this hop, then don't worry because you can head back to the beginning, by clicking HERE and if you would like to see the entire product release , then pop on over to HERE.
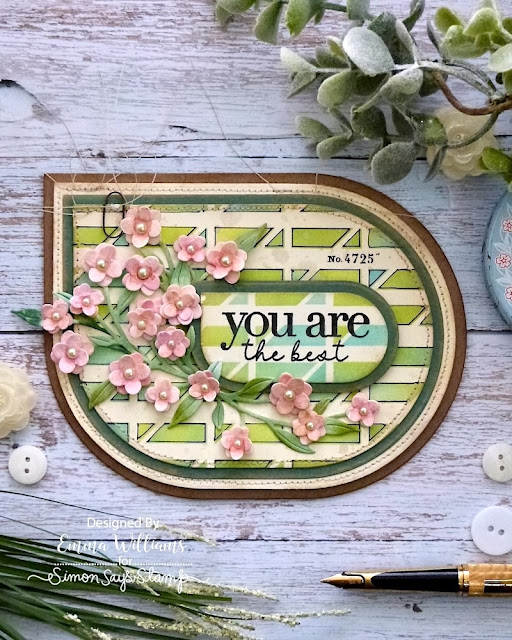
For my card and gift tag make, I was inspired by the colours of Spring and made my projects using the products that I was sent from the release, which included the Receding Squares Stencil for the background, Inside Greetings 1 stamp set and the Squovals die set. I combined these with an older die set, Swing Blossoms as I wanted a focal point for this card set.
So let's get started and here's how I created my projects for this fun blog hop...
To begin with I made the card bases from Tim Holtz Heavystock Kraft Card using the Squovals die set. For the card is used the largest die in the set and for the tag, I used the die to cut a card base measuring, 9.5 x 6.5cm. Each card needs two separate die cuts to form 1 card blank.
Taking the two larger die cuts, I scored a horizontal line, 2cm from the top edge and folded along the scoreline. After placing red line tape onto the 2cm fold, I then attached the second die cut shape to form my card. Repeat this to make the smaller tag.
We're now ready to make the individual pieces.
CARD
When complete this card fits into the A2 Paper Bag envelopes.
LAYERS AND BACKGROUND
Using the dies in descending order, I took the next size down in the die set and cut a panel of Mixed Media Heavystock card and after inking the edges with Frayed Burlap Distress Ink, I machine stitched a border around the outside of the panel.
I then took the next size down to cut a panel of green Kraft stash card. I sanded the edges of the Kraft card, to reveal the core and then adhered this to my larger stitched panel. Finally, I used the next size of down of the dies, to cut a second panel of the Mixed Media Heavystock card.
To create the background, I chose to use the Receding Squares Stencil. This stencil is designed to create the look of *clue in the title*, Receding Squares but for my project, I used the stencil to create a slightly different design to my panel, I wanted more white space on my background ~ so, I created straight lines, instead of the Receding Squares.
I inked the design through the stencil using Blending Brushes to apply, Salvaged Patina and Twisted Citron oxide inks. Once I was happy, I removed the stencil and then flipped it over, lined it up with the previous line of stencilling and then proceeded to ink through the design to create a continuous, horizontal pattern. After removing the stencil, I inked around the edges of panel with Frayed Burlap Distress Ink, added a few splatters of ink and then machine stitched a border.
I then laid the stencil back over the inked design and using a black fine line pen, I outlined each of the tiny squares through the stencil. Flip the stencil over again and then repeat.
I matted this inked panel onto the green Kraft card and then layered this over the larger panels of card. Mount the layers onto the front of the die cut Squoval card blank using foam pads.
The base is now ready for the sentiment and decoration.
DIE CUT SENTIMENT
For the sentiment, I used the 6.8 x 3.8cm die to cut a piece of the green Kraft stash card, followed by another piece of the Mixed Media Heavystock.
I used exactly the same technique of inking through the stencil to create the background on the smaller die cut piece that I will use for the sentiment but this time I didn't add the black lines around the inking.
Instead, I inked one of the sentiments in the Inside Greetings 1 stamp set, "You Are The Best" using Black Soot Archival Ink, and stamped the sentiment onto the inked panel before matting this onto the green card. I mounted the sentiment onto the card front using foam pads to add dimension.
We're nearly there and all that's left is to make the flowers inspired by cherry blossom and attach these to the card front, together with some tiny details.
FLOWERS
I used the Blossom Swing die set to make these beautiful tiny die cut flowers.
I cut multiple pieces of Mixed Media Heavystock card using the die and then inked the stems using Peeled Paint, Shabby Shutters and Bundled Sage Oxide Inks, applied with Blending Brushes.
I then inked the flower heads using Spun Sugar, and added darker centreswith Picked Raspberry and a touch of Spiced Marmalade.
I shaped and attached each of the flower heads onto the main stems using Simon's Precision Glue and then attached them to my card front. To create the arrangement, I snipped into the die cut to create tiny pieces that can fill in.
DETAILS
For the finishing touches, I added a No 4725 rub on from a Tim Holtz Remnant Rub pack that I have in my stash, but you can also use numbers from the Specimen Remnant Rub set...
...and to complete the card, I added tiny pearls to the centres of each of the flowers and then attached a Mini Clip to the top left hand corner.
GIFT TAG
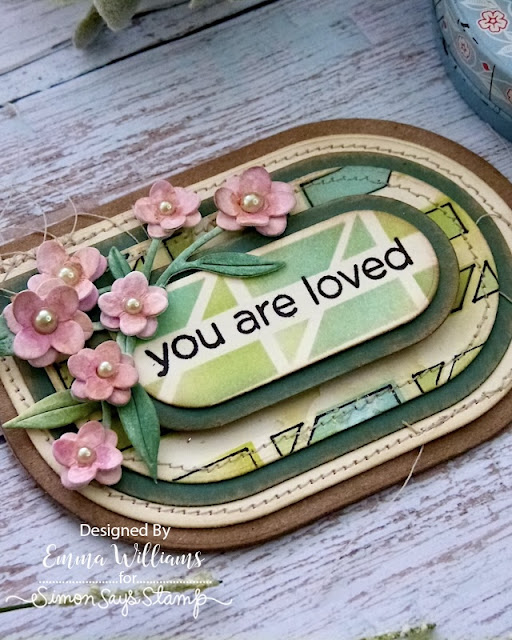
The gift tag is created in exactly the same way as the card, I just used smaller dies from the Squoval set and a different sentiment from the Inside Greetings 1 stamp set.
I then attached the flowers to the top left hand corner to complete the tag...
...before using Black Soot Archival Ink to stamp another sentiment, "thanks for everything' inside.
Now, it's time to hop to the next stop...Mindy Eggen


Wow - what a card! So much pretty details on the little flowers and a very unique shaped card.
ReplyDeleteOMG! These are fantastic! I LOVE the shape! The flowers are gorgeous!
ReplyDeleteI love the stitching detail on this card and the little flowers give it the finishing touch.
ReplyDeleteSo many great ideas! Nice work!
ReplyDeleteWow!!!! Sooooo cool!!!!
ReplyDeleteWhat a unique beauty that is!!!
ReplyDeleteSuch a unique card!
ReplyDeleteLove the tag idea!!
ReplyDeleteBeautiful inspiration! Thank you!
ReplyDeleteWhat a fantastic & unique card, I'm a sucker for a shaped card. The little pink flowers look so realistic & really stand out.
ReplyDeleteBoth are so pretty and clever. Always love what you make.
ReplyDeleteEmma this card took my breath away! I was intriqued by the shape but the design - OH MY! Just GORGEOUS! TFS!
ReplyDeleteWOW! These cards are amazing! I love the colors, the design and that very different looking squoval die set. Thought it was weird looking until I saw your two beautiful cards!
ReplyDeleteHow cute. Very unique design. Love the colors used.
ReplyDeleteTHIS CARD PULLED ME IN. I AM LOVING IT SO MUCH
ReplyDeleteOPPS DIDN'T LOG IN.. ERIKA HAYES HERE :)
DeleteYou've taught me a new term: squoval... You've really shown off this new shape in a superb way! TFS -
ReplyDeleteFantastic tags! I really love the how the colours work together!
ReplyDeleteLove these cards!!!
ReplyDeleteNow, I didn't think I needed those funny shaped dies, but that card is really cool! (Reevaluates cart.....)
ReplyDeleteThat rose stencil is just so gorgeous! And what a lovely card!
ReplyDeleteSo cute! The squoval is my new favorite shape lol. Your card is gorgeous 😍.
ReplyDeleteSuch a fun project!
ReplyDeleteSo many details! Love the use of the Squoval and the Receding Squares Stencil. This card is beautiful!
ReplyDeleteSo many details! Lovely!
ReplyDeleteWOW!!!! Love this card and tag! Your color usage and the receding square stencil are fantastic. Thanks for sharing your amazing talent and inspiration.
ReplyDeleteWhat a great idea using the squoval for the shape of the card!
ReplyDeleteLove all the detail and the design..so unique. Thanks for the inspiration. I might have to case the design. Love your card.
ReplyDeleteYour cards are gorgeous! Love the layers, background, and sweet flowers. A work of art!
ReplyDeleteLoove your card and Tag!!! Wow!!! The design and colors and of course flowers are so sweet!!!!!
ReplyDeleteLike the shape of these. Taking notes here. Very nice cards!
ReplyDeleteMarisela Delgado said: So beautiful! I really love the shape. mariandmonsterd@yahoo.com
ReplyDeleteAdorable! Love the unusual shape of the die!
ReplyDeleteKaren Adams
Wow, again wow! I love the shape of this card. So unique and the layers are beautiful as well.
ReplyDeleteWow! Your projects are so beautiful! I love the little flowers and the shape of the card and tag!
ReplyDeleteOh how FUN! Great shapes and I adore your colors! Makes for a lovely set! And those perfect little posies--pretty!
ReplyDeleteSo unique! I love all of the dimension - especially those flowers! Nicely done!
ReplyDeleteOh my goodness! Your card and gift tag are absolutely stunning! I love the unique shape and the texture of the flowers!
ReplyDeleteI had to look up what the Squovals die set was - love your beautiful example! How many times did you have to run that mini flower die through your machine to make the gorgeous layers?! You go!!
ReplyDeleteWhat a great card design.
ReplyDeleteWhat an amazing and unusual shaped card! Beautiful. I love your card shape and the small flowers.
ReplyDeleteFirst time seeing the Squovals and it is pretty! :) love the Squoval shaped card!
ReplyDeleteWow! The Squovals dies are pretty cool! This is such a work of art! Well, done!
ReplyDeleteSo pretty. I like the Spring colors, pearls and stitching.
ReplyDeleteI have never heard of a squoval until now! But I really like what you did with these dies, Emma. TFS
ReplyDeleteAwesome colors and details! I love the sweet flowers and the dimension!
ReplyDeleteVery pretty cards!
ReplyDeleteWonderful new shape.
ReplyDeleteI love the aged look of your card.
ReplyDeleteOh Emma! These cards are stunning!
ReplyDeleteAnother Fabulous card Emma, I so look forward to your designs.
ReplyDeleteI can't imagine how long it took to do all those precious flowers.
So I don't know how to leave my name except here. I'm older than dirt and not computer literate. lol
Lynn Stevens - minpinsloveme@msn.com
Beautiful. Truly beautiful. I think I could stare for a long while to try to take in all the amazing details. TFS — Bridget N (j.bageln5@gmail.com)
ReplyDeleteAbsolutely gorgeous card and tag! Love everything about each one!
ReplyDeleteI love this shape. Your card and tag are fabulous with this shape and all of the stitching!
ReplyDeleteYou have long been one of my very favorite makers and you never disappoint! Love how you used the squoval here. Great make. Thank you as always for the inspiration!
ReplyDeleteThe flowers, the colors, the shape...this is just so cool!!!
ReplyDeleteYour unique style and technique have created a wonderful masterpiece. I love the colors and all the layers!
ReplyDeleteWow! so gorgeous.
ReplyDeleteI love EVERYTHING about this card!! All the details you've added just make it that much more unique!! LOVE LOVE LOVE!!
ReplyDeleteWow! BEAUTIFUL. ... I love all the details ✨️
ReplyDeleteThese are lovely
ReplyDeleteBeautiful card. I love the shape and all the details.
ReplyDelete