
Hello friends...
Today, I'm sharing my final Christmas idea-ology make that I created for Tim Holtz's YouTube Live Launch! If you didn't see the LIVE or like me, you just want to watch the replay again, and again...then you can catch up with it HERE!
This project was created using the quite a few of the new Christmas products from Tim and included the fabulous new Vignette Plaque, which measures 8" square and is the perfect base for so many different projects ~ I know I'll definitely be stocking up on these!

So let's begin and I'm just going to take you through a few of the techniques I've used starting with the plaque, which I flipped over so that I could use it as a shadow box but you can use it the other way too, which Tim had done and wow, that project is amazing ~ so definitely take a look!

So with the box flipped over, I painted the back and sides of the plaque with a combination of Candied Apple, Aged Mahogany and Black Soot Distress Paint. I started with Candied Apple and then dried the painted surface before adding a dry brushing of Black Soot and the Aged Mahogany over the top. This helps to knock back the brightness of the red and gave me the vintage look I wanted.
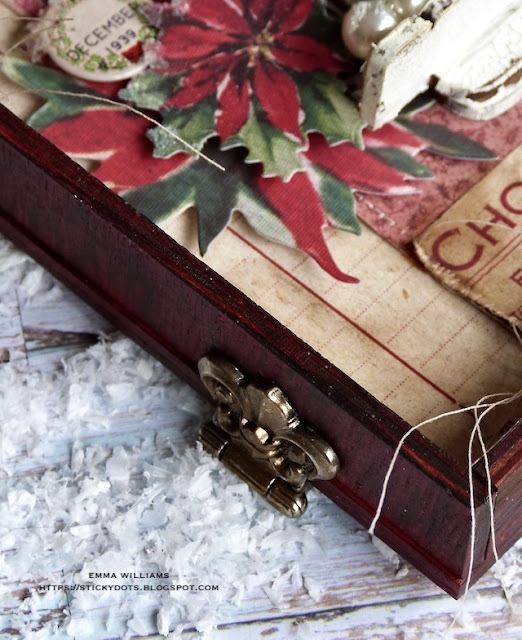
On either side of the box, I added Hinges ~ these aren't functional but just decoration to create the look of a hinge.

I lined the box with papers from the Christmas Backdrops set and cut these into panels, stitched a border around the edge of each and after adding a few rips and tears, I attached them to the plaque with Matte Collage Medium. I always add a coat of the medium over the top of the papers to seal them and I also ran Walnut Stain Distress Crayon around the edges, so that it creates an aged look to the papers.
What I love about these papers is the fact they all work so well together and you don't need to use a full sheet, just use panels and splice them together as I've done here. Even the Chocolate Phalier Douell panel is cut down from the papers and then collaged.

The focal point is the framed sections and I layered a Baseboard Frame over the top of a Vignette Frame that I painted with Speckled Egg Distress Paint and this creates depth to the piece.

In the centre of the aperture of the baseboard frame, I used foam pads to attach a Christmas Layers piece, with the message, A Merry Christmas and A Happy New Year and used Frosted Crystal Embossing Powder over the top of this to create some texture.
I added a star to the top of the frame, which I covered with Holiday Sparkle glitter and for even more sparkle, I applied some Glossy Accents and sprinkled Mica Flakes over the top.
Underneath I added some Vignette Trims to form a ledge ~ I used the Scalloped and Bracket Trims and applied Crackle Paste to the surface.

I then attached the gorgeous little girl and her furry companion to the centre of the ledge, which I colour tinted with Distress Crayons and again attached with foam pads.

In her hand, I placed a small Woodland Tree. I coloured this with Peeled Paint Distress Spray Stain and then frosted the tips with glitter. After removing the wooden base from the tree, I attached it so it looked as if she was holding it.

On either side of the ledge, I broke a metal fence in two, which I inked with Rust and Pitch Black Alcohol Inks to create a rusty finish to the metal before I attached each piece with Matte Collage Medium.

To complete the fence, I tied some rusty alcohol inked Tiny Bells onto the right hand fence.

Around her feet, I added some Grit Paste and some Bauble Findings. I then dusted them with a sprinkling of Rock Candy Distress Glitter and Mica Flakes.
I finished the piece with the gorgeous poinsettias from the Worn Wallpaper Scraps and placed these to cascade around the frame, using different heights of foam behind each piece to create dimension and depth...


...before I added the Mini Flair button and some Mirrored Stars onto the background.

Finally, I painted a Christmas Word Plaque with Candied Apple Distress Paint and attached this along the bottom of my plaque. I added small Hardware Heads to the plaque and then surrounded it with pine cones from my garden and some Mica Flakes...

...before I added a Hardware Pull at the top of the panel and a stitched scrap which I attached at the top of the frame and then added a Mini Pin.

So that completes my final project of 2021 and I hope you've enjoyed reading all about this project. As always, if you make anything, or been inspired by anything that you've seen here on my blog ~ then please, let me know by tagging me on social media or leaving a comment here and I will be right over to take a look!
Thanks so much for taking the time to stop by today and from the bottom of my heart ~ THANK YOU for all the love you've shown my projects and blog over the last year ~ it's not been the easiest of years for so many of us but I'm sure crafting has kept a few of us sane whilst we were in lockdown.
Happy Christmas everyone ~ stay safe, keep well and here's to a happy and healthy new year.
See you in 2022!
Love Emma xxx
Recipe for project:
Distress Crayon: Walnut Stain
Distress Paint: Black Soot, Candied Apple, Aged Mahogany
Distress Spray Stain: Peeled Paint
Tim Holtz Idea-ology: Christmas Backdrops, Woodland Tree Lot, Christmas Ephemera, Worn Wallpaper Scraps, Bauble Findings, Hardware Heads, Vignette Plaque, Christmas Layers, Mirrored Stars, Word Plaques, Tiny Bells, Hinges, Mini flair, Christmas Basseboards, Christmas Paper Dolls, Mini Pin, Stitched Scrap, Hardware Pull
Mediums: Matte Collage Medium, Glossy Accents, Mica Flakes, Hot Glue Gun, Grit Paste, Rock Candy Glitter, Crackle Paste, Holiday Sparkle
Stampers Anonymous: Bracket Etcetera Trims, Scalloped Etcetera Trims
Alcohol Ink: Rust, Pitch Black


Amazing!!!! Splendor of Christmas. Love it!
ReplyDeleteAmazing and beautiful, as always! I hope you had a lovely holiday!
ReplyDeleteAmazing and beautiful, as always! I hope you had a lovely holiday!
ReplyDeleteAmazing and beautiful, as always! I hope you had a lovely holiday!
ReplyDeleteAmazing always!
ReplyDelete