Showing posts with label distress glitter. Show all posts

Monday, 26 October 2015

To The Moon and Back...

Hey everyone and welcome to a brand new challenge over on the Simon Says Stamp Monday Challenge Blog! This week, our theme is called THROWBACK and the challenge is to be inspired by any of the previous challenges. So, you can take a look back at the long list over the years and you can either pick an older challenge of ours, maybe one you didn't have time for yet or one you never finished! Whatever you choose, be sure to tell us which challenge you were inspired by in your entry!

As for me? I was inspired by last years "To The Moon" challenge ~ you can see the original post HERE and there was one die that I had been dying to use but didn't get around to using it for Halloween! So, with this in mind...I thought black cats aren't just for trick or treating, they can also just pop by to say hello in the shadow of a silvery moon!

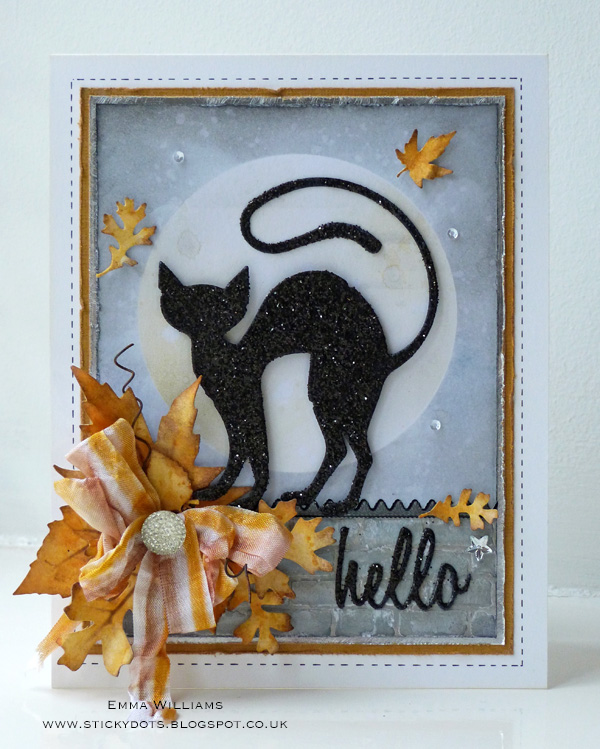
...and here's how I made my card, full of sparkle and shine and plenty of dimension!
To begin with, I created a white card blank, 15 x 18cm which is a size that I love working with at the moment!

To create the background, I started by cutting a piece of white card and adding my wall across the bottom. For this I used the Bricked Layering Stencil and applied a mix of Texture Paste and Stormy Sky Distress Paint through the stencil. Allow the paste to dry and then add some more colour over the top, using Pumice Stone, Hickory Smoke and Black Soot Distress Inks. To create the moon, cut a circle of paper, (I used copy paper) to create a mask. Lay the mask on your card, placing just above the wall and then ink around the circle using Stormy Sky Distress Ink. Remove the moon mask and then ink inside the circle with Antique Linen Distress Ink before inking around the edges with Hickory Smoke. Flick water across the surface of the card and remove the droplets with a kitchen towel. Heat dry thoroughly before spritzing the skyline with Perfect Pearls Biscotti Spray Mist. Heat dry again, before matting and layering the background onto a piece of Core'Dinations Distress Card followed by a layer of Metallic Kraft Core Card. Mount the layers onto your white card blank and outline the matts with faux stitching using a black pen.
Add a border sticker along the top of the wall.

Now, to create the glittery cat and I used black card and the Hocus Pocus die for this. Add embossing ink over the surface of the die cut and then sprinkle with Sticky Embossing Powder and heat. Apply Black Soot Distress Glitter over the tacky surface that the powder creates and tap away the excess. I then attached the cat using foam pads to stand on top of my wall.

Spritz a piece of white card with Fossilised Amber and Spiced Marmalade Distress Spray Stain and heat dry before die cutting some leaves using the Autumn Foliage die. Ink the edges of the leaves and slightly crumple them to create a more realistic look.
Arrange and attach the leaves in a cluster in the corner of your card and also, use some of the smaller leaves to scatter around the card, creating the look of them blowing in the wind. Cut a strip of crinkle ribbon and I then dragged a Spiced Marmalade Distress Marker Pen down one side of the ribbon and Gathererd Twigs down the other side to create a stripe. Slightly dampen the ribbon to take away the harshness of the lines but to still keep the stripes. Heat dry, tie the ribbon into a bow and attach in the centre of your leaf arrangement. Add a gumdrop to the centre and some rusty coiled wire.
Die cut the word Hello using the Friendship Script Dies and glitter using the same technique as on the cat. Attach the wording to the wall and place a mirrored star in the corner.
Finally, add some sequins to the sky for an added hint of shimmer and sparkle.

As always, if you need any further inspiration for this challenge, then you need look no further than our blog to see all the wonderful creations from all the very talented Design Team members and every week, one lucky random participant has the chance to win a $50 gift voucher from Simon Says Stamp. Good luck....

Just click on the link below to go shopping:
Thank you so much for all your visits today and hope you all have a great week ahead
See you again soon...love Emma xx

Products used:

Distress Paint: Stormy Sky
Distress Spray Stain: Spiced Marmalade, Fossilized Amber
Distress Marker Pen: Gathered Twigs, Spiced Marmalade
Embellishments: Sparkle And Shine Sequins
White card blank from my stash

Monday, 23 June 2014

The Colour Purple ~ Simon Says Stamp Monday Challenge

Hello everyone...

There's a new challenge starting today over on the Simon Says Stamp Monday Challenge Blog and this week it's all about ~ I OUGHT TO USE THIS MORE!! Yes, let's face it, we all have lots of these products and techniques that don't get used nearly enough! Perhaps it is a stamp or maybe it's a particular ink colour. Whatever your particular product or technique is ~ this is the chance to get it used and share!!

This week, I chose two things that I don't use enough ~ the colour purple and a technique that I used when I first started crafting but, haven't used since ~ faux batik!! I combined the two to make this card and as always, I'm going to take you on the journey of how I made it and I really hope you love what I've created....
To begin with I covered a piece of white stamping card with Antique Linen Distress Paint. The card stock that I used hasn't got a coating as I find this is better for the next step that follows. I then inked up the Damask stamp with a clear embossing ink pad and stamped directly onto my painted background. I added clear embossing powder over the top and then, heated it until molten.

I now needed to create a background and for this I added a layer of Picket Fence Distress Paint, followed by a layer of Dusty Concord Distress Paint, using a brush to blend the colours together, building up layer upon layer to create a textured looking background and between each of the layers, I wiped away the excess paint from the embossed area using a baby wipe. For the final layer of colour, I used a brush, which has gone a little bit hard from using a multi matte medium and I dry brushed a final layer of purple over the top, which left me with these scratchy lines, which I thought look perfect for the background I needed. Again, I wiped away any excess paint from the embossed area.
Now for the fun bit ~ I took a piece of waxed baking paper and laid it over the top of the card. I then took my iron, a normal household iron as I don't have a craft iron and at this point REMEMBER TO TAKE THE STEAM FUNCTION OFF and with the iron on a low setting, I gently ironed over the top of the waxed paper, laid over the card which I'd embossed. This process removes the raised area of embossing powder to leave you with a completely flat surface and it doesn't take too long, so be careful ~ you usually know when it's ready to remove the waxed paper, as you can see the embossing powder just showing through and adhered to the wax paper.
To complete the background, I sanded away some of the paint from around the edges and distressed them with Distress Ink to give a vintage, shabby look, before stamping the quote directly beneath the Damask stamped image.
Next, I die cut a heart from chipboard using the Movers and Shapers set and covered this with Picked Raspberry Distress Paint. Once dry, I added some Glossy Accents over the top and then a layer of Picked Raspberry Distress Glitter. I attached this to my faux batik piece together with some Crinkle Ribbon dyed with a combination of Picked Raspberry and Dusty Concord Distress Stain. To complete the piece, I added a Pen Nib in the centre.
I mounted the finished artwork onto a piece of black card, followed by a piece of Manila card, stained with Distress Stains and the heavily distressed. I then matted all the layers onto a black card blank.

I do hope you've enjoyed my photo tutorial and loved this technique. As always, if you're looking for some more great ideas and inspiration, then you need to look no further than the blog to see all the wonderful creations from my very talented Design Team members and every week, one lucky random participant has the chance to win a $50 gift voucher from Simon Says Stamp. Good luck....

Products used:


Distress Stains ~ Picked Raspberry and Dusty Concord
Idea-Ology Pen Nibs and Crinkle Ribbon
Archival Ink ~ Black
Uncoated White Card Stock from my own stash

Thank you so much for all your visits today, I really do appreciate them all and I'll see you all very soon!!
Bye for now...love Emma xx

Friday, 14 February 2014

Two Hearts Beat As One....

Hello friends,

...and Happy Valentine's Day!!

Today, I'm sharing my tag inspired by Tim Holtz's wonderful February 12 Tags of 2014 and what better day to share the love!! As always, I hope you love it...
I varied my tag slightly to the original version, which can be seen here but I did use the same quote, just because I love everything about it from the typeface to the actual quote itself, I couldn't have thought of using any other. Also, because I still don't own that amazing embossing powder that Tim uses, I decided to use Perfect Pearls and a Perfect Medium ink pad to create my chalkboard effect and I was so pleased with how it turned out!!


Hope you all have a fabulous day with your loved ones and maybe, even get a special treat or two!!

See you all soon and let's hope that with the next storm front hitting the UK, we all have a safe weekend!!
Bye for now...love Emma xxx

Friday, 13 December 2013

The Magic Of Christmas...

Good morning friends...

Hope you're all well and looking forward to the weekend!! I really don't know how we got to Friday so quickly, it was only Monday when I last looked but what a week it's been!!! After a lovely start meeting a friend for coffee on Monday...Wednesday bought a burst pipe in the kitchen, emergency plumbers, enough water to sink a ship and a very damp floor!! We have no drinking water at the moment and our road is being resurfaced, (don't even mention the noise from that) and we can't get out for the next two days!! These things definitely come to try us but I will not be beat, Christmas is coming and I am going to be ready for it!! *deep breath, keep calm and carry on*

Anyway, back to today's post and today, I'm sharing another Christmas tag with a difference...yes, the corrugated cardboard is back!! I just love this stuff, it gives such an awesome effect. So without further ado, hope you love what I've created!!
The tag is inked with Distress Stains, swooshed onto my craft mat and then I picked up the colour and inked around the edges and used one of Tim's snowflake stamps to create my background. Of course, no tag of mine is complete without lots of Tim Holtz products and this one really has got plenty for you to feast your eyes on, including the gorgeous Reindeer Flight, Festive Foliage and the Snowflake Rosette dies from Sizzix, Distress Glitter, the beautiful Merry Christmas stamp from the Christmas Time stamp set. I think that has to be one of my favourite stamps, it's so delicate and such a beautiful font...FAB~U~LOUS and then, you can also see one of the new Idea-Ology Word Bands at the bottom!!!!
As you can see, I made an embellishment from the Snowflake Rosette and the Festive Foliage before adding a red bow to complete it.

You may also spot my little Christmas tree, more about those in a later post but I made those using Tim's Woodland Trees.

So, that's it from me for today...I'm now ready for a morning of craft, followed by some Christmas baking and cake decorating!! Well, that's the plan........

Have a fabulous Friday everyone, even if it is Friday the 13th and have a great weekend!!
See you soon...love Emma  xxx


Sunday, 17 November 2013

Together at Christmas...

Good morning friends...

Firstly, I wanted to say thank you for all the lovely comments that you left me on my November tag...you really do make all the hard work so worthwhile and a big hello to my new followers...welcome aboard and I hope you'll enjoy all my future posts.

Well, I can't believe I haven't posted since Wednesday, where has this week gone? But I hope you're all enjoying your weekend. Me? I'm as busy as ever but enjoying every minute but the one thing that I must start to make time for is ~ preparing for Christmas!! I need to bake a cake, start thinking about Christmas food and most of all, get some presents!! As for cards, eek...I think I'm going to be one of those crafters that doesn't make her own again...but I have made a lot of Christmas cards for magazine projects and the various design teams I work with so...I've got a really good excuse, don't I???

In the meantime, I do have a Christmas card to share today and this is the first of two cards that I made for the November issue of Making Cards Magazine. As always, I really hope you love it!!
You can buy back issues of the magazine and read all about how I made this card ~ HERE.
But for those of you who want to get ahead, the main ingredients are:
Backing Papers ~ Papermania
Sizzix Dies ~ Reindeer Flight by Tim Holtz, Mini Leaf and Branch Die and Movers and Shapers Magnetic Die Set ~ Oval
"A Joyful Christmas" Stamp from Joyful Song Stamp Set by Tim Holtz
Tim Holtz Distress Glitters ~ Antique Linen and Vintage Photo (Lurve these!!!)
Twine, Buttons, Seam Binding, Tinsel and Holly Punch


So, I hope this card has given you some inspiration for your Christmas cards and I'd love to hear what you think.

See you tomorrow with the second card from this set and have a great Sunday!!
Bye for now...love Emma xxx


Thursday, 31 October 2013

Happy Halloween...

Hello friends!!

Today, I'm sharing my very final Halloween project that I've made and all that's left for me to say, is:
Happy Halloween everyone... 
For this tag, I used some more Tim Holtz goodies, of course and I created a Distress Stain background before stamping that gorgeous spiders web from the Halloween Cutouts stamp set. This time I used the Halloween Shadows die from Tim's Alterations line by Sizzix and die cut those awesome little people, the smaller bats and the Trick or Treat message, from Core-dinations card which I sanded back.
I added die cut bats, die cut from Grungepaper, painted with Black Soot Distress Paint and then covered in Rock Candy Distress Glitter. Finally, I used Distress Stains to tie-dye the seam binding which I tied into a bow.


So, as always...thank you so much for stopping by today and if you're out and about tonight, then please be safe and take care.

See you soon and bye for now...love Emma xxx

Monday, 28 October 2013

Fright Night...

Hello friends!!

Hope you all had a good weekend and looking forward to another week!! If you live in the south of the UK, I think you'll definitely agree, we had a bit of an adventurous start to today!! I was woken around 4am to driving wind and rain and by 6:00 this morning, and after one humongous gust, I thought I was no more and my little house was going to be ripped up out of the ground and on it's way to Oz!! Now anyone who knows me, knows that I HATE windstorms, I can't even watch Twister, lol!! So, to say I was a little petrified, might be an understatement...lol!! Luckily, it seems as if the worst is over now and it's actually been a beautiful day and I hope that anyone who was in the path of this storm is safe and well!!

In the meantime, I've been playing with Distress Stains and Tim Holtz's Halloween Cutout Stamps and this is what I've made. As always, I hope you like it....
The background was created using Distress Stains applied to my craft mat and then spritzed with water before swooshing the card through to pick up the colour. Once I was happy and a little bit of distress ink later, I started stamping onto the background.

To finish this card, I added some Tim Holtz/Sizzix die cuts from the Pediments die, stars from the Crescent Moon and Stars die covered in Distress Glitter and the bat from the Movers and Shapers Mini Bat and Skull set.
I added some doodling with a white pen around the edge and an Idea-ology Skull and Crossbones metal adornment and a stamped Happy Halloween from the Simple Sayings stamp set.
The orange tree which I dyed with Dylusions Sprays and the little freestanding die cuts are actually for another project but I just thought they looked so cool with this card, that I left them there for the pics!!

Well, that's it from me for today and as always, thank you so much for all your visits ~ I really do appreciate them all. Hope you all have a storm free and lovely evening!!
Bye for now...love Emma xxx

Tuesday, 22 October 2013

'Tis Near Halloween...

"When witches go riding and black cats are seen, the moon laughs and whispers, 'tis near Halloween"
~ anonymous

Hello friends...

Hope you've all had a great start to the week, despite the dismal, grey weather we have in the UK at the moment but if you're anything like me then grey weather means one good thing and that is...we can snuggle up inside, get out our inks, paints and glitter and join in with Tim's fantastic 12 Tags of October!!! This month, Tim decided to embrace one of my favourite times of the year, Halloween and how could I not join in?? So, here's my take on Tim's tag and as always, I hope you love it....


Don't forget that if you want to join in too, you can find all the details HERE on Tim's blog.

Thank you so much for popping by today and I'll look forward to reading any comments that you leave. Hope you all enjoy the rest of your day and I'll see you soon!
Bye for now...love Emma xxx


Powered By Blogger

Total Pageviews