Showing posts with label 3D. Show all posts

Tuesday, 2 April 2019

True Friend ~ Heart and Soul

Hello everyone...

I'm back today to share another project which I created for the Tim Holtz Sizzix Booth at Creativation 2019. This little trinket tin is packed full of products and features a combination of dies, both old and new ~ which include Funky Floral 3 die set, together with the Large Funky Floral Die from Chapter 1 and from Chapter 2, the Trinket Frames and I hope it shows you how all these dies can work together so well! 

If you want to read all about the brand new Chapter 2 release, then just pop on over to Tim Holtz's blog ~ it was so good to see Tim back where he belongs, sharing his passion and looking really well, it really did make my day and, if you did miss his latest Facebook Live, then you can catch up with a replay, HERE ~ together with plenty of inspiration from so many talented designers and you might even recognise a few of the projects that I've shared here on my blog...

So, it's time for me to show you around this project...
To begin with, I used one of Tim's Trinket Tins ~ these are sold in a set of 2 and you can see the other tin in the set which I've shown previously on a blog post that you can see here. On this post, I show you how I aged the outside with Crackle Paste, Distress Paints and Alcohol Inks.

On the inside of this tin, I began the process by applying a layer of gesso over the inside of the tin. Once the gesso was dry, I then set to work ageing the metal using layers of Distress Paints, starting with Walnut Stain, adding Evergreen Bough and finishing with Black Soot and Picket Fence ~ each time drying the painted layers that I added. Once I was happy with how the metal looked, I then added some crackle paste around the edges, allowed this to dry before applying Mushroom and Rust Alcohol Inks, allowing the ink to settle into the crackles. In the photo below you can see just see the inside edges of the tin and how all those layers of paint add that wonderful touch of vintage.
Inside the tin, I cut panels of Worn Wallpaper, machine stitched the edges and then adhered them to both sections before adding a strip of lace, attaching it so that it looks like one continuous piece running across both sides of the tin.

Now we move onto the frame that sits inside and for this I used the fantastic Trinket Frame die ~ this is a Bigz die which means you can cut through almost any substrate (always test before you pass it through your machine, if you feel resistance, DO NOT CONTINUE)! I cut my frame from some chipboard as I wanted it to be fairly thick and quite substantial. I then coated the surface with gesso to prime the chipboard before dabbing an Emboss It Dabber over the top, and around the inside edges. I then sprinkled Liquid Platinum Embossing Powder onto the chipboard, tap away the excess and then heat emboss until molten. I repeated this process a couple more times to get a really good coverage on the frame. Once I was happy, I then applied the dabber to random areas of the frame and sprinkled these with a combination of embossing powders ~ black and gold. I then heated the powders once more and let them just blend together to create a wonderful marbling of colour and texture that you can see below.

Pop the frame inside the tin, attaching it with a thin layer of Collage Medium that I ran around the edge.

Setting the tin aside and allowing the medium to do it's thing, I started work on filling the tin with all those gorgeous embellishments and began by making my dimensional flowers.

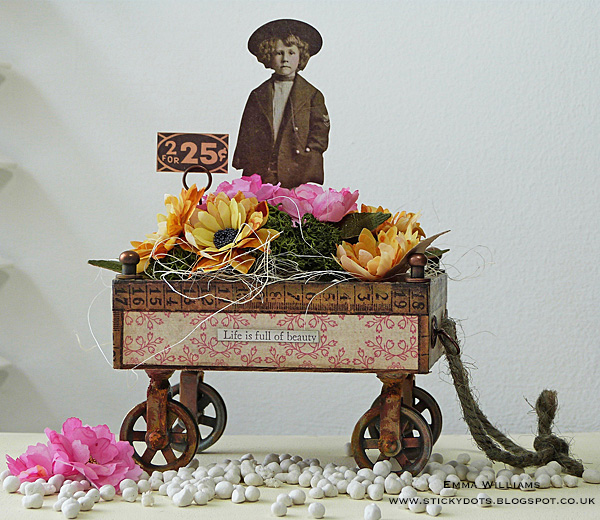
These flowers are die cut using a combination of the Funky Florals 3 and the Large Funky Florals dies. Taking three separate pieces of the Heavystock card, I coloured each panel using Distress Spray Stains ~ for the yellow flowers, I used Mustard Seed and Scattered Straw, for the pink I used Victorian Velvet and for the leaves, I used Peeled Paint and Shabby Shutters. Once the card was dry, I then cut my petals and foliage from each piece of coloured card.

Taking the pink, cut from Funky Florals 3 die and the yellow petals which are cut from the Large Funky Florals set, I layered each section and then added inked baubles to the centres. You can see a tutorial of how these flowers are made and shaped, HERE. For this project, I made three yellow flowers, 2 pink and then using the green card, I cut a selection of foliage using both of the die sets.

Using a selection of the flowers, 2 of each colour ~ I placed these inside the tin, adding the foliage and layering them onto a bed of sisal fibres.
On the opposite side, I used one of the new Photo Booth images which I colour tinted with Distress Marker pens before layering onto gold metallic card, followed by a layer of felt, cut with my Grandmother's precious pinking shears...

I attached the image together with some baubles inked with various colours of alcohol inks and then added the final yellow flower.
...and that completes this trinket tin which I loved creating and hope it's given you some ideas of how to make one of your own and how to use the brand new Trinket Frame die!
Thank you so much for taking the time to stop by today and hope to see you again soon, love Emma xxx

Recipe for project:

Monday, 17 July 2017

Ticket To Ride...

Hello friends and welcome to the brand new Simon Says Stamp Monday Challenge!

This week our theme is called ~ Get In Shape and the team have created some wonderful projects to inspire you to create something shapely! You could create something 3D, a box or folder for example, or you could create a card with 3D elements or a fitness theme. Whatever you decide to make, we will be looking forward to seeing it!

I had such a great time working on my project this week and created a fun piece in the vintage style that I love so very much, co-ordinating products from Tim Holtz to build up the dimension for my little Hay Ride cart...
...and here's how I created this project!
 
To begin with I took my Vignette Box and covered it with some pretty paper from the Memoranda paper stash. I measured each side of the box, cut the pieces to size and then adhered them using Collage Medium. 
Once the papers are dry, I then took some of the designer tapes and with the box facing upwards, I began by adding some tape from the French set, along the top edges of the box. Using a different tape, this time I chose the ruler tape from the Aristocrat set, I then added this along the outside edges of the box and down each of the corner sections.
Next comes the pulley wheels and for this, I used the smaller sized wheels and gave them a coating of Rust Paste ~ remember to do this on the back and front, as you will see both and when adding the paste, ensure that none of it interferes with the turning of the wheels. 
Allow the paste to dry before attaching the wheels to the undercarriage of the box. To attach the rusty wheels, you will probably need longer screws than the ones provided or if you're like me, I just stuck them with some superglue and they are so secure, they won't be going anywhere!
To complete the outside of my box, I added Hitch Fasteners to each corner of the carriage...
...and a couple of Ring Fasteners, again attaching these with a small amount of superglue and then attached a piece of rope through the holes and tying it into a knot to secure.
For the final detail, I added a Clippings Sticker to the front section.

Now to move onto the inside and for this I began by making my flowers. For these flowers, I used vellum, which gave them such a beautiful look to the petals. To colour the vellum I chose, Fossilized Amber and Wild Honey for one set and Picked Raspberry and a small amount of Spiced Marmalade for the second colour way. Spritz the vellum with the Distress Spray Stains and at this point the vellum will curl, don't worry but once you give it a blast of heat, it straightens out again. Once you have your coloured vellum,  I then used the Small Tattered Florals die to die cut each piece, cutting between 4 and 5 layers for each flower. Once all my pieces are die cut, layer them up to create the flowers, shaping the petals to create a more realistic feel.
For the centres, I applied a small amount of Glossy Accents and then sprinkled them with Micro Beads. Set your flowers aside to dry.
Because the boxes are quite deep, I added some foam pieces to the inside which allowed me to have a base to work on. I then cut a piece of scrap card, the same size as the inside of the box, applied a layer of 3D Matte Gel over the top of the card and then sprinkled Art Stones over the top. Allow everything to set and harden before painting the stones with Pumice Stone Distress Paint and then attaching the panel over the top of the foam on the inside of the box.
Now for the fun part, building up my little scene and to begin with I applied a layer of sisal fibres and moss to my stone base. I then attached my flowers over the top of the moss before adding my paper doll. To give some stability to the figure, I attached a cocktail stick to the back of the doll and then poked him into the foam.
Finally I added an ephemera piece, attached to a Memo Pin.
To complete the cart and add some detail at the back, I used a small offcut of mirror card which I inked with alcohol ink before attaching the numbers from the gold alpha metallic set. I then applied a Fragment piece over the top, using Glossy Accents to secure it into place before attaching it to the back of my little cart....
...and I hope you love the finished piece, just as much as I loved creating it!
As always, if you do need any further inspiration, then look no further than our blog to see all the wonderful creations from all the very talented Design Team members and every week, one lucky random participant has the chance to win a $50 gift voucher from Simon Says StampYou have until Monday 8am Ohio time. 1pm UK time, 2 pm CET to join in and good luck....


Thank you so much for stopping by today and see you again very soon!
Love Emma xxx


Monday, 15 February 2010

Retail Therapy

The thing that I love about the Jolly Nation images from The Crafthouse Press, is that there is always someone in your life that one of their characters seems to capture perfectly. The number of times, I've looked at one of their wonderful fun images and thought ... and instantly I know exactly who to make and give that card to. And with this card, I'm 100% sure that we all know someone in our lives that loves a bit of retail therapy from time to time.

This particular card is part of The Crafthouse Press' new Celebrations ~ 3D Die Cut Box Card range and I think they make the most amazing little cards and gifts for that special person. Once all the elements are punched out, it's just a matter of putting the card together, I recommend using extra strong adhesive tape to hold everything in place securely. I then added each layer, at equal distance inside of the box, starting at the back and working forward and gradually building up the scene. As finishing touches, I highlighted certain areas on the card with Stickles glitter glue and added sparkly adhesive gems.

Sunday, 20 December 2009

Santa Claus is coming to town...

When it comes to me making a card, I must admit there are some things that I always like to include. For me, texture is very important, I like to add finishing touches of ribbon, fibres, glitter or jewels, which can sometimes turn a simple design into something that little bit more special. The card always, has to be aesthetically pleasing to the eye and I always believe in "less is more". I like simplicity and I never want to drown the card in design. And then there is one more thing that probably stands out and that is ~ that I love dimension. I think it makes the final card much more interesting and gives it some reality, almost as if you could lose yourself in the card.

So in my opinion, this card, ticks all those boxes. The glitter adds the texture and then you can't get more dimension on a card than creating a 3D Christmas rooftop scene. Each layer of the snowy, sparkling roofs, have been built up individually with 3D foam, with the main focus on Santa, standing at the highest point, with his sack of presents against a glittery, silver moon.


Powered By Blogger

Total Pageviews