Showing posts with label trinket tin. Show all posts

Tuesday, 2 April 2019

True Friend ~ Heart and Soul

Hello everyone...

I'm back today to share another project which I created for the Tim Holtz Sizzix Booth at Creativation 2019. This little trinket tin is packed full of products and features a combination of dies, both old and new ~ which include Funky Floral 3 die set, together with the Large Funky Floral Die from Chapter 1 and from Chapter 2, the Trinket Frames and I hope it shows you how all these dies can work together so well! 

If you want to read all about the brand new Chapter 2 release, then just pop on over to Tim Holtz's blog ~ it was so good to see Tim back where he belongs, sharing his passion and looking really well, it really did make my day and, if you did miss his latest Facebook Live, then you can catch up with a replay, HERE ~ together with plenty of inspiration from so many talented designers and you might even recognise a few of the projects that I've shared here on my blog...

So, it's time for me to show you around this project...
To begin with, I used one of Tim's Trinket Tins ~ these are sold in a set of 2 and you can see the other tin in the set which I've shown previously on a blog post that you can see here. On this post, I show you how I aged the outside with Crackle Paste, Distress Paints and Alcohol Inks.

On the inside of this tin, I began the process by applying a layer of gesso over the inside of the tin. Once the gesso was dry, I then set to work ageing the metal using layers of Distress Paints, starting with Walnut Stain, adding Evergreen Bough and finishing with Black Soot and Picket Fence ~ each time drying the painted layers that I added. Once I was happy with how the metal looked, I then added some crackle paste around the edges, allowed this to dry before applying Mushroom and Rust Alcohol Inks, allowing the ink to settle into the crackles. In the photo below you can see just see the inside edges of the tin and how all those layers of paint add that wonderful touch of vintage.
Inside the tin, I cut panels of Worn Wallpaper, machine stitched the edges and then adhered them to both sections before adding a strip of lace, attaching it so that it looks like one continuous piece running across both sides of the tin.

Now we move onto the frame that sits inside and for this I used the fantastic Trinket Frame die ~ this is a Bigz die which means you can cut through almost any substrate (always test before you pass it through your machine, if you feel resistance, DO NOT CONTINUE)! I cut my frame from some chipboard as I wanted it to be fairly thick and quite substantial. I then coated the surface with gesso to prime the chipboard before dabbing an Emboss It Dabber over the top, and around the inside edges. I then sprinkled Liquid Platinum Embossing Powder onto the chipboard, tap away the excess and then heat emboss until molten. I repeated this process a couple more times to get a really good coverage on the frame. Once I was happy, I then applied the dabber to random areas of the frame and sprinkled these with a combination of embossing powders ~ black and gold. I then heated the powders once more and let them just blend together to create a wonderful marbling of colour and texture that you can see below.

Pop the frame inside the tin, attaching it with a thin layer of Collage Medium that I ran around the edge.

Setting the tin aside and allowing the medium to do it's thing, I started work on filling the tin with all those gorgeous embellishments and began by making my dimensional flowers.

These flowers are die cut using a combination of the Funky Florals 3 and the Large Funky Florals dies. Taking three separate pieces of the Heavystock card, I coloured each panel using Distress Spray Stains ~ for the yellow flowers, I used Mustard Seed and Scattered Straw, for the pink I used Victorian Velvet and for the leaves, I used Peeled Paint and Shabby Shutters. Once the card was dry, I then cut my petals and foliage from each piece of coloured card.

Taking the pink, cut from Funky Florals 3 die and the yellow petals which are cut from the Large Funky Florals set, I layered each section and then added inked baubles to the centres. You can see a tutorial of how these flowers are made and shaped, HERE. For this project, I made three yellow flowers, 2 pink and then using the green card, I cut a selection of foliage using both of the die sets.

Using a selection of the flowers, 2 of each colour ~ I placed these inside the tin, adding the foliage and layering them onto a bed of sisal fibres.
On the opposite side, I used one of the new Photo Booth images which I colour tinted with Distress Marker pens before layering onto gold metallic card, followed by a layer of felt, cut with my Grandmother's precious pinking shears...

I attached the image together with some baubles inked with various colours of alcohol inks and then added the final yellow flower.
...and that completes this trinket tin which I loved creating and hope it's given you some ideas of how to make one of your own and how to use the brand new Trinket Frame die!
Thank you so much for taking the time to stop by today and hope to see you again soon, love Emma xxx

Recipe for project:

Monday, 18 March 2019

Love Within My Heart....

Hi everyone...

Firstly, I wanted to say a huge thank you to everyone who has been messaging me to ask if I was ok because lots of you have noticed that I've been MIA for the last three weeks! Well, I have had a little bit of a rough patch because a few weeks ago I tore a muscle in my neck, and stupidly I didn't listen to my body and tried to carry on, causing my neck and throat to go into spasm! To cut a very long and painful story short and because of a few complications along the way, it meant that I had to step away from my craft table for a while and allow the spasm to heal and let my neck sort itself out but anyone who knows me, knows that you can't keep me down for long and once the boredom set in...I decided I needed to craft! So, I'm back...and under the doctor's strict orders, I'm taking things very slowly for the next few weeks but so excited to be rejoining my lovely teamies for this week's brand new Simon Says Stamp Monday Challenge!

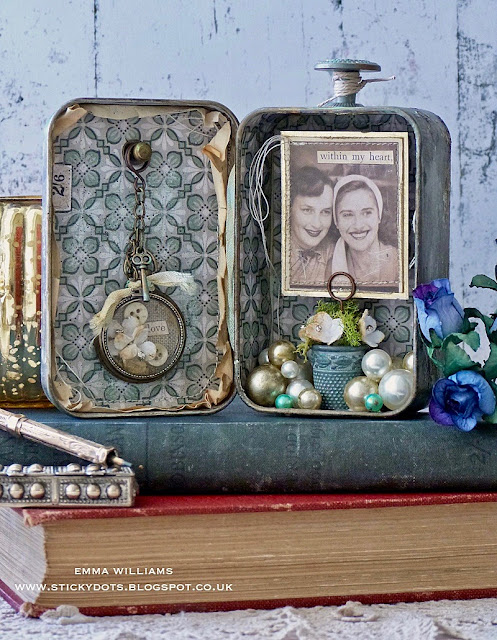
This week's theme is all about MINIATURE/TINY THINGS and for my project, I decided to create a Trinket Tin, packed full of tiny details! Here in the UK, Mother's Day is just around the corner and the inspiration behind this piece came from a Mother's love and I wanted to make something that would be a tribute to all the wonderful Mum's out there and one in particular, my beautiful Mum!
So let's begin ~ it's time for this week's project!

I started by prepping the tin and making it look as if it was even more vintage in appearance than it already was ~ to do this I, or should I say I got a trusty assistant to use a hammer and knock some dents in it. Once I was happy I then took over and started to create some crackle onto the outside of the tin...I usually add a coat of clear gesso over the surface so that the crackle doesn't peel off and once the gesso was dry, I used a palette knife to apply some Ranger Ink Crackle Texture Paste over random areas of the tin, smearing it onto the back and sides. I allowed for the crackles to appear and the paste to dry before moving onto the next stage and adding some colour to the paste. 
For this I took Black Soot, Evergreen Bough and Walnut Stain Distress Paints, applying them lightly over the top of the surface and then lightly spritzing the surface with a mist of water, allowing the paints to blend and the colours to sink into the crackles. 

Dab away any excess water or paint.

Now it's time to decorate the inside and starting on the lid on the left hand side, I cut a panel of Worn Wallpaper the same size as the inside. I then lightly sanded the surface and machine stitched a border around the outside. To create the ripped paper around the outside of the panel, I cut two pieces from an old book page, slightly larger in size than the tin and then using Matte Collage Medium, I adhered them inside the lid, allowing the edges of the book page to crinkle and tear and just create a frame around the outside. I then placed the panel of worn wallpaper over the top, again adhering it over the top of the book page with Matte Collage Medium.
Moving onto the base section of the tin, I lined the inside with more of the sanded Worn Wallpaper and adhered another panel on the back wall, again adding a machine stitched border around the edge.
Setting the tin aside to dry thoroughly, I started creating the embellishments to fill the inside...

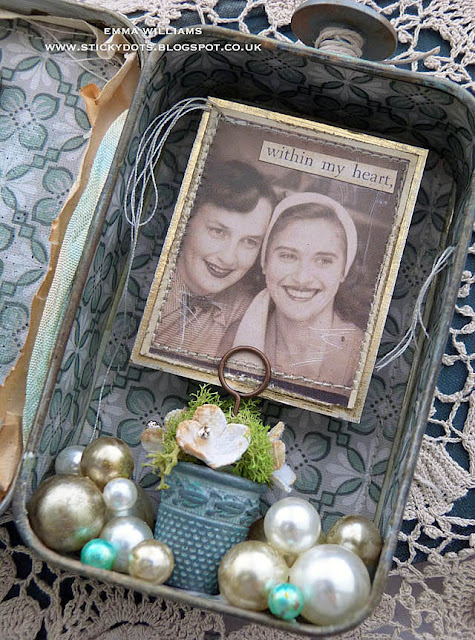
I machine stitched around the beautiful Photo Booth image which is taken from the brand new set from Tim Holtz and used one of a Mother and Daughter which I then layered onto some gold metallic kraft stash, leaving a border around the outside. To strengthen the photo, I placed some chipboard onto the back before attaching it onto a Memo Pin and adding a Clippings Sticker ~ Within My Heart.
I then used a Thimble which I aged with a little Evergreen Bough paint and then smeared Picket Fence Paint over the top to accentuate the design on the metal. I then placed a small piece of oasis foam into the thimble, secured into place with some Collage Medium and placed the photograph in the centre before arranging and attaching moss around the outside.

I completed the little thimble pot with some flowers taken from the Bouquet Findings and coloured with Antique Linen Distress Spray Stain. I added some Platinum Stickles to the centres of each flowers.

I attached the pot to the base of the tin and added some Baubles/Pearls around the outside ~ some of the pearls are coloured with Mushroom Alcohol Ink, some with Aqua and some I kept white.
On the opposite side, I used one of the Mini Pocket Watches, altered with a little Mushroom and Rust Alcohol Ink and lined with some linen and then filled this with some ephemera ~ buttons, bouquet findings and a little Clippings Sticker, "Love".
I placed the watch and a small key on some chain and then added some hand dyed ribbon around the neck before hanging it from a Hitch Fastener attached to the lid using Collage Medium.
As a finishing touch, I added a small decorative knob from the Mini Hardware Findings to the top, once again altered with Evergreen Bough and Picket Fence Distress paint and a light touch of Mushroom Alcohol Ink.
Finally, using some more of the ribbon that I had hand dyed using Tumbled Glass and Antique Linen Distress Spray and wrapped it around the hinged part of the tin, tying it around the back with a simple knot and then attaching a Story Stick, No.365....
...and a heart taken from the Treasures Adornments.
So that completes my project for this week, celebrating all those amazing ladies in our lives ~ our precious Mum's and I hope you'll be inspired by the ideas and maybe create a keepsake tin of your own!
Don't forget, you can find more inspiration from my talented teamies over on the challenge blog and every week, one lucky random participant has the chance to win a $50 gift voucher from Simon Says StampYou have until Monday 8am Ohio time. 1pm UK time, 2 pm CET to join in and good luck....


Thank you so much for taking the time to stop by today and hope to see you again soon, love Emma xxx

Recipe for project:

Distress Paint: Black SootPicket FenceWalnut StainEvergreen Bough
Distress Spray Stain: Tumbled Glass, Antique Linen
Powered By Blogger

Total Pageviews