
Hello friends...
Hope you've had a great start to the week, and the sun is shining wherever you are!
You might remember that last month, I shared a cool technique of how to create rust effects on metal. If you missed this post, then just click HERE to take a look. At the time, I hinted that these gears were for another project that was in the pipeline and today, I'm just popping by to share that project and hope you love what I've made.
The inspiration behind this make was all about individual people and the stories that can be told by just looking at a photo and with this in mind, I found some of my favourite images from Tim Holtz's Photobooth packs and I sat down, and just created this piece, which I hope you love!


So, let's get started and I invite you on this journey...
VIGNETTE DISPLAY PANEL
I used papers from both the 8" x 8" and 12" x 12" Correspondence Paper Stashes that Tim recently bought back from the Vault for a limited time only. These are now so hard to find but if you didn't manage to get your hands on them, then there are plenty of other papers in the idea-ology range to choose from.
I covered the sides of a Vignette Display panel on the outside, and on the inside with a selection of papers from the 12" pack and I also added a Design Trim Tape onto the front edges of the panel.


ETCETERA DISPLAY PANEL
Moving on to the inside, and because of the design of this piece, I didn't want the full depth of this panel ~ so, I used a Etcetera Panel and raised this slightly by using the 'waste' frames, the frame that sits around the Etcetera Tiles to hold them together whilst in the pack. I always hold onto these, as they make perfect frames for projects ~ so, don't throw them away.
I applied a coat of Black Soot Distress paint to the surface of the square Etcetera Panel and once dry, I then applied the same Design Tape Trim as I used on the Vignette Panel, and I placed this around the edges.
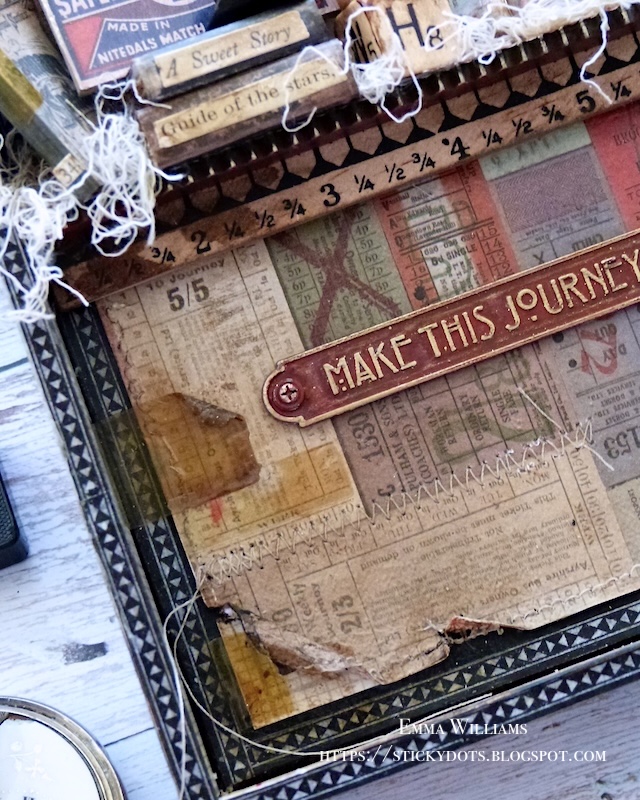
I then took a piece of the ticket design paper from the 8" x 8" Correspondence pack and after adding some rips and tears around the edges, I machine stitched a border and also added some stitching detail around the tickets.

I mounted the paper onto my panel using Matte collage Medium to adhere it into position...

...and used a combination of Vintage Photo and Black Soot Distress Crayons to add the colour and vintage touches to the ripped edges before hammering some Nail Tacks into the corners of the panel. I altered these Nail Tacks with the same colours of Distress Paint as I used on the gears.

To complete the background, I added some Cello Tape Stickers.

GEARS and PHOTO FRAMES
As I mentioned at the beginning of this post, I am using all those rusty gears and I arranged these down the right hand side of the box.

Then, I took my selection of vintage photos, colour tinted the photos that are purely black and white using Distress Crayons and a waterbrush before I cut them using a circle die, so that they would fit behind the circular Baseboard Frames.


I attached these photo frames, to my gear arrangement and added some Screwheads to the centres of some of the gears. You can see the dimension in the photo below.

To complete the arrangement, I placed three Stars Adornments, painted with Candied Apple Distress Paint.


SHELF
Now to bring this piece to life, I wanted to add a shelf of trinkets, and for this I used a Pinked Etcetera Trim and a Ruler Piece. I attached the two piece to form a 'L' shape and this then forms the ledge which I attached to my background.

You can see that the ledge runs from the left hand side and the gears and the photo frames all fit perfectly cascading around the end of the shelf, on the right hand side.
I filled my shelf with some tiny books that I made using the covers from the Halloween Ephemera Pack, a Junk Drawer Baseboard piece, and the hat without the stand, from the Figure Stands Adornments...

...I also added the pointy finger from the Figure Stands Adornments. Both the hat and the pointy finger figure stand are painted using Distress Paints. I completed the arrangement with a Thought Token, "Go, See, Explore", complete with a Swivel Clasp hanging from it. All the pieces are placed over a bed of Mummy cloth fibres, that I shredded and dyed with Frayed Burlap Distress Spray Stain.

I also added a couple of older idea-ology pieces including a light bulb and an Alpha Dice, with the letters T and H!

We're nearly there and all that's left is the large Word Plaque, Make This Journey Your Own, that I painted with Candied Apple Distress Paint. I then highlighted with wording with Gilded Foundry Wax. I applied the wax with my finger to accelerate the quote and then heat set it with a heat tool.

I finished the panel with a knob from the Mini Hardware Set, and once again I painted this with Candied Apple Distress Paint and adhered into position on the top of the panel using Matte Collage Medium. I then tied some twine around the neck.


Recipe for project:


hi Emma. quick question. how do I get your posts once my netvibes goes away. I didn't see a way to sign up for emails. would appreciate you advise. thanks as always for sharing and all your inspiration.
ReplyDeleteAnother amazing piece Emma! I love the way you've rusted the cogs and the Candy Apple red on the stars, draw pull and word plaque look amazing! Love this and all your wonderful details xoxo
ReplyDelete