
Hello everyone and welcome to the brand new Simon Says Stamp Monday Challenge!
This week our theme is all about Embossing It and with so many different products available, I'm sure you'll all be spoilt for choice with ideas and as always, the team have come up with plenty of inspiration.
For my make, I'm taking the wonderful Mr Rabbit on his Easter Adventure because as we all know, all good bunnies are getting ready for an Easter Hop, and are ready to deliver those eggs around the world!
So let's get started, and say hello to Mr Rabbit, the Great Adventurer!


For this make, I used a Mini Etcetera Tag, which I flipped upside down so the top is now the bottom, and an Etcetera Facade.
BACKGROUND FOR TAG
To begin with, I'll start with the background and I cut a panel of Mixed Media Heavystock card the same shape as the tag. I smooshed Scattered Straw, Mustard Seed, Pumice Stone and Frayed Burlap Distress Inks onto my glass mat and then spritzed the inks with water before dipping my card panel in and out of the inks to pick up the colour. Once I was happy with the background colour, I heat dried the panel, and used a blending tool to ink the edges with Gathered Twigs and Walnut Stain Distress Inks.

Taking the polka dot stamp from the Mr Rabbit Stamp Set, I inked it with Scattered Straw Distress Ink, and then stamped randomly onto the panel. I then repeated this using the plaid stamp from the same set.
Once my background was complete, I then machine stitched a border around the outside and attached the panel onto my Etcetera Tag.
ETCETERA FACADE
Now for my facade, which like the tag, I flipped upside down so the point is at the bottom. To cover the facade, I once again used Mixed Media Heavystock card and I inked the card using the same colours of Distress Ink as I used on the tag background.

After heat drying the card thoroughly, I then stamped the polka dots onto the background, stamping the design in sections using Versamark Clear Ink pad and sprinkled Fossilized Amber Embossing Glaze over the top. Tap away the excess and heat emboss. Repeat until the entire card panel is covered with polka dots.

I then covered the facade with my stamped cardstock, trimming away the inside and the edges and adhering it with Matte Collage Medium.
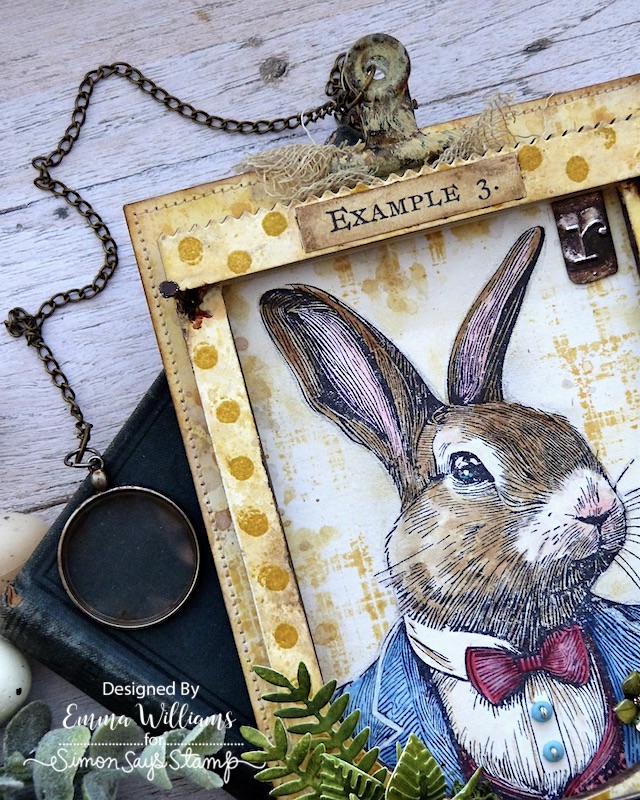
At the top of the facade I placed a Pinked Etcetera Trim, covered with the same embossed polka dot card which I die cut using the Decorative Trims die set and adhered the 'Example 3' Numbers Strip across the top of the frame, attaching it with Matte Collage Medium.

I placed the trim with the pinked edge upwards, across the top of the facade and then hammered two Nail Tacks into either side.

To add some rusty drips around the nails, I used watered down Crackling Campfire, Vintage Photo and Black Soot Distress Paints, and just built up the colour to create the look of rust.
MR RABBIT
Now for the star, the great adventurer and I began by stamping the image of Mr Rabbit onto watercolor card. I then watercolored the image with Distress Watercolor Pencils, adding shading around the edge.

To stamp the background, I made a mask of Mr Rabbit by stamping a separate image onto a piece of paper and then with the paper laid over the image, I inked the plaid stamp with Scattered Straw Distress Ink and stamped the background.

I then added some flicks of Pumice Stone and Scattered Straw inks, heat dried the panel and then placed Mr Rabbit behind the Etcetera Facade using the risers to add dimension to the frame.
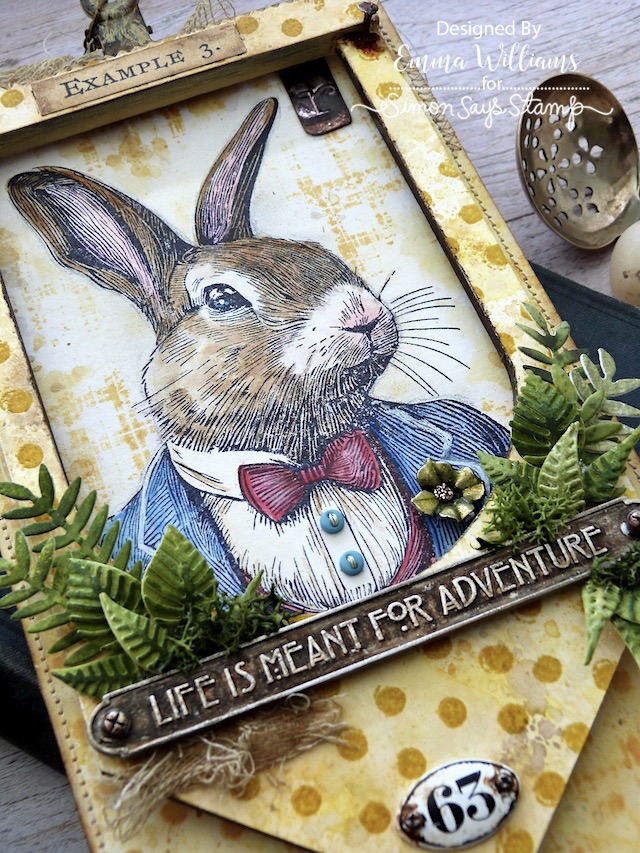
Once I'd attached the facade to my tag, I then added the details to Mr Rabbit himself, placing some tiny buttons onto his shirt and a flower in his lapel.
The metal flower is from the idea-ology Floral Adornments pack and to colour the flower, I applied an embossing dabber to the surface of the metal and then sprinkled Squeezed Lemonade Glaze over the top. After tapping away the excess and heat embossing the powder until the metal becomes enamelled in appearance, I allowed it to cool and then stuck it onto the lapel.

The final detail for the frame is the idea-ology Type Chip in the top right corner, the letter 'r' for rabbit and I just attached this with collage medium.

LARGE WORD PLAQUE AND FOLIAGE
Across the facade, I placed a word plaque, "Life Is Meant For Adventure" and I coloured the metal using the same paints as I used on the nail tacks but to accentuate the wording, I used my fingertip to add a smear of Sterling Foundry Wax across the raised lettering and then heat embossed to set the wax.
I attached two hardware heads to either side of the plaque and again I added the rusty effect to the metal with Distress Paints and then attached the plaque with foam pads.

For the foliage, I used the Funky Florals 3 Die Set by Sizzix, cutting each piece from cardstock inked with Peeled Paint, Rustic Wilderness and Shabby Shutters Distress Spray Stains.

I then arranged the die cuts around the plaque, tucking them underneath and adding some moss and Mummy Cloth to the arrangement.


FINISHING DETAILS
For the finishing details, I added a Mini Plaquette, the number 63 at the bottom of the facade and then placed two large fasteners to either corner of the tag.

To complete my project, I added my final touch ~ the monocle. This was inspired by Tim's make but I haven't attached it to the rabbit himself, I've allowed it to just dangle from the clip at the top of the tag, so that he can use it anytime he wants.

MONOCLE
The monocle is actually a retired piece of idea-ology that I had in my stash and after adding the rusty finish to the metal, I then attached it to some chain, which hangs from the Hinge Clip, which is also altered with some Scattered Straw, Black Soot and Crackling Campfire Distress Paint.

So that's my tag finished and I hope you love what I've made and will be inspired by the ideas and techniques.

Don't forget that every week, one lucky random participant has the chance to win a $25 gift voucher from Simon Says Stamp and you can join in up to 5 times, which means you could have 5 chances to win. You have until next Monday at 8am Ohio time. 1pm UK time, 2 pm CET to join in and good luck....


Recipe for project:


Thank You for always posting fabulous projects for me to drool over lol!!! You are fantastic at everything you make , and I am going to make this adorable rabbit!!
ReplyDeleteThis dapper dude is so charming! LOVE how you've coloured him Emma and as always, I adore all the little details that make your creations so special. The little metal embellishments are so fabulous, perfect placement tying everything together. The little metal 'r' is a genius touch. Hugs, Wends xoxo
ReplyDelete