
Hello everyone and welcome to Day 1 of the Be Bold Blog Hop!
I'm so excited to be joining this hop and you might have arrived here from Jean Doeringsfeld's blog, but if not, and you want to catch up with everyone who is participating in this hop, then don't worry because you can head back to the beginning, HERE.

For my card, I chose to use the Lush Leaves Dies, the Lilac Pawsitively Dazzling Gems and the Mamacita Stamp Set from this release, to create a card celebrating a very special person in my life . You can check out all the fabulous new products in the Be Bold release, HERE.

So let's begin and here's how I created my card.


This card measures, 20 x 11cm and is made from Mixed Media Heavystock card.
BACKGROUND
To start with I made my background and for this, I used the Tim Holtz Linked Squares Layering Stencil. I inked through the stencil onto a panel of watercolour card, using a combination of Aspen, and Sage Positively Saturated Inks and Pumice Stone Distress Ink, blending the colours over the card with a stencil brush.

Once happy with the blend, I spritzed water over the background and allowed the inks to puddle and pool before heat drying the surface.

Once this was dry, I applied Frayed Burlap Distress Ink to my glass mat, sprtized with water and then dipped my inked card panel into the droplets of ink. Once again I heat dried the surface before inking the edges with Walnut Stain Distress Ink.
To add more layers to the background, I inked one of the stamps from the Tim Holtz/Stampers Anonymous Botanic Collage stamp set, with Black Soot Distress Ink, inking the type script section of the stamp only and stamping it randomly around the edges of the panel.

To complete the panel, I machine stitched a border and then matted it onto a panel of card, inked using the same colours of Positively Saturated Ink, Sage and Aspen as I used through the stencils.
Matt the layered panel onto Mixed Media Heavystock card using foam pads, followed by a layer of kraft card before mounting onto the card blank.

SENTIMENT LABEL
For the sentiment label in the centre of the card, I used Tim Holtz's Vintage Label dies by Sizzix. These labels create a debossed outline around the edge and using the large circular die, I cut the shape from Heavystock card, inking the raised area of the die with Rustic Wilderness Archival Ink.
I inked the surface of the die cut with Pumice Stone and Frayed Burlap Ink and spritzed with water to blend the inks before heat drying the circle.
I then stamped the sentiment in Black Soot Archival Ink, using two separate stamps from the set.
Beneath the sentiment, I placed a small die cut heart from the Lovebirds die set, that I had on my desk from a previous project and inked this with Kitsch Flamingo Distress Ink.

Mount the sentiment onto the card using foam pads to add dimension.
LUSH LEAVES
Taking the Lush Leaves dies, I cut multiple pieces from Distress Watercolour Card.
I then inked the die cuts with the Pawsitively Saturated Ink Trio 14, starting with Aspen, followed by Sage and finally adding darker shades with Pine.

After shaping each of the flourishes and leaves, I arranged them onto my card.

I placed them around the circular vintage label, layering them and arranging them to create a fluffy, dimensional look to the piece.
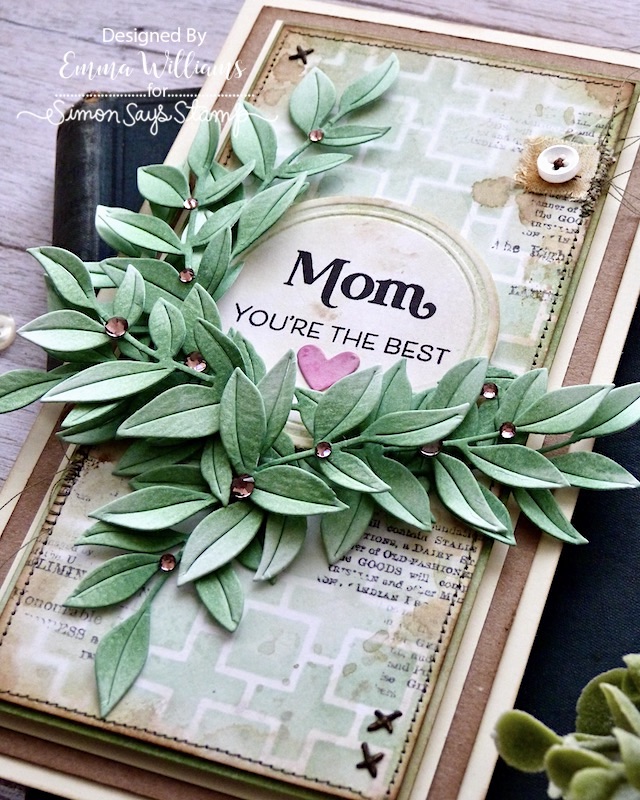
To complete the leaves, I added some gems, sticking them directly onto the foliage.

FINISHING DETAILS
We're nearly there and all that's left is the finishing details.
I added a scrap of linen from my material box to the top right hand corner, complete with a button that I sewed onto the linen scrap.

Finally I added some fo the tiny stitches, die cut from black card using the Bunny Stitch die by Tim Holtz and Sizzix and placed these in the top left and bottom right hand corners.

...and that finishes my card for this hop.

I hope you love this make and all the techniques I've used.
Now, it's time to hop to the next stop...


What a pretty card. Love the leaves.
ReplyDeleteJana Mays -jmariedesigned@gmail.com. No longer anonymous
DeleteWOW, that is an amazing projects....love it!!
ReplyDeleteAbsolutely stunning. I love all the greenery. So much interest and dimension. Thank you for sharing your time and talent.
ReplyDeleteYour stenciling makes the layout lovely
ReplyDeleteI definitely had to look at this card in detail because of all that spectacular dimension!!!!! So, so beautiful! I also really loved the jewel choice on the leaves.
ReplyDeleteYour dimension is fabulous!
ReplyDeleteLove the greenery. It looks so natural.
ReplyDeleteBeautiful dimension and texture!
ReplyDeleteThe dimension of the leaves is amazing.
ReplyDeleteWow, just wow. Over the top but in a good way. Thank you.
ReplyDeleteLove the pattern and softness of the background, what a great stencil! Amazing card!!
ReplyDeleteThat is beautiful - I do not have a mom anymore but that certainly can be used for so many things - great layout!
ReplyDeleteI love the layering of leaves!
ReplyDeleteBeautiful card! Thank you for sharing 💗
ReplyDeleteWonderful green leaf arrangement.
ReplyDeleteMelissa
"SunshineHoneyBee"
Lovely card! Your stenciling is gorgeous as is this beautiful card!
ReplyDeleteWhat a unique card! I love it!
ReplyDeleteBeautiful card - love the colors! Terrific new release!
ReplyDeleteWow, fantastic project! I love all that dimension!
ReplyDeleteGreat card. Lots of texture with stencil and leaves,etc.
ReplyDeleteI'm not computer savvy. Great card. Love the texture.
ReplyDeleteSo much details and dimension in this card but for a well appreciated Mother. Beautiful.
ReplyDeleteAbove messages from Lenora - vandune66@gmail.com. As I said. Not very computer savvy.
ReplyDeletePretty card and the amount of dimension created by all that lovely greenery. Thanks for sharing.
ReplyDeleteWhat a lovely card for Mother's day. The leaves make such a change from flowers..
ReplyDeleteBeautiful card. Thank you for sharing the recipe!
ReplyDeleteFabulous cards! I love all the texture and dimension.
ReplyDeleteLove the stitched background and all the pretty leaves. One lucky mom is gonna love it!
ReplyDeleteThis is INCREDIBLE! Your mom is going to love it!!!!!!
ReplyDeleteWow, you take three dimensional to a whole new level! Any mother would love to get that card. Great job! (PS I scrolled down and absolutely love your "Lucky" piece too!)
ReplyDeleteLove the card, the greenery is a nice touch and the dimension is wonderful.
ReplyDeleteLove the dimension on the leaves. Gorgeous card.
ReplyDeleteGreat dimension really makes the card
ReplyDeleteI absolutely love everything about this card. Just fantastic. So much creativity in one place.
ReplyDeleteGorgeous card! I love the depth, dimension, and colors! Thank you for the inspiration.
ReplyDeleteI was wowed by this card! So much to look at and all the texture. Beautiful job!
ReplyDeleteVery pretty. Love all the dimension it has.
ReplyDeleteOh yes! I love the leaves and the background is just wonderful.
ReplyDeleteBeautiful card...love the leaves.
ReplyDeleteThis is beautiful and with a vintage look!
ReplyDeleteBeautiful card! Love your ink dipped panel, gorgeous!
ReplyDeleteThis is spectacular.. I love it!!!
ReplyDeleteWow, that 3D greenery really stands out on this card. What a beautiful design.
ReplyDeleteWhat a lovely card! I just love those leaves - so lush!
ReplyDeleteOh wow, this card is amazing! Absolutely beautiful design.
ReplyDeleteGorgeous card, love all the dimension. Thank you for the detailed explanation of how you did the background, it’s perfect!
ReplyDeleteI love all this dimension! Gorgeous!
ReplyDeleteThe greenery really makes this card stand out.
ReplyDeleteMerrill P
What a beautiful card!! The background is amazing and the dimension on the leaves, wow!!! Thanks so much for sharing.
ReplyDeleteBeautiful design and dimension! Love the special card you created!
ReplyDeleteOh my! I love this! so pretty!!!
ReplyDeleteMarisela Delgado said: So lovely! mariandmonsterd@yahoo.com
ReplyDeleteYour card is beautiful!
ReplyDeleteBeautiful card, love the background! Love your card!
ReplyDeleteBeautiful project ❤️
ReplyDeleteVery nice but how would you fit it in an envelope?
ReplyDeleteLove all the dimensions!
ReplyDeleteOh so stunning and elegant. I love the shading of the leaves, and the layered foliage. Great background as well. Thanks for all the details of your making this card.
ReplyDeleteBeautiful! Mom will surely cherish it.
ReplyDeleteYour card is amazing. Love the colours and all the little details.
ReplyDeleteGorgeous! Love your beautiful design! So much texture from those layered leaves, aren't they fantastic!!!
ReplyDeleteI absolutely love what you did with those leaves! Wowzers!
ReplyDeleteLove all of the dimension.
ReplyDeleteThanks for sharing.
Wow! I love all the detail and dimension on your card- lovely design!
ReplyDeleteLove the dimension. Beautiful card!
ReplyDeleteGreat card! Love the leaves!
ReplyDeleteLove how you layered and layered the leaves!
ReplyDeleteMy jaw dropped when I saw this stunning card! And after reading all the steps you took to create it I understand why it is so amazing!
ReplyDeleteWow, this is an amazing card! Love all the details, incredible!
ReplyDeleteThe watercoloring gives this card an added dimension to it
ReplyDeleteThis is so lovely! What a wonderful piece of art. If I got this card it would go up on my wall for decoration. Beautifully made!!!
ReplyDeleteWOW!!!! Gorgeous!!!! I love your leaves and the dimension!!!
ReplyDeleteOkay Emma, I really didn’t think I needed another leaf die…but OMG you have sold me! Thank you for your wonderful card inspiration! I just love it.
ReplyDeleteWow, so many beautiful details in your card!
ReplyDeleteAmazing card.
ReplyDeleteThere are not enough words for how spectacular this card is. I had no idea a leaf die could be used in such a way! Fantastic!
ReplyDeleteWhat a wonderful way to showcase the leaves! Thank you for your inspiration!
ReplyDeleteGreat card, love all the dimension!
ReplyDeleteThis is absolutely amazing! What a feast for the eyes!
ReplyDeleteWonderful card!
ReplyDeleteThis is stunning
ReplyDeleteBeautiful card. Love the layers and depth. Love the leaves.
ReplyDeleteYour card is really gorgeous!!! I love those leaves.
ReplyDeletesuch peace and dimension
ReplyDeleteThe way you created the swag of greenery was so lush and beautiful!
ReplyDeleteLovely card - love the dimension you created with the Lush Leaves die!! Thank you for the inspiration.
ReplyDeleteBeautiful card and like the dimension you created with the leaves!
ReplyDeleteWhat a fabulous card! I love your ink blending on the leaves and the colors you used on this card!
ReplyDeleteGorgeous! From Kris Boydstun. artbringsmejoy@icloud.com
ReplyDeleteFabulous card! The dimension you’ve created with the layering of the leaves is beautiful! - lisascreativeniche
ReplyDeleteSuch a special beautiful card. Thank you for sharing
ReplyDeleteAbsolutely gorgeous card!
ReplyDeleteSuch depth to your beautiful piece of art!! Gorgeousness!
ReplyDeleteSuch a beautiful card!!
ReplyDeleteWow, so detailed and beautiful! What gorgeous inspiration!
ReplyDeleteBeautiful card!! Thank you for sharing your creativity!
ReplyDeleteBeautiful work! Melissa
ReplyDeleteReally cool mixed media, even using stitching.
ReplyDeleteLove what you created!
ReplyDeleteOh my goodness. Gorgeous sprig! It looks so amazing. Wonder how you got it so 3D looking, glue dots? How many did you have to cut to get that look?
ReplyDeleteThank you so much for your kind comment Danyelle, I really do appreciate it and so happy you loved the card!
DeleteIn answer to your questions, I cut three of each of the two sprigs and then gently squeezed the leaves together to shape and create the dimension before I attached them with a hot glue gun and I then added some foam dots that I strategically placed behind the leaves, so that they gave the lift and dimension! Hope that helps and any other questions, just ask away! 🙂