Showing posts with label Mr Rabbit. Show all posts

Monday, 25 March 2024

The Great Adventure ~ No. 63

Hello everyone and welcome to the brand new Simon Says Stamp Monday Challenge

This week our theme is all about Embossing It and with so many different products available, I'm sure you'll all be spoilt for choice with ideas and as always, the team have come up with plenty of inspiration.

For my make, I'm taking the wonderful Mr Rabbit on his Easter Adventure because as we all know, all good bunnies are getting ready for an Easter Hop, and are ready to deliver those eggs around the world!

So let's get started, and say hello to Mr Rabbit, the Great Adventurer!


For this make, I used a Mini Etcetera Tag, which I flipped upside down so the top is now the bottom, and an Etcetera Facade.

BACKGROUND FOR TAG

To begin with, I'll start with the background and I cut a panel of Mixed Media Heavystock card the same shape as the tag. I smooshed Scattered Straw, Mustard Seed, Pumice Stone and Frayed Burlap Distress Inks onto my glass mat and then spritzed the inks with water before dipping my card panel in and out of the inks to pick up the colour. Once I was happy with the background colour, I heat dried the panel, and used a blending tool to ink the edges with Gathered Twigs and Walnut Stain Distress Inks.

Taking the polka dot stamp from the Mr Rabbit Stamp Set, I inked it with Scattered Straw Distress Ink, and then stamped randomly onto the panel. I then repeated this using the plaid stamp from the same set.

Once my background was complete, I then machine stitched a border around the outside and attached the panel onto my Etcetera Tag.

ETCETERA FACADE

Now for my facade, which like the tag, I flipped upside down so the point is at the bottom. To cover the facade, I once again used Mixed Media Heavystock card and I inked the card using the same colours of Distress Ink as I used on the tag background.

After heat drying the card thoroughly, I then stamped the polka dots onto the background, stamping the design in sections using Versamark Clear Ink pad and sprinkled Fossilized Amber Embossing Glaze over the top. Tap away the excess and heat emboss. Repeat until the entire card panel is covered with polka dots.

I then covered the facade with my stamped cardstock, trimming away the inside and the edges and adhering it with Matte Collage Medium.

At the top of the facade I placed a Pinked Etcetera Trim, covered with the same embossed polka dot card which I die cut using the Decorative Trims die set and adhered the 'Example 3' Numbers Strip across the top of the frame, attaching it with Matte Collage Medium.

I placed the trim with the pinked edge upwards, across the top of the facade and then hammered two Nail Tacks into either side.

To add some rusty drips around the nails, I used watered down Crackling Campfire, Vintage Photo and Black Soot Distress Paints, and just built up the colour to create the look of rust.

MR RABBIT

Now for the star, the great adventurer and I began by stamping the image of Mr Rabbit onto watercolor card. I then watercolored the image with Distress Watercolor Pencils, adding shading around the edge.

To stamp the background, I made a mask of Mr Rabbit by stamping a separate image onto a piece of paper and then with the paper laid over the image, I inked the plaid stamp with Scattered Straw Distress Ink and stamped the background.

I then added some flicks of Pumice Stone and Scattered Straw inks, heat dried the panel and then placed Mr Rabbit behind the Etcetera Facade using the risers to add dimension to the frame.
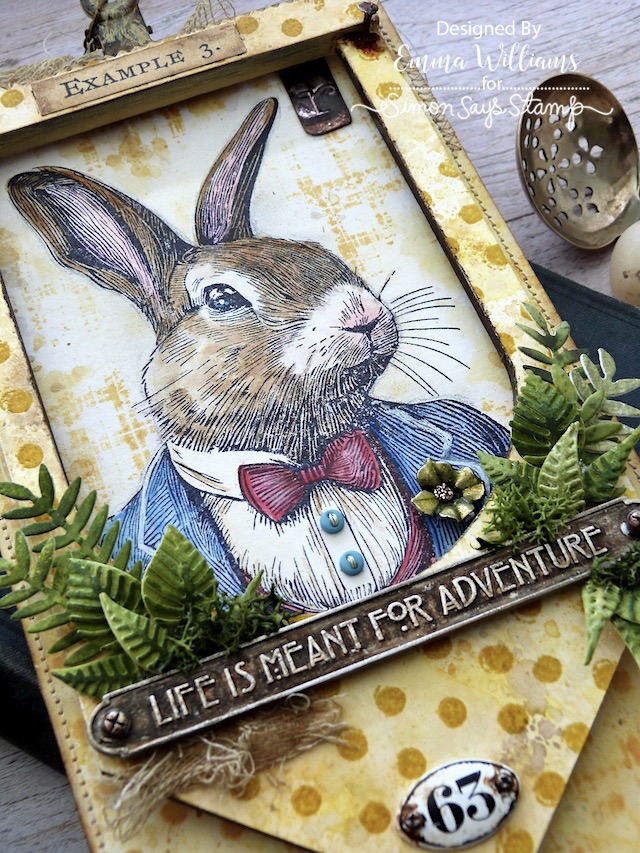
Once I'd attached the facade to my tag, I then added the details to Mr Rabbit himself, placing some tiny buttons onto his shirt and a flower in his lapel.

The metal flower is from the idea-ology Floral Adornments pack and to colour the flower, I applied an embossing dabber to the surface of the metal and then sprinkled Squeezed Lemonade Glaze over the top. After tapping away the excess and heat embossing the powder until the metal becomes enamelled in appearance, I allowed it to cool and then stuck it onto the lapel.

The final detail for the frame is the idea-ology Type Chip in the top right corner, the letter 'r' for rabbit and I just attached this with collage medium.

LARGE WORD PLAQUE AND FOLIAGE

Across the facade, I placed a word plaque, "Life Is Meant For Adventure" and I coloured the metal using the same paints as I used on the nail tacks but to accentuate the wording, I used my fingertip to add a smear of Sterling Foundry Wax across the raised lettering and then heat embossed to set the wax.

I attached two hardware heads to either side of the plaque and again I added the rusty effect to the metal with Distress Paints and then attached the plaque with foam pads.

For the foliage, I used the Funky Florals 3 Die Set by Sizzix, cutting each piece from cardstock inked with Peeled Paint, Rustic Wilderness and Shabby Shutters Distress Spray Stains. 

I then arranged the die cuts around the plaque, tucking them underneath and adding some moss and Mummy Cloth to the arrangement.

FINISHING DETAILS

For the finishing details, I added a Mini Plaquette, the number 63 at the bottom of the facade and then placed two large fasteners to either corner of the tag.

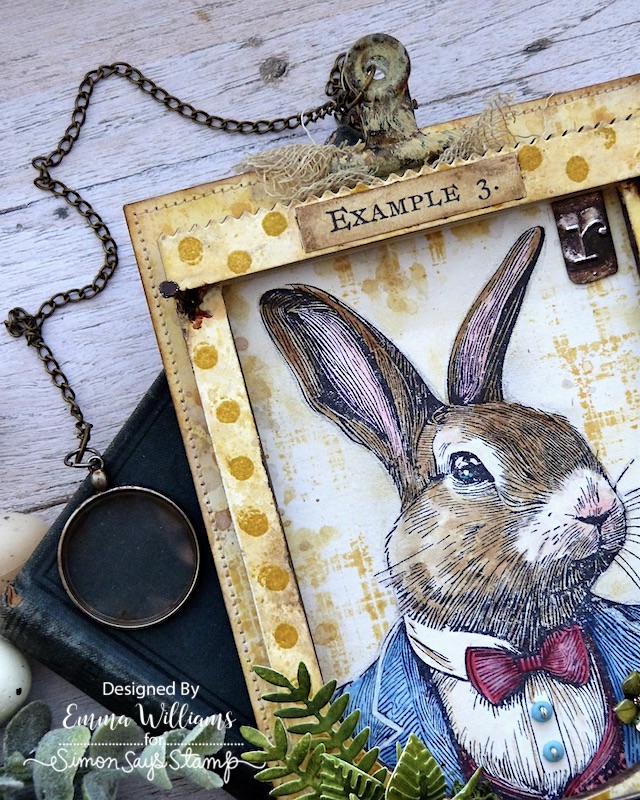
To complete my project, I added my final touch ~ the monocle. This was inspired by Tim's make but I haven't attached it to the rabbit himself, I've allowed it to just dangle from the clip at the top of the tag, so that he can use it anytime he wants.

MONOCLE

The monocle is actually a retired piece of idea-ology that I had in my stash and after adding the rusty finish to the metal, I then attached it to some chain, which hangs from the Hinge Clip, which is also altered with some Scattered Straw, Black Soot and Crackling Campfire Distress Paint.
So that's my tag finished and I hope you love what I've made and will be inspired by the ideas and techniques.

As always, if you make anything, or if you've been inspired by anything that you've seen here on my blog ~ then please, let me know by tagging me on social media or leaving a comment here and I will be right over to take a look!

Don't forget that every week, one lucky random participant has the chance to win a $25 gift voucher from Simon Says Stamp and you can join in up to 5 times, which means you could have 5 chances to winYou have until next Monday at 8am Ohio time. 1pm UK time, 2 pm CET to join in and good luck....


Thank you so much for taking the time to stop by today...Love Emma xxx

Recipe for project:

Tim Holtz/Stampers Anonymous: Etcetera TagEtcetera FacadeMr Rabbit, Pinked Etcetera Trims
Distress PaintBlack Soot, crackling Campfire, Scattered Straw
Distress Embossing Glaze: Scattered Straw, Squeezed Lemonade
Distress Spray Stain: Rustic Wilderness, Shabby Shutters, Peeled Paint
Distress Ink: Walnut Stain, Gathered Twigs, Mustard Seed, Scattered Straw, Pumice Stone, Frayed Burlap
Hot Glue Gun
Moss, monocle and chain from my own stash

****These are not affiliate links****

Monday, 29 March 2021

Mr Rabbit Springs Into Action...

Happy Monday friends... 

Hope you've all had a wonderful weekend and ready for a brand new week and the new challenge that is starting today, over on the Simon Says Stamp Monday Challenge Blog!

This week, our theme is all about Spring and Easter and we hope you'll join us, and share all your beautiful creations!

For my project, I couldn't resist using another Tim Holtz die from the 2021 Sizzix Chapter 1 release and would like to introduce you to Mr Rabbit, a very handsome bunny with those gorgeous long ears and big feet, who is looking for Eater treats and getting his little habitat ready for Easter.

So, let's get started and here's how I created this project!

With spring in the air, I wanted to keep this card looking fresh but still have that shabby chic vintage vibe to the overall piece ~ so I kept the background white, just adding a touch of ink to take away the starkness and then added all my layers over the top.

So after cutting a panel of Distress watercolour card, I spritzed it with a light misting of water. I then placed the floral background stamp from the Vines and Roses Stampers Anonymous set onto my stamp platform, and used different coloured Mini Distress Inks to ink up the various detail of the stamp.

Flowers: Broken China and Kitsch Flamingo

Leaves: Bundled Sage and Iced Spruce

I then spritzed the stamp with water and stamped directly onto the card panel. To cover the entire panel, I moved the stamp down slightly and then repeated the previous step.

After heat drying the stamped panel, I then inked the edges with Frayed Burlap and also added a few splashes of the ink over the background, creating little inky pools. 

Once the background was thoroughly dry, I added some stamped imagery, some script using the stamp from the Poinsettia stamp set and stamped onto various areas of the panel, a postmark and receipt no. which is from the Field Notes Stamp set.

After machine stitching a border around the edge...

...I matted it onto some paper from the Etcetera Paper stash and then matted theses panels onto a piece of thick media board from Sizzix that I cut slightly larger than the previous matted panels. Around the outside edge of the mount board, I applied some Design Tape.

Before moving on, I created a ledge for Mr Rabbit to stand on and this is just two Etcetera Pinked Trims, one slightly narrower than the other and overlaid. I then applied some Crackle Paste over the surface, allowed for this to dry before applying some Walnut Stain Distress Crayon over the top to accentuate the crackles. I attached the ledge across my background, allowing it to slightly overhang the edges.

I now have my background ready to embellish...and now I can formally introduce you to Mr Rabbit who is placed amongst a backdrop of Spring greens, which are all die cut from Mixed Media Heavystock card, coloured with Rustic Wilderness, Peeled Paint and Shabby Shutters Distress Inks and using the foliage from Funky Nature Thinlits Die Set.

With the foliage cut, I formed and arranged it into an arch, attaching it to sit on the ledge.

I cut the image three times from Kraft Heavystock card and layered the card using Matte Collage Medium to form one rabbit that resembles the thickness of chipboard.

I then added some detail to the rabbit using Polychromos pencils from Faber Castell. I also added some white pen details to add those few extra highlights.

Once I had Mr Rabbit ready, I moved onto the toadstool and used one of the dies from the Funky Toadstools set. As with Mr Rabbit, I wanted quite substantial pieces as I wanted to create dimension, so I cut two of each of the image pieces from Mixed Media Heavystock card and then layered them with Matte Collage Medium before painting the cap with Candied Apple Distress Paint, and a touch of Black Soot mixed in and the stalk was coloured with Gathered Twigs Distress Ink. I then added some small white dots onto the cap using Tonic Nuvo Drops in White.

The carrot was cut using the smaller of the two carrot dies in the Carrot Bunny Thinlits Die set and once again, layered to create a thicker die cut and coloured with Spiced Marmalade, Carved Pumpkin and a touch of Vintage Photo Distress Paints. The leaves are cut from some leftover card that I coloured for the foliage.

Using foam pads, I attached the toadstool, the rabbit and the carrot in amongst the foliage, placing clumps of moss in and around the base.

To complete the scene, I added some dried flowers that I had in my stash and also some Bouquet Findings. These are all coloured with Spun Sugar Distress Spray Stain and have Platinum Stickles applied to the little stamen centres and hidden amongst the foliage, I placed one lucky Bauble finding. I coloured this with Limeade and Mushroom Alcohol Inks and attached it to nestle into the greenery.

Now for all the finishing touches, and I added some rusted Index Clips, complete with Hardware Heads and clipped these to either side of the panel. I also placed a Field Notes Ephemera piece onto the right hand side.

In the top left hand corner, I placed a Stitched Scrap, and attached the Mini Pin.

I attached a Prima Marketing Rusty Metal clip at the top of the panel...

...and finally, I added the Theories Quote Chip, "never stop exploring" and placed this beneath the ledge, adding a Hardware Head to either side of the chip.

My spring themed project is now ready to display and I hope you've enjoyed the walk through the process of how I made it and how Mr Rabbit was bought to life.

Don't forget that every week, one lucky random participant has the chance to win a $25 gift voucher from Simon Says Stamp and you can join in up to 5 times, which means you could have 5 chances to winYou have until Monday 8am Ohio time. 1pm UK time, 2 pm CET to join in and good luck....


Thank you so much for taking the time to stop by today ~ stay safe and keep well.
Love Emma xxx


Recipe for project:
Mini Distress Inks: Broken China, Kitsch Flamingo Iced Spruce, Bundled Sage
Distress Inks: Frayed Burlap, Rustic Wilderness, Peeled Paint and Shabby Shutters 
Distress PaintSpiced Marmalade, Carved Pumpkin, Vintage Photo, Candied Apple and Black Soot
Distress Crayon: Walnut Stain
Distress Spray Stain: Spun Sugar
Powered By Blogger

Total Pageviews