
Hello everyone and Happy Monday...
Hope you are all well and had a lovely weekend and now ready to join us for the brand new Simon Says Stamp Monday Challenge. This week our theme is all about THANKS and THANKSGIVING and we would love for you to play along and share your makes with us.
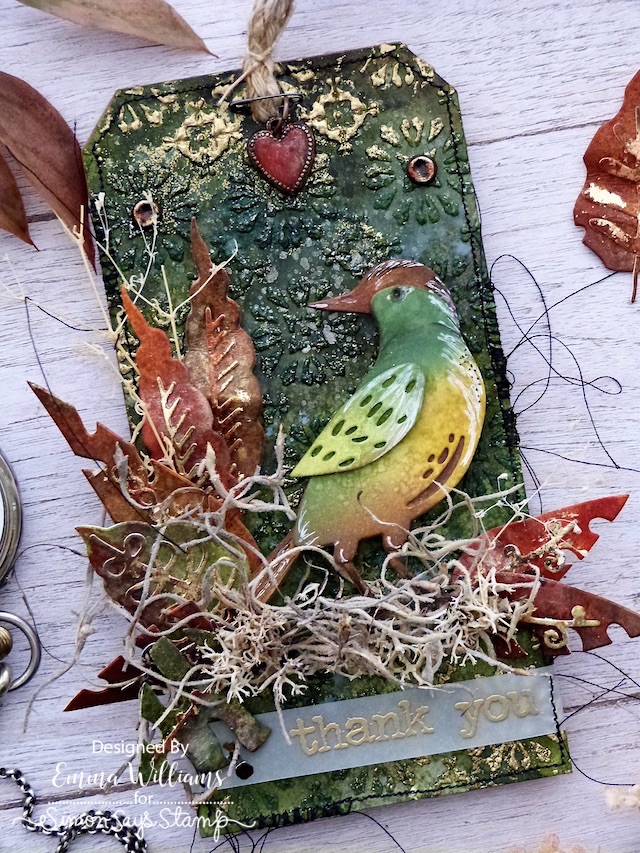
For my project, I created a Size 8 Etcetera Tag which features old and new dies from Tim Holtz and Sizzix, including one of my all time favourite dies, Feathered Friends who is popping by to say thank you to everyone who visits my blog and socials, because it's your kind words that make all the hard work so worthwhile!
So let's get started and here's how I created this tag....


This project uses a Size 8 Stampers Anonymous/Tim Holtz Etcetera Tag and Heavystock Tag.
TAG BACKGROUND
To begin with I coloured my tag background using Distress Spray Stains, Mica Sprays and Oxide Sprays in the following colours.
OXIDE SPRAYS: Speckled Egg
MICA SPRAYS: Tree Lot, Unravelled
DISTRESS SPRAYS: Rustic Wilderness, Black Soot, Speckled Egg
I misted he tag with water, I then spritzed the colours listed above onto the tag, allowing them to blend. You can use more water if necessary.
Once the tag was dry, I placed the Rosette Layering Stencil over the top and applied Translucent Grit Paste through the stencil with a palette knife. Working quickly, I removed the stencil and separately applied a sprinkle of Rustic Wilderness Distress Glaze and Gold Embossing Powder over the pasted areas. Set the tag to one side to dry and once I could feel that the paste has set, I heat embossed the paste on a gentle heat setting until molten and shiny.

Across the bottom of the tag, I added my sentiment using a strip of vellum. The vellum is cut to measure 1.5cm and on the right hand side I stamped the sentiment in clear embossing ink. Sprinkle with gold embossing powder and heat emboss. Wrap the vellum strip around the tag, securing the ends at the back and on the left hand side, I hammered a nail tack through the tag. This helps to pin down that strip and secure it.

After machine stitching a border around the edge, I adhered the tag onto my Etcetera Tag.

I threaded a piece of rope through the hole in the top...

...and then hung a Heart Adornment from a mini pin. The Heart Adornment is painted with Candied Apple Distress Paint, which adds colour to the heart itself and once dry, I added a touch of gilding wax from my stash to accentuate the beading around the outside.

FEATHERED FRIEND

We can now start creating the scene and firstly, I made my feathered friend and I used the larger bird in the set for this make and cut all the pieces from Mixed Media Heavystock card. The Distress Inks that I used to colour him are as follows:
Mowed Lawn, Rustic Wilderness, Fossilised Amber, Walnut Stain, Gathered Twigs
I layered all my die cut pieces together to assemble the bird and then added the wing using foam pads which help to create movement.

I then added some white and black pen work to bring out the detail.

I placed the bird onto my tag using foam pads and sat him in a nest made from Spanish Curly Moss that I have in my stash.
ARTSY LEAVES
In amongst the moss, I added some autumn leaves and for these I used the Sizzix Artsy Leaves Die Set by Tim Holtz.
I cut all my leaves from Mixed Media Heavystock Card that I coloured with the following:
DISTRESS SPRAY STAIN: Crackling Campfire, Spiced Marmalade, Vintage Photo, Aged Mahogany, Peeled Paint, Walnut Stain
MICA SPRAY: Unravelled, Mulled Cider and Fallen Acorn
After cutting the leaves and placing the veins over them, I then added touches of gold and for this I used Prima Metal Flakes. I smeared some Flake Glue over the raised areas, and once the glue has changed colour and become translucent, I applied the flakes, removing any excess with a hard brush.

I then inked the edges of the leaves and arranged them around the bird, by tucking them into the moss.

Finally I added some dried flower stems and small clumps of reindeer moss.
We're nearly there and all that's left is to add the two Large Fasteners at the top of the tag. I cut the legs of the fastener and then hammered them to give them all those little dents before attaching them directly to my tag using Matte Collage Medium.

So that's my tag finished and I hope you love the ideas and inspiration I've used on this make...
Don't forget that every week, one lucky random participant has the chance to win a $25 gift voucher from Simon Says Stamp and you can join in up to 5 times, which means you could have 5 chances to win. You have until next Monday at 8am Ohio time. 1pm UK time, 2 pm CET to join in and good luck....


Recipe for project:


Your words were both powerful and thought-provoking. Thanks for sharing!
ReplyDeleteThank you for sharing your Artistry and the alchemy of your make. It's gorgeous.
ReplyDelete