
Happy Monday....
Where has the first week of November go?!?!? I can't believe how fast these weeks are flying and how fast this year has gone!!!
But, a new week means that we have a brand new Simon Says Stamp Monday Challenge and this week, our theme is GRUNGE IT UP and I have had so much fun making an Etcetera Panel full of Autumn vibes, using products from Tim Holtz and Stampers Anonymous to bring this story to life!
This week the DT are showcasing the products of Carabelle Studio within their makes.


PANEL BACKGROUND
To begin with I applied some of Tim's Design Tape around the edges of the panel, using one design that I have in my stash but there is a similar design in the Design Tape Trims set, which I adhered on the side edges and a second design from the Humidor set, which I placed down the two sides, left and right, of the panel.

I then cut a panel of Mixed Media Heavystock Card, 11.5 x 18.5cm and after a spritz of water, I applied the following sprays and Oxide Sprays:
DISTRESS SPRAY STAINS: Ground Espresso, Speckled Egg, Tumbled Glass, Antique Linen, Walnut Stain, Crackling Campfire
OXIDE SPRAYS: Tumbled Glass, Speckled Egg
Once I was happy with the blend, I heat dried the panel, inked the edges with Walnut Stain Distress Ink and then applied Sparkle Paste through the 'crosses' stencil in the Carabelle Studio Mix and Match Set, and positioned this down the two sides.

I set this to one side to dry, then machine stitch a border around the edge before attaching it centrally onto my Etcetera Panel.

To complete the panel, I attached Hardware Heads, two in each of the bottom left and right hand corners and one in each of the top corners.

I then painted these with Black Soot and Crackling Campfire Distress Paint for more of a rusty look to the metal.
TAG BACKGROUND
Moving onto the tag, I used exactly the same colours as I did on the background but this time, I spritzed the sprays so that there would be a section of blue in the centre of the tag.

After heat drying the tag, I lightly flicked Unravelled Mica Spray across the surface and again heat dried the tag.
To add some more layers of interest, I inked through the remaining stencils with Walnut Stain Distress Ink and then used Jet Black and Barn Door Archival Inks to stamp some imagery from the Mini Glitch Stamp Set down the two sides of the tag.

I then machine stitched around the outside, before matting the tag onto a panel of gold metallic kraft card. I then mounted the tag onto the centre of my panel using foam pads.
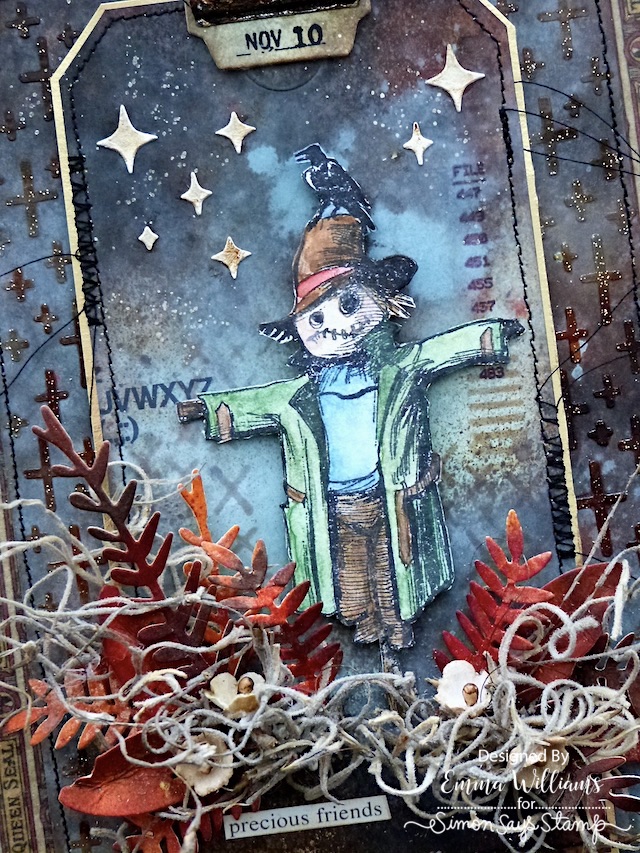
At the top of the tag, to cover the hole I placed an Index Tag that I had previously cut for a project but discarded along the way. I just placed this along the edge of the tag and added a Remnant Rub, Nov 10 onto it.

THE SCARECROW
Once I'd stamped the image of the scarecrow onto watercolour card with Jet Black Archival Ink, I painted it using a waterbrush and Distress Watercolour Pencils. I used Tim's scissors to fussy cut around the outline and then mounted this onto my tag with foam pads.

Around the scarecrows head, I added a few sparkles which were left over from last week's project and die cut using from silver metallic kraft stash, using the Winter Shadows Thinlits die set. If you don't have this die set, then any stars will work.

FOLIAGE AND MOSS
Around the base of the scarecrow, I attached clumps of curly Spanish Moss using hot glue. I have a huge bag of this in my stash that I bought online and it is perfect for these kind of makes.

Once the moss was in position, I wanted to add some more depth and decided to use die cuts!

For this I chose dies from two sets ~ Modern Floristry for the leaves and Funky Florals 3 for the ferns.
I cut a selection of these from mixed media heavystock card that I coloured with the following spritzes and sprays:
Distress Spray Stains: Crackling Campfire, Vintage Photo, Spiced Marmalade
Mica Sprays: Mulled Cider, Fallen Acorn
After inking the edges of each piece, I arranged them into the moss, attaching them with a hot glue gun.

Finally, I spritzed a bunch of the Bouquet Findings Flowers with Unravelled Mica Spray Stain and snipped the individual flower heads away from the main stem, and placed this into the arrangement.

FINISHING DETAILS
We're nearly there and all that's left is the final details.
I added a sticker, 'precious friends' from the Clippings Sticker Book and placed this beneath the moss arrangement.

For the final touch of grunge, I added a Hinge Clip to the top of the tag. I smeared the metal with Translucent Grit Paste, then once this had dried, I added Statue Foundry Wax over the top. I heat set the wax to fix it, then added a lighter coverage of Sterling Wax, again heat setting the wax.
Finally, I dribbled some Mushroom Alcohol Ink over the top, dabbing away any excess before clipping it onto my tag.

That's my make finished for this week, and I hope you've enjoyed the process and all the techniques I've used.

Don't forget that every week, one lucky random participant has the chance to win a $25 gift voucher from Simon Says Stamp and you can join in up to 5 times, which means you could have 5 chances to win. You have until next Monday at 8am Ohio time. 1pm UK time, 2 pm CET to join in and good luck....


Recipe for project:


This is so cool!
ReplyDeleteHugs, Christine