
Hello everyone...
Can you believe it's Monday...again?!?! Where are the weeks going? Where is the year going? It's flying...but as always, a new week brings a new Simon Says Stamp Monday Challenge and this week our theme is called, RAINBOW and with so many products to inspire you, the DT can't wait to see what you'll be creating to join us and play along with our fun theme.
For my make, I chose to use the colours of the rainbow, "red and yellow, and pink and green, orange and purple and blue", to create a background for my project. Now, I will admit that bright colours aren't my go to colour scheme but I gathered a selection of Tim's Oxide Inks and just went for it and hope you love the finished piece that I've made.


For this make you'll need a Size 8 Mixed Media Heavystock Tag and a sheet of Mixed Media Heavystock card.

BACKGROUND
To begin with, I'll start with the background layers and I made two separate backgrounds, the tag and a second panel that I mounted the tag onto.
Using the Brush Arch Stencil from the brand new Stampers Anonymous/Tim Holtz 2023 release, I placed the stencil over the tag and then applied my rainbow of Oxide Inks through the stencil, using blending brushes.

COLOURS USED; Cracked Pistachio, Peacock Feathers, Wild Honey, Mustard Seed, Fossilized Amber, Kitsch Flamingo
Once I was happy, I removed the stencil and then spritzed the tag with a light mist of water to move the inks slightly, before heat drying the surface.
To add layers to my background, I inked the script stamp from the Exquisite Stamp set with Wild Honey Oxide Ink and rolled the stamp over the background, just allowing the stamp to catch areas of the card, not create a solid image.
I then added some more layers by inking just the newsprint section from two stamps in the Botanic Collage stamp set, with Black Soot Archival Ink and stamping around the edge.

In the top right hand corner of the tag, I added the "free" Remnant rub from the Labelled set.

After inking the edges of the tag with Walnut Stain Distress Ink, I machine stitched a border around the outside and layered the tag over the top of the second panel of cardstock, cut slightly larger than the tag, and inked using the same stencil and the same colours.
Punch a hole through the layers, and then I added rope through the hole in the top of the tag.

Cut a panel of card, slightly larger in size than the stencilled background layers and apply a border of the black/white dot design tape around the edge. Matt this onto silver metallic kraft card and then onto a card blank made with Black Heavystock Card.
I used foam pads to mount the tag layers onto the card blank.

S.M. TINKHAM AND SON ADVERTISING PANEL
Cut a strip of the Mixed Media Heavystock card, 3cm in depth and 8'5cm in length.
After inking the strip using Mustard Seed Oxide Ink and the Brush Arch Stencil, I machine stitched the two sides of the strip and then stamped the advertising logo onto the card.

Attach the strip across the tag using foam pads and use some more of the black and white dot design tape along the top and bottom of the strip to create a trim and border.

We now have the surface ready to embellish....
UMBRELLA
I love images of umbrellas, it's just one of those things that appeals to my imagination and I have always had a soft spot for this umbrella die cut from Sizzix The Gent Die Set by Tim Holtz, so what better die to use to create a rainbow umbrella.
I cut the solid canopy and pole section of the umbrella, together with two separate layers of the spokes from Black Heavystock card and then cut the inlay pieces from Mixed Media Heavystock card.
Starting with the inlay pieces, I inked each piece with Distress Inks, Mowed Lawn, Mustard Seed, Mermaid Lagoon and Candied Apple.

Moving onto the solid umbrella canopy/pole die cut, cut away the handle before applying the Embossing Dabber over the pole section only and then sprinkle a combination of Liquid Platinum Embossing Powder and Gold Embossing Powder over the top. Heat emboss the powder and then repeat the process to create an enamelled look.
I then repeated this technique on one of the 'spokes' die cut piece before layering all my sections to make the umbrella and create dimension.
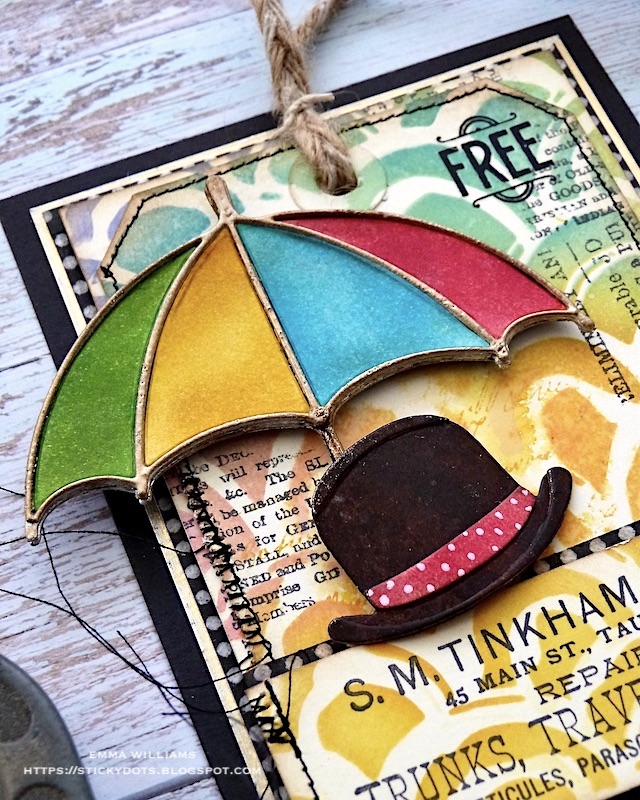
To build the layers, I started by attaching the spoke die cut that wasn't embossed, then attached the inlay pieces and then finally attached the embossed/enamelled spoke layer over the top of the inlay pieces to complete the umbrella.

TAILORED
Now to make up the hat and jacket using the Tailored Thinlits die set. I used the bowler hat and the tie for this particular piece, all of which are cut from Mixed Media Heavystock card and then coloured with Distress Spray Stains.

Bowler Hat: Black Soot, Walnut Stain, Brushed Corduory, Ground Espresso, Antique Linen and Frayed Burlap Oxide Spray.
Hat Band: Candied Apple and a white gel pen to add polka dots
Suit: Black Soot, Walnut Stain, Brushed Corduory, Ground Espresso, Antique Linen and Frayed Burlap Oxide Spray.
Shirt and Waistcoat: Speckled Egg
Tie: Candied Apple and a white gel pen to add polka dots

To add a little quirky, fun detail to the jacket, I cut a daisy from the Bunny Games Die Set and just popped this on the lapel of the jacket.

FINISHING DETAILS
To complete the card, I attached two hardware heads in the bottom left and right hand corners....

...and then attached a mini pin into the right hand side of the panel.

So that's my make finished for this week, and I hope you love my rainbow of colours card and how I chose to use them to bring this piece to life.

Don't forget that every week, one lucky random participant has the chance to win a $25 gift voucher from Simon Says Stamp and you can join in up to 5 times, which means you could have 5 chances to win. You have until next Monday at 8am Ohio time. 1pm UK time, 2 pm CET to join in and good luck....


Recipe for project:


that polka dot tie is so cute!!! - paula
ReplyDeleteI love everything about this!
ReplyDelete