Hello everyone...
Hope you all had a wonderful Easter weekend and been visited by the Easter Bunny who might have left you a few sweet surprises!
As always on a Monday, it's time for the brand new Simon Says Stamp Monday Challenge and this week our theme is called GET LUCKY! So whatever you choose to use and make, we can't wait to see your projects and hope you'll join us and play along.
For my make this week, I decided to create a Size 8 Etcetera Tag project, that is packed full of lucky symbols and hope you love seeing how this tag was put together and how I created a background using Tim Holtz dies from Sizzix.
So let's get started, it's time to share all the details of my lucky tag...


For this project you need a Size 8 Etcetera Tag and a Size 8 Mixed Media Heavystock Tag.
BACKGROUND
To begin with I made the background and this is really easy but so effective ~ it just seemed such a shame to cover the majority of the background but I took a photo before I did that to show you what it looks like.
I started by die cutting a collection of number 7's using the Bulletin Thinlits Die Set and the Emporium Thinlits Die Set. I cut six of the larger numbers and four of the smaller.
I then attached the numbers in rows, the first of the three larger number 7s along the top of the tag, followed by the smaller 7s and finishing with the remaining three large 7s underneath.
With all my numbers in place, I then started adding the colour using Distress Spray Stains and Oxide Sprays.
COLOURS:
Distress Spray Stains; Ground Espresso, Speckled Egg, Antique Linen and Crackling Campfire
Oxide Sprays; Speckled Egg, Tumbled Glass
After lightly misting the tag with water, I then spritzed it with the sprays.
Once I was happy with the mix, I heat dried the tag.
Now to accentuate the numbers and for this I used some Foundry Wax, applying a combination of the three colours, Gilded, Sterling and Statue.
I applied the waxes, one layer at a time and then heat set them between applications to create the rusty finish I was looking for before I ran Walnut Stain Distress Crayon around the edges, blending out the harsh lines of colour and just adding enough to accentuate the number.
To complete the tag, I machine stitched a border around the edge and then attached it to the Ecetera Tag using Matte Collage Medium.
EMBELLISHMENTS
The first embellishment is the dimensional lucky four leaf clover which is cut from Mixed Media Heavystock, using the Lucky Love 3D Impresslits Cut and Emboss Folder. I cut two separate pieces which I then coloured with a combination of Rustic Wilderness and Mowed Lawn Distress Sprays and then heat dried. If at this stage you lose any definition of the embossed areas, just pop it back into the folder and run it through the machine one more time.
To add some metallic highlights to the clover leaf, I applied a light touch of Gilded Foundry Wax and then heat set the wax.
Taking the second clover leaf, I snipped along the leaves towards the centre, being careful not to snip all the way and then lifted and shaped each leaf before attaching the clover to the second clover by adding glue in the centre only.
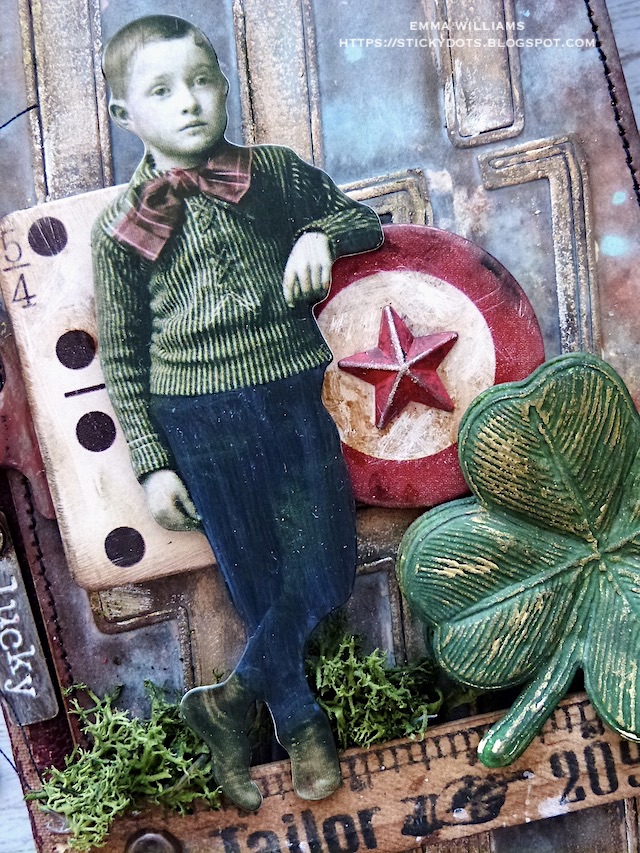
Now to start building up the layers and the lucky symbols and for this, I used a Ruler Piece, the clover leaf, a paper doll and some Baseboard Layers.
PAPER DOLL
After applying a coat of clear gesso to my chosen paper doll, I colour tinted the image using a water brush and Distress Crayons.
BASEBOARD PIECES AND RULER
After snapping a ruler piece in half, I swiped the Walnut Stain Distress Ink Pad over the surface and using a baby wipe, I blended the colour over the ruler piece to darken the wood.
Heat dry the ink and then attach it to the tag using foam pads. I then added a Large Fastener to the left hand side of the ruler piece. I cut the legs away from the fastener and then used the Texture Hammer to make it look worn and battered. I then attached the hardware to the ruler using Matte collage Medium.
In the arrangement the domino and star target pieces from the Junk Drawer Baseboard pack to use on this particular make and began to make them look more vintage in appearance by first sanding the edges of each piece and then inking them with Walnut Stain Distress Ink.
I then scribbled Black Soot and Gathered Twigs Crayon over the top of each piece and blended out the colour.
Now to add the embellishments and I placed the Baseboard pieces on foam pads, and attached the paper doll over the top, again using foam pads to add dimension.
You might notice that in the centre of the star target baseboard piece, there is a Star Adornment. This is painted with Candied Apple Distress Paint and then attached to add more dimension.
I then attached my four leaf clover to the right of the arrangement.
To complete the scene, I added some moss beneath the boy's feet.
We're nearly there and all that's left is the all important details...
DETAILS
I started with the charms that hand from the clip on the side.
All the charms are altered with a combination of Distress Paints, Crackling Campfire, Black Soot and Antique Bronze.
The Hinge Clip is painted red using Candied Apple Distress Paint, clipped to the side of the tag ready for me to hang some chain from it. On the chain, I attached a 'Lucky" Story Stick, and a wishbone and clover leaf from the Lucky Adornments Set.
Finally, I added a Clippings Sticker to the top right hand corner....
...and the tiny stitches in the top left hand corner. These were leftover from a previous project, and die cut using the Bunny Stitch Die.
So that's my project for this week complete and I hope you love what I've made.
As always, if you make anything, or if you've been inspired by anything that you've seen here on my blog ~ then please, let me know by tagging me on social media or leaving a comment here and I will be right over to take a look!
Don't forget that every week, one lucky random participant has the chance to win a $25 gift voucher from Simon Says Stamp and you can join in up to 5 times, which means you could have 5 chances to win. You have until next Monday at 8am Ohio time. 1pm UK time, 2 pm CET to join in and good luck....
Thank you so much for taking the time to stop by today ~ stay safe and keep well.
Love Emma xxx
Recipe for project:
Distress Spray Stain: Rustic Wilderness, Mowed Lawn,
Ground Espresso, Speckled Egg, Antique Linen and Crackling Campfire Distress Paint: Candied Apple, Crackling Campfire, Black Soot and Antique Bronze.


No comments:
Post a Comment
Thank you for all your comments and messages, they are all appreciated and I hope you'll come back and visit again soon...
Emma ~xx