Friday, 30 April 2021

Simon Says Stamp Born To Sparkle Blog Hop ~ Day 2

Hello creative friends and Happy Friday...

It's day 2 of the Simon Says Stamp Born To Sparkle blog hop and I'm so excited to be joining in as one of the stops. If you've been hopping along, you'll have arrived here from my Monday Challenge teamie, the very talented Anna-Karin ~ but if you've just popped by and want to join us then you can head back to the beginning at Simon Says Stamp's Blog. Also don't forget that you can check out this awesome release in full, by clicking HERE!

We also have a special promotion running with this hop and for a limited time only when you shop during our Born to sparkle releases blog hop, you can claim a FREE gift of a Island Crush ink cube set and all you need to do is use the code: CRUSH428 Offer is valid until 2nd May or while stocks last.


For this blog hop I created a card, and combined the gorgeous Party Balloons stamp with the Congrats On A Line Wafer Die. I chose to colour my balloons blue, because I was making this particular card for a new born baby boy, but there are so many other options, pink for a girl, multicoloured for a party or just choose the recipients favourite colour to make it personal ~ the choices are endless and all you have to do is pick a colour!
So, let's get started and here's how I made my vintage style baby card...
To begin with I cut a panel of Tim Holtz Distress watercolour card, 11 x 19cm. I placed the balloon stamp onto my Tim Holtz Stamp Platform, inked it with Versamark Embossing Ink and stamped a portion of the image onto the card panel.

I then sprinkled gold embossing powder over the ink, tapped away the excess before heat embossing the powder until molten.

In the top right hand corner, I added a second, raised set of balloons by stamping this portion of the stamp once more and then fussy cutting around the outline.
I chose to watercolour all the balloons, including the fussy cut balloons, using Distress Inks. Applying the colour of each ink onto my glass mat and then picking up the ink with a water brush and applying it to the image.

The colours I used in order of application were: Speckled Egg, Broken China, Peacock Feathers and Faded Jeans.

Between each layer of ink, I always heat dry before adding the next colour and I coloured the confetti with gold watercolour paint.
Once I had finished the artwork and added white gel pen highlights, I inked inbetween the balloons using Antique Linen Distress Ink and a blending tool. I also added a few splatters of the ink, that I watered down and just flicked across the panel with a paint brush. After attaching the fussy cut balloons using foam pads to raise them and add dimension, I inked the edges with Walnut Stain Distress Ink before adding a machine stitched border around the outside edge.

With the balloon in place, I added a small bow.
I then matted the panel onto slate grey card, followed by a layer of gold card before mounting the matted layers onto a black card blank.

Moving on, I added some gold stars, these are die cut from Metallic Kraft Cardstock using the Sizzix Falling Stars Thinlits Die by Tim Holtz.
I attached a selection of stars, all different sizes, to my card panel, placing a Little Things From Lucy, gold jewel in the centre of the larger stars.
Now for the wording that sits across the card and for this I used the Congrats On A Line wafer thin die set. Taking the smaller of the two dies, I cut Mixed Media Heavystock card, three separate times and then layered them and stuck them together to form one die cut, the thickness of chipboard.

To add the sparkle, I used Tim Holtz Vintage Platinum Glitter Dust. I applied a coat of Matte Collage Medium over the surface of the die cut wording and working quickly, I sprinkled the glitter over the top. Tap away the excess and left it to dry thoroughly.
After using the die once more to cut a piece of slate grey card, I layered the glittered wording over the top, slightly offsetting this to create a drop shadow behind the die cut.
I attached the wording across my balloon panel.

Finally, I added some pearl embellishments to either side of the wording. I used Fresh Water Pearlz from Buttons Galore & More and attached each pearl to cascade down either side using Matte Collage Medium.
So that completes my card for today and I hope you loved what I've created and it's inspired you with some ideas.
Thank you so much for taking the time to stop by today ~ stay safe and keep well.
Love Emma xxx

HOP DETAILS
Simon Says Stamp is giving away a $25 coupon to every stop on the hop from your blog comment section. We’ll choose your winners and post on our Simon Says Stamp blog on Wednesday, the 5th of May. Your winner can email us to claim his/her prize

HOP ORDER

Recipe for project:

Simon Says Stamp Born To Sparkle Release: Party Balloons stampCongrats On A Line Wafer Die
Simon Says Stamp products: Slate Card
Tim Holtz/Sizzix: Falling Stars
Distress Inks: Walnut Stain, Antique Linen, Speckled Egg, Broken China, Peacock Feathers and Faded Jeans

Monday, 26 April 2021

Park Life...

Hello friends...

Hope you've had a wonderful weekend and the sun has been shining for you! Can you believe we're heading towards May already? Where did the last four months go? Time sure has flown in lockdown but as we start another new week, it's time for the brand new Simon Says Stamp Monday Challenge and this week, we'd love for you to join us for our theme, ADD A QUOTE!

We all have to make a special card from time to time and last week we celebrated my Dad's birthday, and yes he was 21 again, lol!!!! So armed with Tim Holtz and Sizzix Chapter 1 and Chapter 2 releases plus an older die set thrown in, I created this card full of dimension, and layers and with a particular theme in mind. As a baby, I just never slept and my parents will tell you, I was a nightmare, lol ~ I think I aged them in those first few months of my life because if I was awake, so were they ~ doing everything they could to get me to sleep! But the one thing that my Dad always did, was sing to me and the song that he always turned too was, 'You Are My Sunshine'. Sometimes it worked...sometimes it didn't but he always hoped that this was the day, because as the quote chip says, "today is full of possibilities"!

So, let's get started and here's what I did..

Starting with the background, which is a piece of Distress watercolour card, cut to measure 10 x 16cm. I then spritzed it with a light misting of water before adding Speckled Egg, Antique Linen and Old Paper Distress Inks to my glass mat, adding a mist of water to the inks and then dipping my card in and out of the inks to pick up little pools of the individual colours on the card. Between each of the colours, I heat dried the card and re-dipped before drying the panel thoroughly with a heat gun.

After machine stitching a border around the edge of the panel, I matted it onto green card, lightly sanded with a sanding tool, or sand paper. This card is from the Cool Kraft Stack.

I mounted the layered panels using foam pads onto a piece of card, which I applied strips of design tape to around each of the four edges. If you haven't got design tape, don't worry as any of Tim's patterned papers will work with this. I matted the layers onto a panel of black card, taken from the Neutrals Kraft Stack, again sanded for more of a distressed feel, before mounting onto my black card blank.

Now that the base is ready, it's time to start die cutting and for this card I used a combination of Circle Play, Flower Field, and The Park. These are all dies by Tim Holtz for Sizzix.

Starting with the big bright yellow sun and this is from the Circle Play Thinlit die set, cut from watercolour card and coloured with a combination of Mustard Seed and Squeezed Lemonade Distress Spray Stains. 

When you cut the image of the sun, you will have two separate pieces, the rays and the centre, and because I wanted to add foam pads to the back, I placed these onto a circle of card, the same size as the circle in the centre of the rays and adhered my two pieces onto this. I then attached the sun onto my background.

Moving onto the flower field. This is cut from watercolour card, again cutting it three separate times to create a really thick die cut, resembling a piece of chipboard.

I then layered each of the pieces to create my flower field using Matte Collage Medium as my choice of adhesives. Once the medium was dry, I watercolored the image with Distress Re-inkers. Drop a small droplet of the colour onto your glass mat or onto a palette and then using a water brush, I hand coloured them. To add a few details to the centres of some of the flowers I used a black and a white fine detail pen and just created a few dots.

I attached the finished flower field along the bottom of my background panel, using foam pads that I placed on the wide bottom edge of the die cut.

I then took a Theories Quote Chip, 'Today Is Full of Possibilities'. I sanded the edges of the chip and inked them with Walnut Stain before attaching it across the bottom of my flower field die cut using Matte Collage Medium.

On either side of the chip, I adhered Hardware Heads, coloured with Mustard Seed Distress Paint.

Moving onto my gentleman from The Park, I cut him from black kraft stack card, taken from the Neutrals Kraft Stock pack. I cut this three separate times and then layered each piece to create one substantial die cut figure. I then lightly sanded the surface of the top layer before adding white pen details to highlight the buttons on his jacket.

I repeated this with the kite, also from The Park die set and again cut from black kraft card, before I then cutting the tiny little butterflies that are in the top right hand corner from gold metallic kraft stash.

Attach the silhouette and the kite using foam pads for even more dimension and height and placing him to stand on the quote chip. I then added small clumps of moss around the base of his feet.

To complete the card, I added a Specimen Remnant Rub, No. 365, 302 in the top right hand corner...

...adding the tiny gold die cut butterflies beneath it, attaching them between the number and the silhouette.

For the finishing touch, I added some small sequins, placing them around the butterflies.

Finally, I added a quote stencil chip in the top left hand corner. I cut the chip in half and clipped it to the card using a Tiny Clip.

So that's my card finished and I hope you've been inspired by the dies I've used to make it. As always, if you make anything that you've seen on my blog, then just tag me on social media or leave a comment here, I will be over as soon as I can to take a look!

Don't forget that every week, one lucky random participant has the chance to win a $25 gift voucher from Simon Says Stamp and you can join in up to 5 times, which means you could have 5 chances to winYou have until Monday 8am Ohio time. 1pm UK time, 2 pm CET to join in and good luck....


Thank you so much for taking the time to stop by today ~ stay safe and keep well.
Love Emma xxx


Recipe for project:
Tim Holtz/Sizzix: Flower Field, The Park, Circle Play
Distress Inks: Walnut Stain, 
Distress Re-Inkers: Peeled Paint, Bundled Sage, Iced Spruce, Crackling Campfire, Mustard Seed, Tumbled Glass, Picked Raspberry
Distress Spray Stains; Antique Linen, Speckled Egg, Old Paper, Mustard Seed, Squeezed Lemonade
Distress Paints: Mustard Seed

Wednesday, 21 April 2021

Funky Insects Vignette Tray

Hello everyone...

Hope you're all having a fantastic week and the sun is shining! It's been beautiful here in London over the last few days, so I think we can say Spring is finally in the air!

Today, I'm sharing the first of my projects created for Tim Holtz's Sizzix Chapter 2 live. If you missed the live, then you can catch up on replay and see all the wonderful projects from the makers HERE, together with the full collection of dies that are available within this launch!

When the box of dies arrived in the house, like many of the makers, I was immediately drawn to the Funky Insects and I knew exactly what I wanted to create and had so much fun making this project. 

So let's get started and here's how I made my Funky Insects Vignette Tray!

To begin with I covered all four raw edges of the back of the wooden tray with Tim's Design Tape to create a nice neat finish. Any design you have to hand will work, I used one with script on but unfortunately I couldn't tell you which set this came from as my tapes are so mixed up, lol!
I then moved onto covering the back and sides of the tray and for this I used silver metallic kraft stock and embossed enough panels of the card using the Circuit 3D Texture Fade to cover the surface.

For the length of the tray, you will need to cut and splice the panels together but once this is done, you won't see the join at all ~ it's cleverly hidden!

With all the embossed panels in front of me, I then started to add the colour to create a really cool metal effect and for this I used Distress Paints; Black Soot, Ground Espresso, Evergreen Bough and finally a layer of Antiqued Bronze.

I started by applying the Black Soot paint over each of the panels, by the time I've covered each of the panels, I can move onto the next step and working quickly, I took a dry paper towel and removed any excess paint that is on the panels. The paint that remains will slightly darken the metal, sit in the recesses of all the embossed detail but it shouldn't be black in colour, it should still retain some metallic sheen to the surface.

Allow for this to dry, or you can gently heat dry but be careful not to overheat the metallic card.

Next colour, Ground Espresso and using a dry brush technique, apply the paint over the previous paint layer just allowing the paint brush to kiss the metallic card, don't go in too heavy as it will become a solid block of colour. Repeat the process by applying each individual paint colour, gradually building up the layers, adding different paints to different areas to create colour variations and depth to the metallic surface but always remembering to dry between each layer as you don't want a muddy mess. If at any point you feel you need more of any of the paints, just reapply and repeat the process and remember the mica in the Antiqued Bronze paint will always help to maintain the metallic shimmer which will shine through.
Once I was happy with the coverage, I cut the panels to size and adhered them to the sides...
...and back of my tray. To cover and mask the join across the back, I added a strip over the top which just neatens up the look.
With the tray covered, I wanted to add some rusty crusty goodness and for this I applied Translucent Grit Paste using my fingers and/or a palette knife to apply the paste along the edges and over areas of the metal.
Once the paste was dry, I then started to add more paint layers but this time I used Rusty Hinge, Vintage Photo, Antiqued Bronze and Black Soot and applied the paint with a fine detail paint brush. To complete the box, I used a little gilding wax, which I lightly applied over the raised areas of embossing and paste to accentuate all the detail.
So the outside of the box is ready, now for the inside and I began by covering the raw edges using Design Tape, folded over onto the inside and just adhered with a little Matte Collage Medium to secure it in place.
For the background and sides on the inside of the tray I used Distress Watercolor Card.

Taking the card, I inked up the Tapestry background stamp using clear embossing ink and stamped randomly onto the cardstock. For this particular background, I don't stamp the whole image, I stamp a partial image to create more of worn effect.

I then applied Speckled Egg Distress Glaze over the ink, tapped away the excess and heat embossed.

Once all the stamped areas were embossed, I misted the card with water, then spritzed the background with Antique Linen and Old Paper Distress Spray Stains, adding just a touch of Frayed Burlap into the mix.

After gently heat drying the card, I stamped some script onto the open areas of the background inking the calligraphy stamp from The Poinsettia stamp set with Black Soot Archival Ink.

I then cut the background card into panels to fit the sides and back of my tray, before inking the edges with Frayed Burlap and Walnut Stain Distress Ink and stamping a number from the Field Notes stamp set in , using Barn Door Archival Ink and placing it in the top right hand corner of the large back panel.
Attach the side panels, together with the panels along the top and bottom using Matte Collage Medium and after machine stitching a border around the edge of the back panel, I attached this into place.
Around the edge on the inside of the box, I used Mummy Cloth. I dyed the cloth with Pumice Stone and Frayed Burlap Distress Spray Stain and once it was thoroughly dry, I pulled  the cloth apart to create a looser weave and attached it around the edge of the tray with Matte Collage Medium.
To complete the tray, I added some Hardware Heads, altered with a little Picket Fence, Rusty Hinge and Black Soot Distress Paint, and placed two down each side.
We now have a completely covered box ready to house those gorgeous Funky Insects...

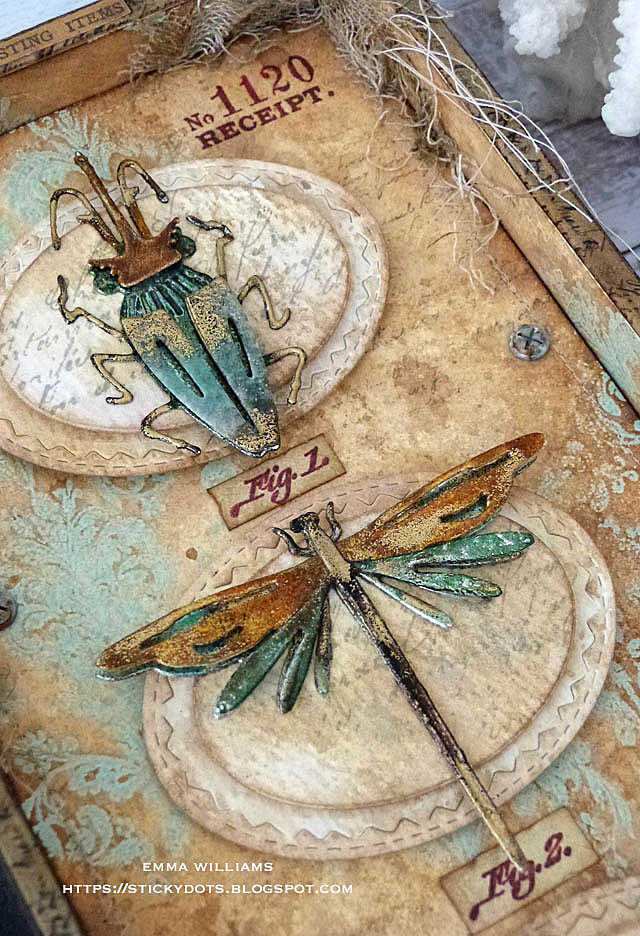
To begin with I cut the oval layers. Each of the three layers are cut from watercolour card, inked with Antique Linen and Old Paper Distress Spray Stains using a combination of the older Stitched Ovals dies, that I have in my stash, and the new Stacked Oval Tiles. Once the ovals were cut, I stamped the smaller Stacked Oval Tiles with the calligraphy stamp that I used on the background and then layered them over the top of the larger die cut using foam pads.

I then placed them down the centre of my tray, again using foam pads to adhere them into place.

I used three of the bugs from the Funky Insect set ~ the beetle, dragonfly and bee and to begin with I was going to just watercolour these to make them look realistic but I decided that I wanted to make them just a bit edgier and carrying on the metallic theme, the lightbulb moment struck and I made them from metallic kraft stash. What is fun with this technique is that each time you make a bug it will be totally individual, you will never get them to look exactly the same but this is how I built up the colour.

Using all the dies that are needed to complete one insect, I cut each from silver metallic kraft card.

Now to create that effect and for this I used a combination of Distress Embossing Glaze and embossing powders.

Beetle...
Body; CRACKED PISTACHIO and gold embossing powder.
Head and legs; FIRED BRICK, RUSTY HINGE, WALNUT STAIN and gold embossing powder.
Final layer; WALNUT STAIN

Dragonfly...
Body, Wings; CRACKED PISTACHIO, HICKORY SMOKE, FIRED BRICK, RUSTY HINGE and gold embossing powder.
Final layer; WALNUT STAIN

Bee...
Body and legs; FOSSILIZED AMBER, RUSTY HINGE, HICKORY SMOKE, black and gold embossing powder.
Wings: SPECKLED EGG
Final Layer; WALNUT STAIN

Using the embossing dabber, dab the ink over the surface of each individual piece of each of the three die cut insects and using all the glazes, except Walnut Stain and the gold embossing powder, apply the powders, one by one. If there are areas you want to accentuate with different colours, apply the dabber or an embossing pen to those individual areas and then apply the glaze over the top. Gently heat emboss the glaze between each layer and just play, building up the colour and once I was happy, I added a hint of gold. Once again apply the embossing dabber ink to the surface and then sprinkle a very small amount of the gold embossing powder over the top...you don’t want or need a lot as this is just to add highlights, not a block colour! Once I had melted the gold powder with heat and achieved the colours I wanted for each bug, I then applied a final layer of embossing dabber and just a very light sprinkle of Walnut Stain glaze. I brushed away the majority of this, so you just see hints of the powder speckled onto the surface. I then gave a final blast of heat to melt the darker glaze into the previous molten layers of powders.

With all the pieces ready, I layered them to create each of the bugs, shaping their bodies and wings to create dimension.

Attach each of the bugs onto the oval tiles and underneath each of them, I stamped a Fig #...1, 2 and 3 from the Field Notes stamp set. I just stamped these on small inked offcuts of card using Barn Door Archival Ink and then attached them underneath.
We're nearly there and all that's left is details...

A Clippings Sticker, 'Interesting Items' is placed along the top of the box....
...and finally the handle on the side, which is altered using Evergreen Bough, Rusty Hinge, Vintage Photo, Picket Fence Ground Espresso and Antiqued Bronze Distress Paints. 
I then attached the handle onto the side, before dangling a Typed Token, 'Lost & Found' and a Factory Tag from a Swivel Claps, again all of which are altered with the same colours of Distress Paints. Attach the handle with Matte Collage Medium.
So, that's my first project for the Sizzix 2021 Chapter 2 release and I hope you've enjoyed the creative process and all the tips and techniques I used to make this tray.
As always, I want to thank Tim, Mario and Paula for inviting me to create projects for this amazing release and thank you to everyone for all your lovely comments about my makes, they are always appreciated and I can't wait to see how you'll be inspired by this tray!

Thank you so much for taking the time to stop by today ~ stay safe and keep well.
Love Emma xxx

Recipe for project:

Sizzix/Tim Holtz Dies: Funky InsectsStacked Oval Tiles, Circuit 3D Texture Fade, Stitched Oval Dies from my own stash
Distress PaintAntiqued Bronze, Black Soot, Evergreen Bough, Rusty Hinge, Ground Espresso, Picket Fence and Vintage Photo
Distress Embossing Glaze - all colours used for the insects are listed above in the step by step.
Embossing Powder: Simon Says Stamp Black and Gold
Distress Inks: Walnut Stain and Frayed Burlap
Stampers Anonymous: The Poinsettia, Field Notes, Tapestry

Powered By Blogger

Total Pageviews