
Hello friends...
Hope you've all had a good start to the new week and you're enjoying Tim Holtz's Halloween Inspiration Series and been inspired by all the wonderful projects that have been shared by some very talented designers! You can catch up with all the projects over on Tim's Facebook and Instagram pages.
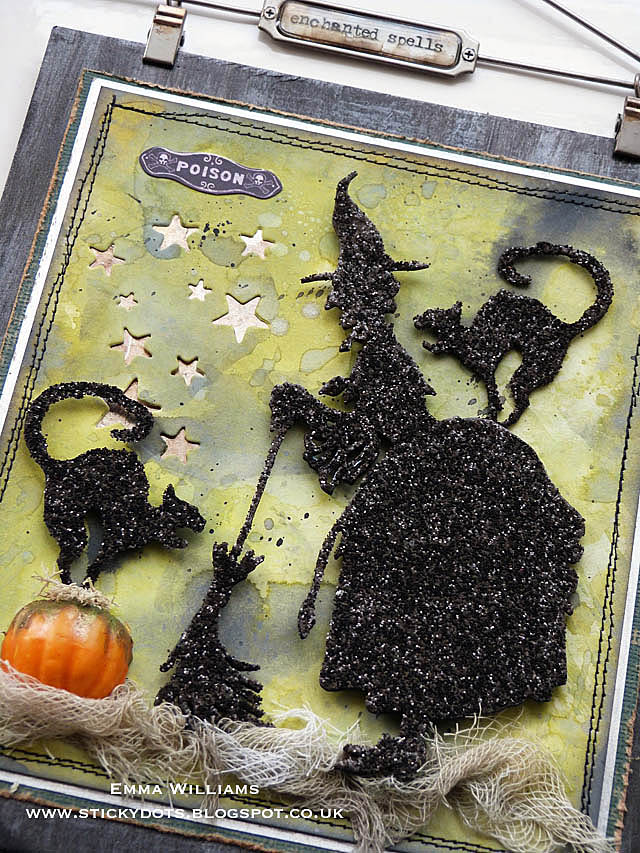
Today, I'm sharing my Wicked project ~ a wallhanging that would be perfect to display amongst all your Halloween decorations and at the end of the post, I will include a list of ingredients I've used to create this piece and I hope you'll be inspired by some of the tricks and treats along the way that can be used on your projects, whether they are home decor or cards...
So, here we go...the creative cauldron is bubbling and here's how I created this project!


To get that gorgeous wicked green background colour, I used Distress Oxide Ink Pads and applied a combination of Peeled Paint, Twisted Citron and just a touch of Iced Spruce to my craft sheet. Mist the ink with water and then taking your panels of card, swish the card through the inks, picking up the colour. Heat dry the inked card and if you need to pick up more colour from the sheet, go back into the ink, to layer the colours of ink.
Once I was happy with the colour, I heat dried the card thoroughly and then inked the edges with Black Soot Distress Ink.
Taking the larger piece of card and using the stars from the Witchcraft die, place the die in the top left hand corner of the card and run it through the machine to cut the stars into the card.
Machine stitch a 'wonky' border around the outside of each panel of inked card and then matt the card onto metallic kraft stash. The die cut stars on the larger piece of card, now shine through.

Die cut the witch and two separate images of the cat from black card and run the die cut images through a Xyron machine, applying a layer of the adhesive to the side that you want uppermost ~ as you can see from the picture below, I reversed the die cut of the two cats, so that they face opposite ways! Sprinkle the images with Black Soot Distress Glitter and tap away the excess.

For the lower panel, I used the Wicked die from the Vintage Spirits die set and again cut the wording from black card. I then used the same technique to emboss the lettering as I used on the Ornate Owl in this post, click HERE.

To complete the smaller panel, I attached the stars that were originally cut from the large piece of green card and used Collage Medium to secure them into place.
Finally, I punched two holes into the bottom of the large panel and two holes in the top of the small panel, aligning the holes on each of the panels so that they would hang straight. I added the mini book rings through the holes, joining the separate panels together.

As a finishing touch, I used one of Tim's Display Hangers, clipped it to the top and then used a Remnant Rub, "enchanted spells" to complete the wall hanger.

Thanks so much for stopping by today and thank you to everyone who has taken their time to leave me a comment on all the recents shared posts...it means so much to me to read them all!
See you soon...Emma x
Recipe for project:
Tim Holtz/Sizzix Dies: Witchcraft, Vintage Spirits
Distress Oxide Ink: Peeled Paint, Twisted Citron, Iced Spruce
Distress Paint: Black Soot, Brushed Pewter
Distress Spray Stain: Pumice Stone, Antique Linen
Idea-ology: Pumpkin Pieces, Mini book Rings, Halloween Ephemera, Display Hanger, Halloween Remnant Rubs
Black Soot Distress Glitter
Black Soot Distress Glitter
Surfaces: Metallic Kraft Stock, Black Card, Classic kraft Stash, Mixed Media Heavyweight Card
Ranger Foam Tape
Ranger Foam Tape
Cheesecloth and chipboard from my own stash


