Showing posts with label steampunk. Show all posts

Monday, 8 January 2024

Wheels Of Time....

Hello friends and welcome to this week's Simon Says Stamp Monday Challenge.

This week's theme is all about Things With Wheels and whatever you choose to use, we can't wait to see how you'll interpret it with all of your makes.

For my make, I was inspired by Doctor Who and the "Wheels Of Time" and I created a project using Tim Holtz products, including idea-ology, Stampers Anonymous and Sizzix to begin this time travellers adventure!

So let's get started, the clock is ticking and it's time to turn those wheels...


PANEL

This make uses the larger sized Rectangular Etcetera Panel and I began by painting the raw edges of the panel with Black Soot Distress Paint, and once dry, I then applied Design Tape along the top and bottom of the panel. The tape I used has a clock design, and is one of Tim's older designs.

The background consists of a combination of a panel of design paper featuring the Watch and Clockwork wording from the Backdrops 2 pack and a selection of Collage Strips, which I cut down and placed down the right hand side and along the bottom.

I cut the panel so that it would fit on the left hand side of my panel, it measures approx 14cm square. When you see the original piece of paper, you will notice that the wording runs in a line, but I cut my panel into two separate pieces, cutting away the 'watch and' section and then stitching it back onto the 14cm paper panel, but this time attaching it so that it runs up the left hand side.

In the top right hand corner of the paper panel, I added a Remnant Rub ~ "*5-2410".

After adding a few rips and tears around the edges and also machine stitching a border, I adhered the paper onto my Etcetera panel using Collage Medium.

I selected some Collage Strips, all of which have something to do with travel or time, and I adhered these down the side and across the bottom section of the panel and then applied a coat of the collage medium over the entire panel to seal it.

In amongst the collage strips, I attached a Quote Chip Label ~ 'When Nothing Is Sure Everything Is Possible'. This fit perfectly with the strips and I after sanding and inking the edges, I attached it.

I then used the Walnut Stain Distress Crayon, which I scribbled over the surface of the paper panel and the collage strips before blending the colour with a semi dry wipe, moving the crayon around to sink into all those cut lines and add some definition around the ripped and torn edges.

To complete the background, I used the splatter brush to flick Black Soot Distress Paint across the surface and left this to dry.

Sitting across the panel, where the paper and the collage strips join, is a Ruler Piece. This fits the width of the panel perfectly and I just darkened the wood with Walnut Stain Distress Ink, before attaching it into position with Matte Collage Medium.

The final touch for the background is a Typed Chip, with the letter 'T', which I attached at the top, to overhang the top of the panel.

CLOCK

We can now move onto creating that beautiful die cut clock.

The Timekeeper Bigz Die is one of Tim's older dies and I used it to cut three separate layers of chipboard and a final top layer of Woodgrain Cardstock ~ cutting each layer one at a time before adhering and layering the die cuts over one another to form a substantial die cut piece.
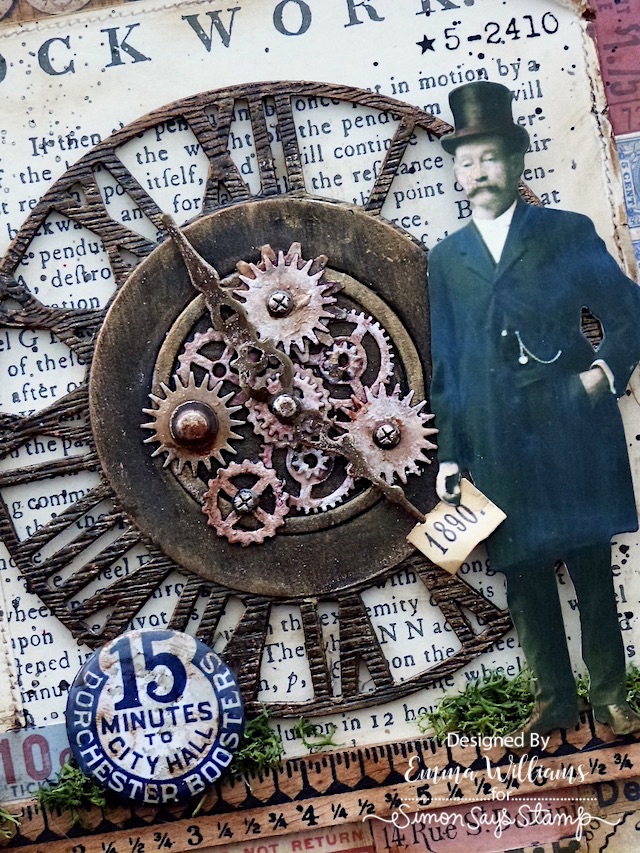
This die does have an open centre, you just pop out the circle which contains the hands but I didn't remove it, and left it in place in the centre of the clock to form a base for my next layer using the Steampunk Parts Bigz die.

Once again, I cut the both the large circle, and the smaller outline circle that are both on this die from chipboard and then attached it to the centre of my clock, and as before I kept the inner circular piece in position, so that it forms a solid base.

With my clock complete, I then painted it with a combination of Distress Paints:

Black Soot, Walnut Stain and Antiqued Bronze.

I began with Walnut Stain, then gently dried the paint surface before dry brushing Black Soot and Antiqued Bronze over the top. If you feel that you apply any paint layer too heavy, and the paintwork become dark, then just knock it back with the paler colour ~ either the gold or walnut stain.

Once I was happy with the finish of my clock, I attached it to the panel with foam pads.

COGS and WHEELS

In the centre of the clock, I used a selection of Sprocket Gears and Mini Sprocket Gears and altered the surface of the metal with a combination of Statue and Sterling Foundry Wax and Distress Paints.

Beginning with the Statue Foundry Wax, I applied this direct to the surface and then heat set the wax. I then repeated the process with Sterling Foundry Wax, but this layer doesn't need to be a solid coverage, you still want the previous layer to show. Heat set the wax and then using a paint brush, stipple the surface with a combination of Black Soot and Burnt Sienna Acrylic Paint to create the rusty finish to each piece.

Attach the cogs in the centre of the clock using Matte Collage Medium and layering them to form different heights.

I added Hardware Heads and a Hitch Fastener to the centres of cogs before attaching the clock hands. All these pieces are altered using the same technique as I used to alter the cogs themselves.

PAPER DOLL

I chose this paper doll because he just fitted the whole piece so well and colour tinted him with Distress Crayons:

Faded Jeans on his coat, Gathered Twigs on his trousers and shoes, Black Soot on his hat and Tea Dye and Aged Mahogany for his skin tones.

I attached him to the right hand side of the clock, building up foam pads on the back to make him dimensional and then placed a Numbers Snippet, that I slightly cut down in size, and popped this into his hand, so he appears to be holding it.

To add some texture, I attached small clumps of moss along the ruler piece.

We're nearly there and all that's left is the details...

DETAILS

I added a Vintage Flair piece in on the left of the clock face, which I altered with a touch of Mushroom Alcohol Ink and Walnut Stain Distress Crayon.

I then attached Long Fasteners to each corner. I cut the legs of each brad, so that they will have a flat back and then attached them with a dot of Collage Medium to secure them into position.

I finally clipped a Hinge Clip to the side of my project, which I had sitting on my desk...I had made this for a previous project but didn't use it and once again, altered the metal in using the same technique as I used on all the other metal work on this piece.

I hung a Hook Clasp from the clip, complete with Thought Token ~ 'Go+See+Explore' that I attached to the end.

...and that completes my project for this week and I hope you love the techniques I've used and the inspiration behind the piece,

As always, if you make anything, or if you've been inspired by anything that you've seen here on my blog ~ then please, let me know by tagging me on social media or leaving a comment here and I will be right over to take a look!

Don't forget that every week, one lucky random participant has the chance to win a $25 gift voucher from Simon Says Stamp and you can join in up to 5 times, which means you could have 5 chances to winYou have until next Monday at 8am Ohio time. 1pm UK time, 2 pm CET to join in and good luck....


Thank you so much for taking the time to stop by today...Love Emma xxx

Monday, 9 January 2023

Shake, Rattle and Roll...

Happy Monday friends...

Hope you've all had a wonderful start to 2023 and you're ready for the second Simon Says Stamp Monday Challenge of the new year! This week our theme is called Shake It Up. So whether you decide to make shaker cards and projects, or have something completely different in mind that fits the theme, then we can't wait to see what you create and hope you'll join us!

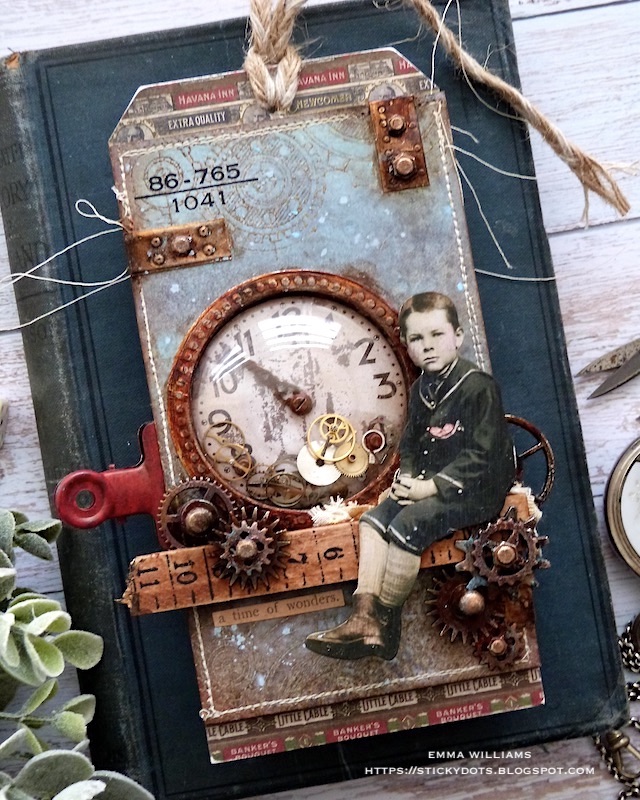
For my project, I decided to create a shaker, or as Tim says, a "shakety shake" tag but because I'm not a huge fan of sparkly things, I went down the steampunk route and used Tim Holtz and Sizzix products to bring this story to life!

 So let's get started and here's how I created my shaker project and apologies for the reflections on the dome ~ my camera, shiny surfaces and UK weather, were all against me and not a match made in heaven this week!


To begin with I used a Size 8 Etcetera tag and covered the tag with a panel of the Cigar Box Trims design paper from the Etcetera Paper Stash, adhering the paper with Matte Collage Medium and trimming away any excess overhang.

INKED SHAKER PANEL

Now to create the shaker panel, and for this I cut a piece of Heavystock Mixed Media Card to measure. 8 x 13cm. I misted water onto the card panel and then to colour it, I spritzed the following combination of spray stains and oxide sprays:

Spray Stains; Ground Expresso, Speckled Egg, Antique Linen, Frayed Burlap

Oxide Sprays; Speckled Egg, Tumbled Glass

After a light misting of water, I allowed the panel to dry before flicking Speckled Egg Oxide Spray across the surface.

At the top and bottom of the panel, I added some very subtle stamping using the gears stamp from the Observations stamp set. I inked the stamp with clear embossing ink and then sprinkled Walnut Stain Distress Glaze over the top. After tapping away the excess, I heat embossed the powder until molten.

Ink the edges of the panel with Walnut Stain Distress Ink and then machine stitch a border around the outside edge.

CREATING THE DOME

To create the aperture, I used a 2" circle die from my stash. This die is by Sizzix but I'm sure SSS stock plenty of circle dies that will be the same size and can be used.

I placed the die on the left hand side of my panel and ran it through the die cutting machine. Place a 2" Sizzix Dome behind the aperture. These domes are self adhesive on one side, but I always attach the upper side to my card to ensure it's completely sealed. Place foam pads on the back of the panel.

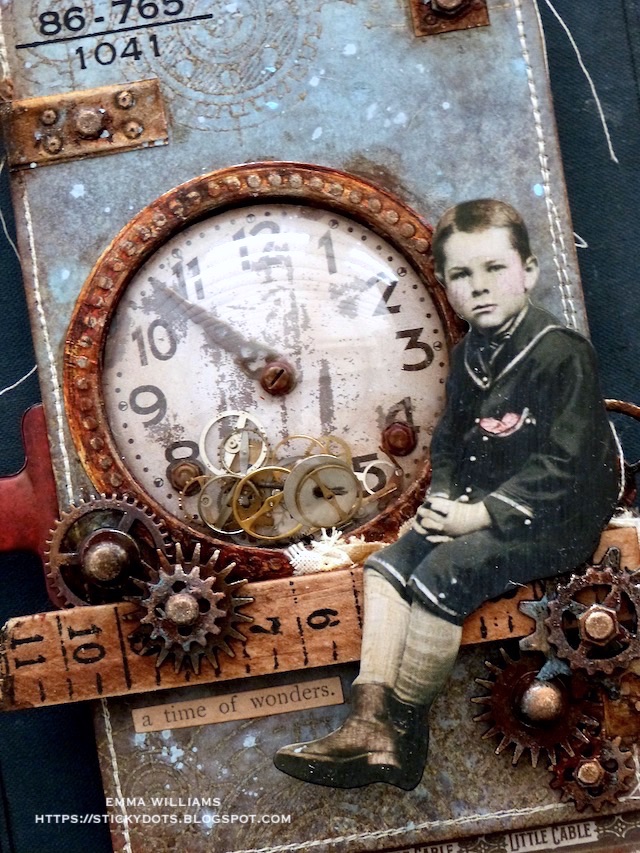
Behind the dome, I used a clock from the Tim Holtz idea-ology Urban Layers pack. I added a clock hand and some hardware heads to the clock face before I attached the piece directly onto my covered tag, making sure it will be aligned with the dome and panel that fits over the top.

I then added some old watch parts that I've had in my stash for a while and just added a selection in the centre of the clock face.

Place and adhere the dome and panel over the top, sealing those tiny watch parts inside the dome itself.

I now have my shaker but wanted to add a frame around the edge of the dome and for this, I used the Sizzix Seal Switchlit Die and Embossing folder to cut a piece of silver metallic kraft card.

I then placed the same 2" circle that I used before centrally inside the circle and ran this through my cutting machine to create the frame.

I applied Crackling Campfire, Black Soot and Ground Espresso Distress Paints over the top to create a rusty colour to the metal and then attached to frame my dome.

CREATING THE SCENE

Now to bring the scene to life and to begin with I colour tinted my paper doll using Distress Crayons and a water brush. I always add a coat of clear gesso to my doll to prime the surface before adding the colour.

Setting the coloured doll to one side, I took a ruler piece and broke the end of it before swiping Walnut Stain over the surface. I used a baby wipe to blend the colour into the wood before I picked a selection of various sizes of Sprocket Gears that I painted with the same Distress Paint colours as I used on the frame around the dome.

After attaching the ruler underneath the clock face using foam pads, I sat the paper doll on the right hand side of the clock, placing him to sit on torn pieces of linen. I then arranged the sprocket gears to cascade around the ruler and the paper doll. In the centres of the gears, I added Hitch Fasteners and Hardware Heads, all painted with the same paints as before.

DETAILS

To complete the tag, I added tiny offcuts of metal that I had leftover from a previous project. These are cut from metallic kraft stash that are embossed using the Foundry 3D folder and coloured with the same paints as I've used throughout the project.

I attached the offcuts to the background panel, and then added hardware heads to each piece before adding a Labelled Remnant Rub number in the top left hand corner.

To complete the panel, I threaded some rope through the hole in the top of the tag...

...before I painted a large Hinge Clip with Candied Apple Distress Paint and clipped this to the left hand side of my tag.

For the very final details, I added a Clippings Sticker, "a time of wonders' and placed this in the bottom left hand corner of the tag.

So that completes my project for this week, and I hope you've loved the piece I've made and it's given you inspiration to "Shake It Up".

As always, if you make anything, or if you've been inspired by anything that you've seen here on my blog ~ then please, let me know by tagging me on social media or leaving a comment here and I will be right over to take a look!

Don't forget that every week, one lucky random participant has the chance to win a $25 gift voucher from Simon Says Stamp and you can join in up to 5 times, which means you could have 5 chances to winYou have until next Monday at 8am Ohio time. 1pm UK time, 2 pm CET to join in and good luck....


Thank you so much for taking the time to stop by today ~ stay safe and keep well.
Love Emma xxx

Recipe for project:

Tim Holtz for Stampers Anonymous: Size 8 Etcetera Tag, Observations
Distress Paints: Ground Espresso, Crackling Campfire, Black Soot, Candied Apple
Distress Spray StainGround Expresso, Speckled Egg, Antique Linen, Frayed Burlap
Distress Oxide Sprays: Speckled Egg, Tumbled Glass
Distress Inks: Frayed Burlap, Walnut Stain

Monday, 21 September 2020

Caution Beware ~ 286

Happy Monday everyone...

It's that time of the week again and that means the brand new Simon Says Stamp Monday Challenge has just begun and this week our theme is STEAMPUNK. So, it's time to put your steampunk hats on and hope come join us because we can't wait to see what you create using this fun theme as your inspiration.

For my project, I created a Size 8 Etcetera tag, all about the steampunk beetle, specimen no.13 and used plenty of products from Tim Holtz, Sizzix, Stampers Anonymous and Ranger Ink to tell the story of this deadly creature that creates havoc to all those who cross his path when it wakes in the dead of night...

Click on any photo to enlarge them and see all the details!


So, let's get started and here's how I created this piece!

To begin with I took one of Tim's Distress Heavystock Mixed Media Size 8 Tags to use as my background and after lightly spritzing it with water, I added the following Distress Sprays; Speckled Egg, Ground Espresso and Antique Linen. Layer the sprays to add colour and then give another light misting of water to blend the colours together and either set aside to dry or if you're like me, then give a quick blast of heat to dry.

I then spritzed Speckled Egg Oxide Spray over the top of the inked tag before adding a little more of the Speckled Egg Distress Spray. Once dry, I wanted to add some more layers and for this used a combination of stamps and stencils. I took the Script Mini Stencil from Set 49 and using Vintage Photo Oxide Ink, inked through the stencil using an applicator tool.

I then added some text from the Dearly Departed set over the top of the stencilled areas using Black Soot Archival Ink before a final layer of stamping using the splatter stamp from the Examination set and for this I stamped in clear embossing ink before sprinkling the stamped areas with Weathered Gold Wow embossing powder and heat embossing the powder until it melts.

The final stamp imagery is taken from the Examination set and I stamped the wording Identification Check in the bottom left hand corner.

After inking the edges with Walnut Stain Distress Ink I added a machine stitching a border using black cotton and then adhered the tag to my Etcetera Tag. I've used this because I want the tag to be substantial to hold the arrangement of gears that I'll be adding...

...and for these I used the Industrial L Bigz die to die cut some thick chipboard. This die is one of Tim's older dies and has been available from SSS but after I made this piece, I realised it's currently unavailable. But I'm sure many of us Tim Holtz addicts already own this or another of Tim's gears die, and if you don't, then don't worry as there are alternatives ~ I would recommend you can use either Gadget Gears and Sprocket Gears from Tim's idea-ology range or even this die from Spellbinders. Also, why not try cutting circles using Tim's Stacked Circles die set.

Once I had all my die cuts, 14 in total ~ I applied some Translucent Grit Paste over small areas of each of the gears, allowed the paste to dry and then painted them all with Black Soot Distress Paint. After allowing for the paint to dry, I then layered my paint colours to create the rusty, crusty goodness. I used Rusty Hinge, Antiqued Bronze, Evergreen Bough, and Ground Espresso and between each layer of paint, I always let them dry before adding the next as you don't want to end up muddying your colours. To add the final layer of colour, I used Metallic Distress Crayons and just gently applied the crayon over the top, before blending out any harsh lines with my fingers.

When I was happy with the look of each piece, I then arranged and layered all but one of the gears to cascade down the right hand side of my tag, using foam pads and Matte Collage Medium to adhere them into place. 

As a final detail to the gears, I added some Hardware Heads to some of them, applying the Distress Paints over the top to colour the silver metal.

Now for the focal point and for this I used the largest beetle from the idea-ology Entomology Adornments. To colour the metal I painted it with Alcohol Pearls in Envy, Tranquil and Mineral and then placed the beetle over the top of the remaining die cut gear.


The gear is then sat over the top of two small pieces of mica sheets which I've had in my stash for years and years ~ in fact it was one of the first crafty pieces I bought. I layered two pieces of the mica over the top of one another and then placed the bug on the gear over the top. I then added three Hardware Heads to the mica sheets to create the look of them being screwed onto the tag.


Now for all the finishing touches ~ I added a poison snippet ephemera piece above the Identification Check stamp, together with a star adornment.

In the top left hand corner, I placed the No 13 which I cut from Tim's Halloween Label Tape.

Finally, I used a Swivel Clasp and hung a spider charm from the Halloween Adornments, a Halloween Token ~ 'Caution Beware" and a sprocket gear. I also added some tiny offcuts of metal that I embossed with the Foundry 3D Texture Fade and had left over from a previous project and as they were sitting on my desk, I thought why no ~ they just added that finishing touch.

After placing a Machinery Head in the bottom right hand corner, altered with Rust and Pitch Black Alcohol Inks, I added a Prima Metal Mini Hardware piece in the opposite corner.

...and that's my tag complete and my project for this week finished! I hope you've enjoyed the creative process behind this piece and I've inspired you with the tips and techniques I've used! It was definitely fun to create and if you're not a huge fan of Halloween, then this is idea as I think it's got a nod to the dark side but not full on creepy!

Don't forget, if you would like to see more inspiration from my talented teamies over on the challenge blog and every week, one lucky random participant has the chance to win a $25 gift voucher from Simon Says Stamp and you can join in up to 5 times, which means you could have 5 chances to winYou have until Monday 8am Ohio time. 1pm UK time, 2 pm CET to join in and good luck....


Thank you so much for taking the time to stop by today ~ stay safe and well, and see you again soon, love Emma xxx

Recipe for project:


Tim Holtz/Stampers Anonymous: Dearly Departed, Examination, Mini Stencil Set 49, Size 8 Etcetera Tag
Tim Holtz/Sizzix: Industrial Bigz L Die
Distress Paint: Black SootAntiqued BronzeRusty Hinge, Evergreen Bough, Ground Espresso
Distress Spray Stain: Speckled Egg, Antique Linen, Ground Espresso
Distress Oxide Spray: Speckled Egg
Distress Ink: Walnut Stain
Oxide Ink: Vintage Photo
Powered By Blogger

Total Pageviews