
Hello friends and welcome to this week's Simon Says Stamp Monday Challenge.
This week's theme is all about Things With Wheels and whatever you choose to use, we can't wait to see how you'll interpret it with all of your makes.
For my make, I was inspired by Doctor Who and the "Wheels Of Time" and I created a project using Tim Holtz products, including idea-ology, Stampers Anonymous and Sizzix to begin this time travellers adventure!

So let's get started, the clock is ticking and it's time to turn those wheels...


PANEL
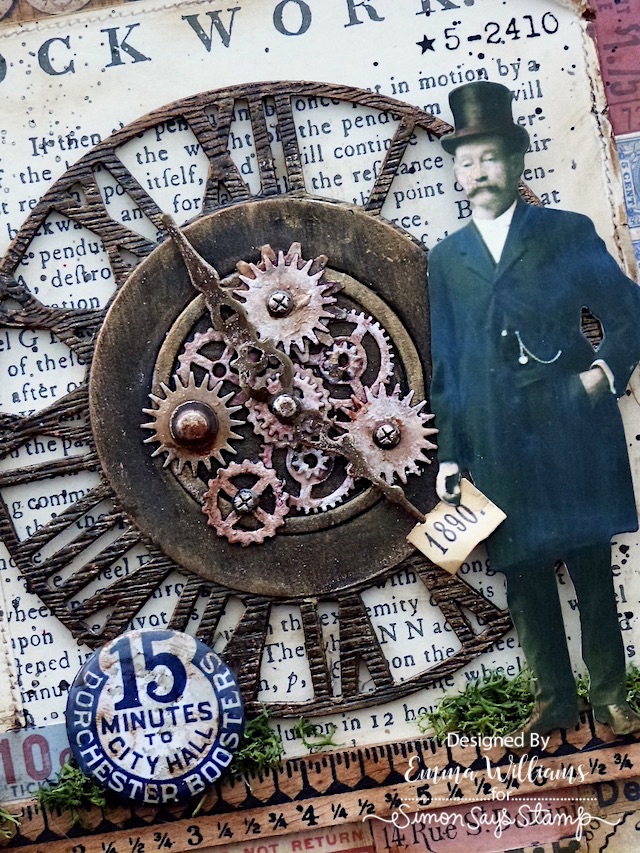
This make uses the larger sized Rectangular Etcetera Panel and I began by painting the raw edges of the panel with Black Soot Distress Paint, and once dry, I then applied Design Tape along the top and bottom of the panel. The tape I used has a clock design, and is one of Tim's older designs.

The background consists of a combination of a panel of design paper featuring the Watch and Clockwork wording from the Backdrops 2 pack and a selection of Collage Strips, which I cut down and placed down the right hand side and along the bottom.
I cut the panel so that it would fit on the left hand side of my panel, it measures approx 14cm square. When you see the original piece of paper, you will notice that the wording runs in a line, but I cut my panel into two separate pieces, cutting away the 'watch and' section and then stitching it back onto the 14cm paper panel, but this time attaching it so that it runs up the left hand side.

In the top right hand corner of the paper panel, I added a Remnant Rub ~ "*5-2410".

After adding a few rips and tears around the edges and also machine stitching a border, I adhered the paper onto my Etcetera panel using Collage Medium.
I selected some Collage Strips, all of which have something to do with travel or time, and I adhered these down the side and across the bottom section of the panel and then applied a coat of the collage medium over the entire panel to seal it.


In amongst the collage strips, I attached a Quote Chip Label ~ 'When Nothing Is Sure Everything Is Possible'. This fit perfectly with the strips and I after sanding and inking the edges, I attached it.

I then used the Walnut Stain Distress Crayon, which I scribbled over the surface of the paper panel and the collage strips before blending the colour with a semi dry wipe, moving the crayon around to sink into all those cut lines and add some definition around the ripped and torn edges.
To complete the background, I used the splatter brush to flick Black Soot Distress Paint across the surface and left this to dry.
Sitting across the panel, where the paper and the collage strips join, is a Ruler Piece. This fits the width of the panel perfectly and I just darkened the wood with Walnut Stain Distress Ink, before attaching it into position with Matte Collage Medium.
The final touch for the background is a Typed Chip, with the letter 'T', which I attached at the top, to overhang the top of the panel.

CLOCK
We can now move onto creating that beautiful die cut clock.
The Timekeeper Bigz Die is one of Tim's older dies and I used it to cut three separate layers of chipboard and a final top layer of Woodgrain Cardstock ~ cutting each layer one at a time before adhering and layering the die cuts over one another to form a substantial die cut piece.
This die does have an open centre, you just pop out the circle which contains the hands but I didn't remove it, and left it in place in the centre of the clock to form a base for my next layer using the Steampunk Parts Bigz die.
Once again, I cut the both the large circle, and the smaller outline circle that are both on this die from chipboard and then attached it to the centre of my clock, and as before I kept the inner circular piece in position, so that it forms a solid base.

With my clock complete, I then painted it with a combination of Distress Paints:
Black Soot, Walnut Stain and Antiqued Bronze.
I began with Walnut Stain, then gently dried the paint surface before dry brushing Black Soot and Antiqued Bronze over the top. If you feel that you apply any paint layer too heavy, and the paintwork become dark, then just knock it back with the paler colour ~ either the gold or walnut stain.
Once I was happy with the finish of my clock, I attached it to the panel with foam pads.
COGS and WHEELS
In the centre of the clock, I used a selection of Sprocket Gears and Mini Sprocket Gears and altered the surface of the metal with a combination of Statue and Sterling Foundry Wax and Distress Paints.
Beginning with the Statue Foundry Wax, I applied this direct to the surface and then heat set the wax. I then repeated the process with Sterling Foundry Wax, but this layer doesn't need to be a solid coverage, you still want the previous layer to show. Heat set the wax and then using a paint brush, stipple the surface with a combination of Black Soot and Burnt Sienna Acrylic Paint to create the rusty finish to each piece.
Attach the cogs in the centre of the clock using Matte Collage Medium and layering them to form different heights.

I added Hardware Heads and a Hitch Fastener to the centres of cogs before attaching the clock hands. All these pieces are altered using the same technique as I used to alter the cogs themselves.

PAPER DOLL
I chose this paper doll because he just fitted the whole piece so well and colour tinted him with Distress Crayons:
Faded Jeans on his coat, Gathered Twigs on his trousers and shoes, Black Soot on his hat and Tea Dye and Aged Mahogany for his skin tones.
I attached him to the right hand side of the clock, building up foam pads on the back to make him dimensional and then placed a Numbers Snippet, that I slightly cut down in size, and popped this into his hand, so he appears to be holding it.

To add some texture, I attached small clumps of moss along the ruler piece.
We're nearly there and all that's left is the details...
DETAILS
I added a Vintage Flair piece in on the left of the clock face, which I altered with a touch of Mushroom Alcohol Ink and Walnut Stain Distress Crayon.

I then attached Long Fasteners to each corner. I cut the legs of each brad, so that they will have a flat back and then attached them with a dot of Collage Medium to secure them into position.
I finally clipped a Hinge Clip to the side of my project, which I had sitting on my desk...I had made this for a previous project but didn't use it and once again, altered the metal in using the same technique as I used on all the other metal work on this piece.

I hung a Hook Clasp from the clip, complete with Thought Token ~ 'Go+See+Explore' that I attached to the end.

...and that completes my project for this week and I hope you love the techniques I've used and the inspiration behind the piece,

Don't forget that every week, one lucky random participant has the chance to win a $25 gift voucher from Simon Says Stamp and you can join in up to 5 times, which means you could have 5 chances to win. You have until next Monday at 8am Ohio time. 1pm UK time, 2 pm CET to join in and good luck....


Recipe for project:


Wauw this looks like a piece of art to me. I love it.
ReplyDeleteGreetings Miranda
Dr Who and Tim! great combination. thanks as always for sharing and all the inspiration.
ReplyDelete