
Hello everyone and Happy Monday...
This week's brand new Simon Says Stamp Monday Challenge is all about one of my favourite times of the year ~ Halloween and we want you to create a project inspired by this spooktacular event.
Now as regular friends and followers of this blog already know, I've been in Halloween making mode since June and as we now count down the final days, I have two more projects to share and this is the first of them!
I thought for this week's make it would be fun to create a menu for those Halloween parties and get togethers because, let's face it...after two years of lockdowns and celebrating in bubbles, it's time to break open those elixir bottles and celebrate in style. So with this in mind, I chose to go back into Tim Holtz's vault and use the Sizzix Halloween Vault die to create my project for this week and of course, no Halloween scene is complete without a big moon in the background ~ I hope you love it!


To begin with I used a 14.5 x 19cm black card blank, matted with a panel of black card that I spritzed with Iron Gate Mica Spray Stain. This just added a shimmer to the card, which I thought looked perfect behind the scene that I'm about to create.

CARD BACKGROUND and MOON
I'm continually asked about how I create the moons on the backgrounds of my cards and so for all those, who have been requesting it, this one's for you!

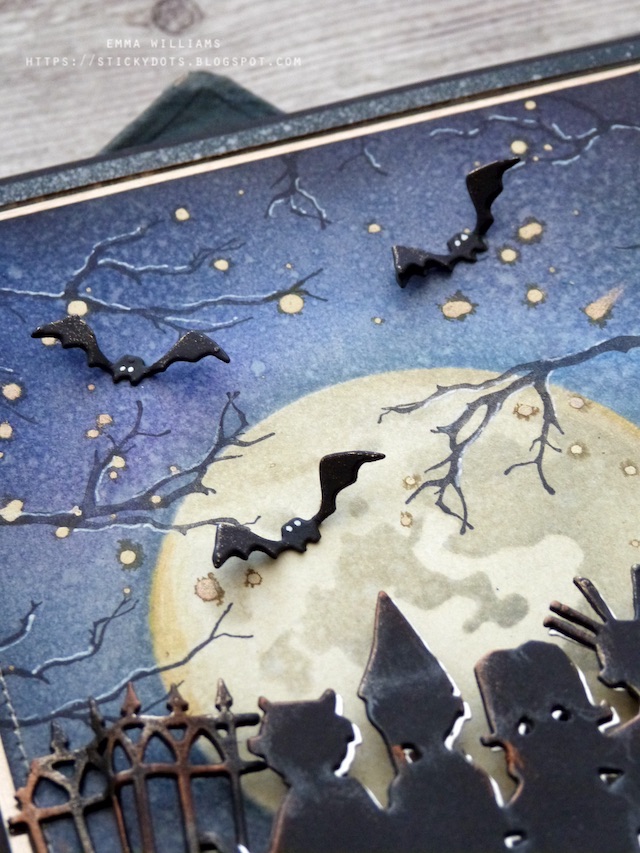
We begin by cutting a panel of Heavystock Mixed Media card, 12 x 16.5cm and placing the middle sized solid moon mask onto the centre of the card.
I then took the following Distress Inks; Prize Ribbon, Villainous Potion, Black Soot (you can choose any colour you want, it's entirely up to you) and using a blending tool, I blended the blue and purple inks, one by one, over the card surface. After removing the mask, I then spritzed a light misting of water over the top and heat dried the inky background, before I blended Black Soot ink around the edges of the card panel.
Now to create that big moon that's sitting in the centre of the card and using the corresponding moon mask, I inked the details using Hickory Smoke Distress Ink and a blending brush.
I then inked over the top of the moon with Antique Linen Distress Ink to add a glow.

For the branches, I used the stamp from the Mr Bones stamp set, and stamped these in Black Soot Archival ink, twisting the stamp around and stamping them so they come in from the edges.
I then accented them with a white gel pen before flicking Decayed Mica Stain across the surface of the background panel.

We now have the scene ready and after machine stitching a border around the outside, I matted it onto champagne coloured metallic kraft card, followed by black kraft stash card, both sanded around the edges, and then mounted the layers onto my card blank.
DIE CUTS
Moving onto the die cutting and for this, I used the Halloween 2021 Vault Die set. This set features some older dies, that were bought back in a slightly smaller size. I used three dies from this set, the Trick or Treaters, the gates and the bats and cut them all, twice from black card stock.
I layered the die cut pieces together to create thicker, more substantial die cuts and then taking the trick or treaters die cut, I wanted to add a deliberate outline and drop shadow behind this die cut by die cutting a further layer from silver metallic kraft card.
To add detail to this die cut, I took the Picket Fence Watercolour pencil and just shaded the shadowy areas. I then added a small amount of Mined Foundry Wax to the edges.
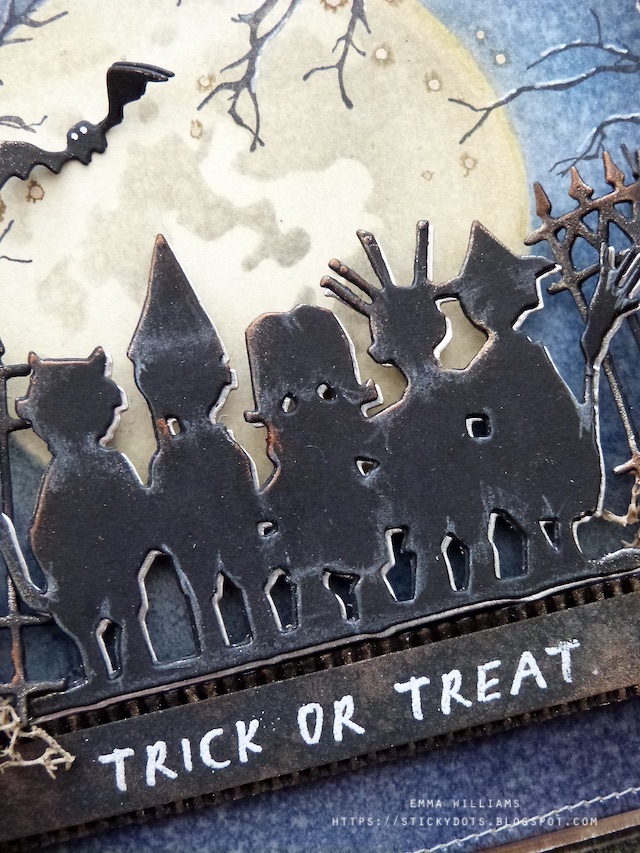
For the fence, once again I adhered the two die cut layers over the top of one another to create a thick die cut. I blended some Mined and Sterling Foundry Wax over the die cut itself and heat set the wax before bending and crumpling the die cut, to make the fence appear all twisted and broken down.
I attached the fence to either side of my card, placing glue on the flat part, allowing the bent areas to have more dimension and stick up.

I then attached my trick or treaters into place using two depths of foam pads to add even more height.
Around the scene, I added some flying bats that I'd cut from the black card and edged with Foundry Wax before adhering them onto my night sky and adding the white pen work.
SENTIMENT
To create a solid grounding for the die cuts, I used the sentiment and for this I cut a strip of black card, and once again, I spritzed it with Iron Gate Mica Stain. Heat dry the ink and then using Versamark Embossing Ink Pad, ink up the "Trick Or Treat" stamp from the Unravelled stamp set and stamp the sentiment in the centre of the strip. Sprinkle white embossing powder over the top, and heat emboss.

I mounted the strip onto a scrap of corrugated card, that I painted with Black Soot Distress Paint and then once dry, applied a smear of Foundry Wax over the surface to accentuate the corrugation.
I wrapped some cotton thread around either side of the strip and then mounted it underneath the die cut scene using foam pads.
To complete the strip, I attached two Hardware Heads which I 'rusted up' with a little Crackling Campfire and Black Soot Distress Paint.

FINAL DETAILS
Finally, I added some clumps of moss around the base of the fence...

...and on the side of my card, I attached a flash card from the Halloween Ephemera pack that I inked with Hickory Smoke Distress Ink.

All that's left to do is add the menu to the back and for this, I typed it and then printed it out onto some handmade paper before attaching it to my make.

So, that's it from me for this week and I have one final Halloween make that I'll be sharing with you all before the big day, so keep watching ~ because something wicked this way comes!

As always, if you make anything, or if you've been inspired by anything that you've seen here on my blog ~ then please, let me know by tagging me on social media or leaving a comment here and I will be right over to take a look and if sometimes I miss it ~ just keep nudging me!
Don't forget that every week, one lucky random participant has the chance to win a $25 gift voucher from Simon Says Stamp and you can join in up to 5 times, which means you could have 5 chances to win. You have until next Monday at 8am Ohio time. 1pm UK time, 2 pm CET to join in and good luck....


Recipe for project:


This is magnificent! You are so creative, and I love seeing your art. Thanks for always including your process so we can see how you made your beautiful pieces.
ReplyDeleteGreat project I am a huge fan of all you do! Thanks for all the details!
ReplyDeleteSomething wicked this way comes...a wicked cool make...
ReplyDelete