Showing posts with label Tim Holtz Christmas 2022. Show all posts

Monday, 19 December 2022

Let's Get This Party Started...

Hello friends...

It's time for the final Simon Says Stamp Monday challenge of 2022. This challenge is running for TWO weeks until the 2nd January, so you'll have plenty of time to play along with our fun challenge theme ~ Party Time and we can't wait to see what you create.

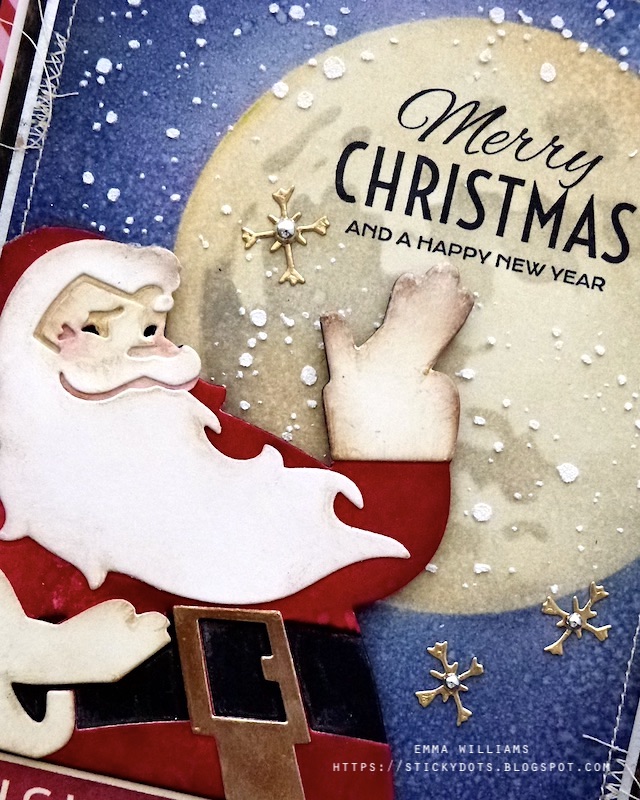
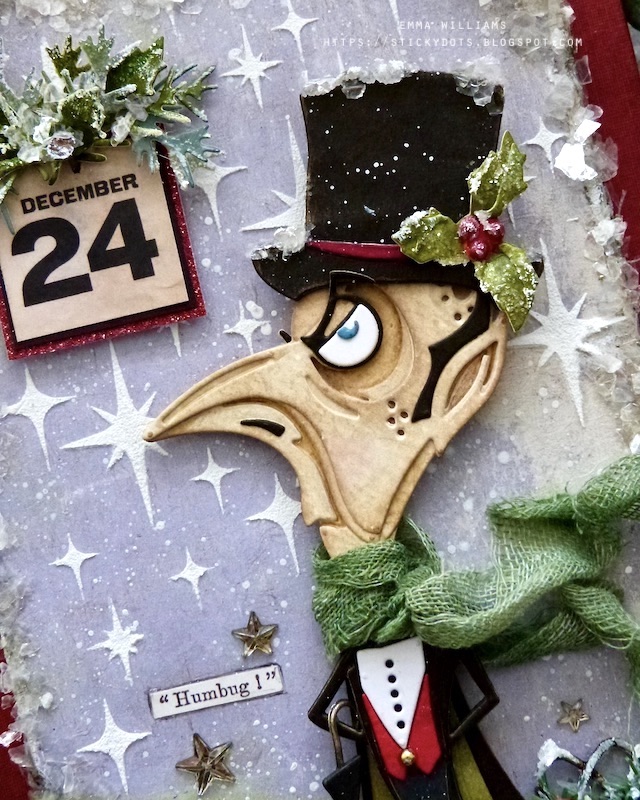
Now for my final make of 2022, and these were inspired by Raymond Briggs’ book, The Snowman and especially the scene at the North Pole when all the snowmen from around the world throw a Christmas party with Santa! So, with this in mind, I wanted to make some place settings that I'll be placing on each dinner plate at my Christmas gathering, and all of them will have a Christmas message inside and as no party is complete without special guests, I decided to use the infamous Twig And Stump from Tim Holtz and Sizzix...I'm still waiting for my Chilly & Freezy die set to arrive, and if it makes it to the UK before the big day, then they will also join in, but for now, I've used just the original die.


So let's get this party started and hope you’ll join Twig, Stump and friends for their Christmas party.

ENVELOPES AND SLIDE FOLDERS

To begin with I made my envelopes.

I used the Collector Thinlits Die Set as my base, and cut each envelope from Light Gray Woodgrain Cardstock. I also cut the cards for inside my pockets, using dies from the same die set to cut Christmas Pocket Cards for the backgrounds and then, some more of that gorgeous Light Grey Woodgrain card which I will be stamping on. 

I applied Grit Paste through the Speckles Layering Stencil to the front of the envelopes before setting to one side to dry. Once the paste is dry, I machine stitched a border around the outside before assembling the pockets and inking the edges with Pumice Stone DI!

With my pockets ready, I began to cut the slide frames from the same woodgrain cardstock using the die from the Specimen Die Set.

I folded along the scorelines to assemble the die cut and then placed the blue option from the Winter Deco Sheets so that they will show behind the aperture windows. 

Don't stick the slides together just yet!!!

TWIG AND STUMP

Moving on, I cut all my layers and pieces to assemble all my different versions of Twig and Stump. I used Distress Watercolour Card for the snowmen because I like the texture it gives the die cuts, and then I coloured Heavystock Mixed Media card with various Distress Inks and sprays for all the remaining pieces that are die cut. I also used some of my previously made backgrounds for their scarves and hats.

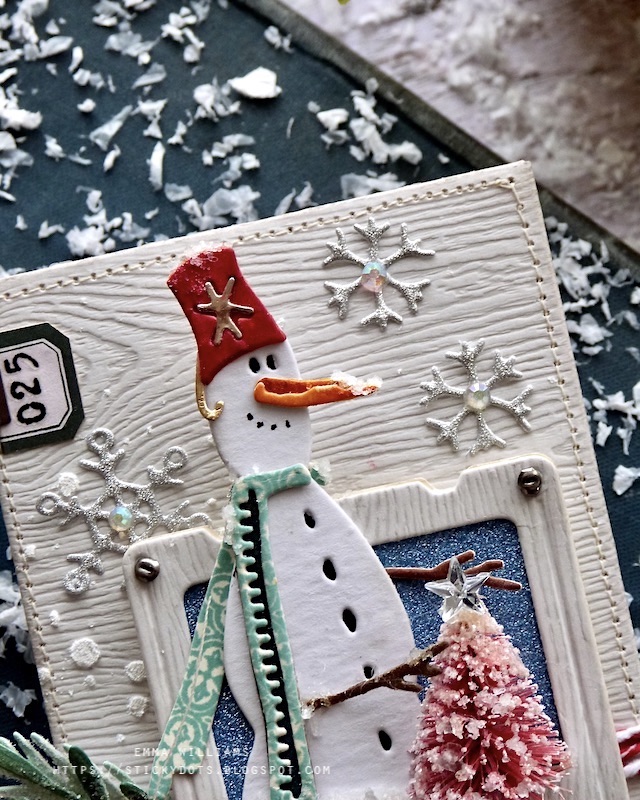
POCKET ENVELOPE 1 ~ DECK THE HALLS

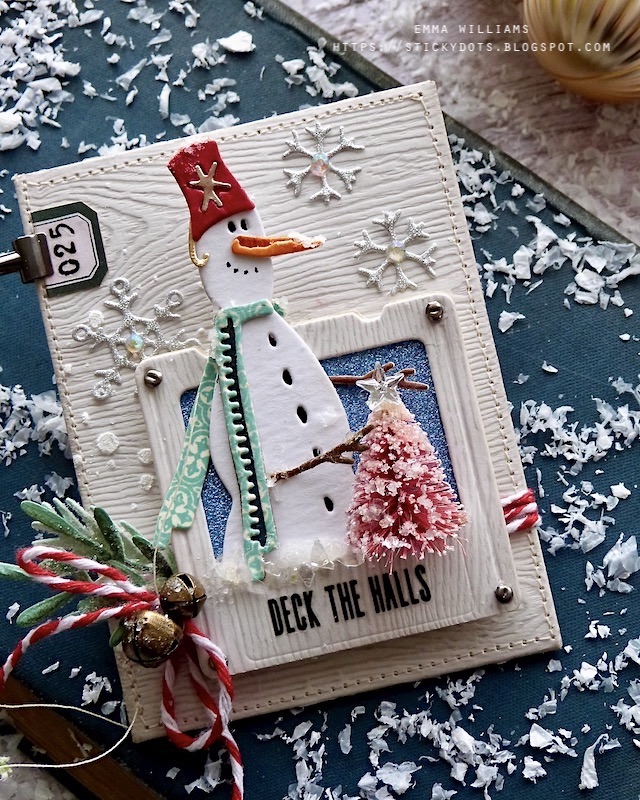
For my first envelope, which is vertical, I began by wrapping some candy cane twine around the envelope and tying it on the left hand side to secure it. I then took one of the specimen slides and my finished Twig and cut a small section away from the bottom of Twig before placing him behind the specimen slide aperture.

I added a mouth using a black pen and placed a small woodland tree beside him, wrapping his twiggy arms around the tree. The Woodland Tree is dyed using Kitsch Flamingo Spray Stain, sprayed directly onto the tree itself before drying the stain. After removing the wooden base from the tree, I rolled each one in Glossy Accents that I applied to my glass matt and sprinkled with Rock Candy Dry Glitter and Mica Flakes for a little sparkle. I then attached the tree to my envelope and added a Mirrored Star on top.

Spilling out from the image is some more frosty sparkle and I drizzled Glossy Accents along the base of Twig and the tree, and then sprinkled Mica Flakes over the top.

After adding Mini Fasteners to each corner, I applied a Remnant Rub along the bottom of the slide frame before attaching it to my envelope, using foam pads.

To add a little greenery, I cut pieces from green inked card, using one of Tim’s older Sizzix die sets, called Festive Greens (662425) but if you don't have this set, you can use any foliage die you have in your stash.

I arranged the greenery around the bow before adding two tiny bells, that I attached with hot glue.
To add a frosty look to the entire piece, I applied Snow Fall paste onto the bells and onto Twig, including  his little frosty carrot nose, and then cut some snowflakes from the silver Winter Deco Sheets, using the dies in the Twig and Stump Set. I adhered these to my pocket, adding small crystal gems in the centre of each snowflake.
To complete pocket number 1, I added a small Christmas ephemera piece in the top left corner, complete with the no. 25 remnant rub and then added a Mini clip to the side.

POCKET ENVELOPE 2 ~ BELIEVE IN MAGIC

Each of the envelopes follow the same design but for these two, I switched the pocket to be horizontal.
Once again, I wrapped the twine around and then added frosted greenery...
...and then placed Stump with his arms in the air inside my specimen slide and attached this to my pocket.
In the corners of this slide, I added Metallic Droplets and then I made a bow using the dies from the Yuletide Colorize die set. I cut each layer of the bow from Mixed Media Heavystock card that I coloured with Lumberjack Plaid Distress Spray Stain and attached this to the envelope, adding a smear of Glossy Accents over the edges, and a sprinkle of Mica Flakes.
After applying the Believe In Magic Remnant Rub, I attached my slide and then added a snowflake in Stump's twiggy hand. To complete the piece, I attached a small die cut heart that I had on my desk from a previous project and placed this in the centre of the snowflake for some snowflake kisses.

POCKET ENVELOPE 3  ~ NAUGHTY OR NICE
For the final envelope, I added the twine, some greenery and my slide folder but this time it has Stump facing a different direction but once again, he's holding a small woodland tree.

I then added the Mini Fasteners to the slide and a Christmas Pearl Droplet in the centre of the holly greenery.
Finally, I added the "Naughty or Nice' Remnant Rub.

MESSAGE CARDS

Inside the pockets, are my messages, stamped in Archival Inks using the Mini Bold Tidings Stamp Sets and the little stars from the Darling Christmas ~ both dies are perfect for these small pocket sized project. Each card has a different message and I didn't want to give to much away to my family who will be receiving these but below, is an example of just one of them...
So that completes my makes for this week and I hope you love them and you're inspired by them!

As always, if you make anything, or if you've been inspired by anything that you've seen here on my blog ~ then please, let me know by tagging me on social media or leaving a comment here and I will be right over to take a look!

Don't forget that every week, one lucky random participant has the chance to win a $25 gift voucher from Simon Says Stamp and you can join in up to 5 times, which means you could have 5 chances to winYou have until next Monday at 8am Ohio time. 1pm UK time, 2 pm CET to join in and good luck....


Thank you so much for taking the time to stop by today and to all the followers and friends of my blog ~ thank you for all your love and support in 2022!

Merry Christmas everyone, be safe and hope 2023 brings you everything you wish for!
Love Emma xxx

Recipe for project:

Distress Spray Stain: Kitsch Flamingo

Monday, 5 December 2022

Santa Claus Is Coming To Town...

 Happy Monday friends...

As the Christmas countdown begins, it's time for a brand new Simon Says Stamp Monday Challenge and this week, our theme is all about Holiday Cheer and we would love for you to join us and play along. The DT are showcasing the amazing products from the equally amazing Tim Holtz but this isn't something you have to do, but of course if you'd like to ~ then that would be fantastic!

For my project I created a Christmas card full of the holiday spirit and used one of Tim's brand new Christmas dies from Sizzix ~ the beautiful, stylised Retro Santa and hope you'll love how I made my project combining this image with Stampers Anonymous stamps and that gorgeous Moon Mask, which really is the gift that keeps giving ~ other than inks and tools, I honestly think this is the one thing in my stash that I use the most.

So, let's get started, say hello to Santa because it's time for some Christmas joy

To begin with I made a white card blank to measure 14.5 x 19cm and started by adding the first of my base layers.

I cut a panel of white card, and applied the Candy Stripe Christmas Design Tape around the edge of the card stock to create a patterned border. I then matted the panel on to a piece of navy blue cardstock, slightly smaller in size than the card blank and mounted these layers onto my card blank.

MOONLIT BACKGROUND

Now for the background and how I created that big moon behind him. I cut a panel of Mixed Media Heavystock card and 11.5 x 16cm and I placed the solid Moon Mask onto the right hand side of the panel, slightly off the edge.

I then used a blending tool to ink around the mask using Stormy Sky and Chipped Sapphire Distress Inks. starting with the lighter colour and then working my way inwards from the edge using the darker colour, adding less ink as I get towards the edge of the Moon Mask. To complete the background, I blended Villainous Potion Distress Ink around the edges.

Flick water across the surface to add tiny speckles and heat dry thoroughly.

After removing the mask, I inked the inside of the moon with Antique Linen Distress Ink before placing the detail mask over the top and inking through it with Hickory Smoke Distress Ink.

To complete the moon, I added some darker shading around the edge and then stamped the sentiment in black Soot Archival Ink, using a stamp from the Festive Overlap set.

Machine stitch a border around the outside of the panel.

Now for the snow and I to create this, I applied Opaque Grit Paste through the Speckles Layering Stencil and then allowed for it to dry.

Matt the background onto a panel of silver metallic cardstock, followed by a layer of black kraft cardstock and a layer of white card. I then mounted the panels onto the front of my card blank, using foam pads.

ICICLES FOR DECORATING BORDER STRIP

Using the "Icicles for decorating Christmas Trees' stamp from the Vintage Holidays stamp set, I placed the stamp into my stamp platform, inked with Barn Door Distress Ink and stamped the border. Without removing the stamp from the platform, I inked it once more with a light touch of Black Soot Archival Ink and then stamped again.

Cut the border strip down to size and then after inking the edges, I attached this along the bottom edge of my card. Add a gold metallic droplet to each side of the strip.

RETRO SANTA

Now for my star, that gorgeous Santa. I just love this die, it really does epitomise Christmas and his face is just one of the best Santa's I've seen. The die itself is so simple to put together and I went for traditional colours, but you can choose anything you want.

To begin with I inked my layers and used the following colours:

Santa's Suit: White Heavystock Card inked with LumberJack Plaid and Candied Apple Distress Spray Stains

Beard and cuffed gloves: White Heavystock Card

Base layer: Black Heavystock Card

Belt Buckle: Gold Metallic Kraft Stock

Once I'd die cut all my layers, I inked the edges of each piece with Frayed Burlap Distress Ink, before I started to build Santa. On the original die, Santa's face shows the red layer but I wanted to create a proper face, so after cutting the red layer, I then cut a second layer from white heavystock card, trimming the die to have just the piece that will become his face. I then adhered this over the top of the red layer before adding the final die cut layer, which will form the complete face and his beard. I used Distress Watercolour Pencils to add any details to the face.

With Santa complete, I attached him to my card using foam pads and placing him above the border strip.

FINAL DETAILS

We're nearly there and all that's left for me to do is add those gold snowflakes, complete with the Metallic Droplets centres.

I used the snowflake die from the Cozy Winter set to die cut gold metallic kraft card and attached three snowflakes onto the background. To complete the snowflakes, I added gold droplets in the centres of each

So that's my card finished and I hope you love what I've made and the ideas I've used to create this piece.

As always, if you make anything, or if you've been inspired by anything that you've seen here on my blog ~ then please, let me know by tagging me on social media or leaving a comment here and I will be right over to take a look and if sometimes I miss it ~ just keep nudging me!

Don't forget that every week, one lucky random participant has the chance to win a $25 gift voucher from Simon Says Stamp and you can join in up to 5 times, which means you could have 5 chances to winYou have until next Monday at 8am Ohio time. 1pm UK time, 2 pm CET to join in and good luck....


Thank you so much for taking the time to stop by today ~ stay safe and keep well.
Love Emma xxx

Monday, 28 November 2022

Bah Humbug!

Hello everyone...

As another month flies by, it's time for a brand new Simon Says Stamp Monday Challenge and this week, our thoughts are turning towards Winter, and we challenge you with our FREEZING COLD mood board which you can see over on the challenge blog, together with all the details of how you can play along with this week's theme.

For my make, I created a tag inspired by Charles Dickens', A Christmas Carol and used one of my favourite Halloween dies, The Count who just needed a few additional items of clothing to update him for his freezing cold debut on this wintery make. I just thought this was perfect to use for the star of the show, Ebenezer Scrooge and of course, I loved the fact that he had such an 'frosty' stare.

 So let's get started, it's time to pull up a chair to see how I created this week's make!

To begin with I used the Mini Etcetera Tag and began by covering it to form the base for my make...

ETCETERA TAG

I prepped my tag by applying Christmas Design Tape to form a border along the bottom and top edges. I then cut a panel of the blue paper and a strip of the green stripe paper, both of which are from the Christmas Backdrops pack. Taking the blue panel of paper, I applied some Opaque Grit Paste through the Sparkle Layering Stencil, and once the paste was dry, I added rips and tears around the edges of the blue panel of paper. 

You can see how the crumpled edges look on the finished tag, in the photo below and this shows how I followed the shape of the tag without cutting any of the paper away.

I then machine stitched a border around the outside edge of both pieces before I adhered both panels onto my tag, placing the green striped strip at the bottom and then sticking the blue panel to cover the remainder of the tag.

To add some frostiness to my tag, I drizzled Glossy Accents around the edges, and whilst the medium is still wet, I sprinkled Mica Flakes over the top. Set the tag to one side to dry thoroughly.

LEDGE AND FENCE

For the ledge, I used the medium sized Pinked Etcetera Trim and covered it with a generous amount of Crackle Paste. Once the paste was dry, I attached the ledge to my tag, placing it over the join of the two panels of paper and adhering it into place with Matte Collage Medium.

On either side of the tag, I added a small fence. For this I used one of Tim's idea-ology Metal Gates and snapped these in two pieces. I then painted the metal with white gesso, dried it throughly before drizzling a small amount of Mushroom Alcohol Ink over areas of the metal, leaving some of the painted areas to still appear white.

I attached the gates to each side of the tag, placing them onto the ledge using matte collage medium.

To decorate the gates, I cut small pieces of Pine Twine. Because this is wired, you can shape the twine which I did to form a garland. I then attached my tiny garlands to each of the gates using hot glue before attaching red and blue Christmas Droplets, which I glued into place with Matte Collage Medium.

Now to add the first of that crisp and white, frosty snow, and for this I used Opaque Grit Paste, which I applied along the top of the ledge and onto the tops of the gates. Sprinkle with Rock Candy Glitter for a touch of sparkle.

For even more sparkle and a frosty appearance on the garland, I smeared some Glossy Accents over the surface and once again, I sprinkled with Dry Rock Candy Glitter.

To complete the ledge, I added some 'snowball' Baubles and attached these with Glossy Accents, before sprinkling some more Dry Rock Candy Glitter over the top.

THE COUNT ~ EBENEZER SCROOGE

Now to move onto the star of the show...

I used the following cardstock for The Count:

FACE: Distress Watercolour Card, inked with Antique Linen Distress Ink and edged with Frayed Burlap

WAISTCOAT: Distress Watercolour Card, inked with Lumberjack Plaid Distress Ink

CLOAK, SUIT, FACIAL FEATURES, UMBRELLA and HAT: Black Kraft Card

HOLLY and INSIDE OF CAPE: Distress Watercolour Card inked with Peeled Paint Distress Ink.

EYE and SHIRT: White Heavystock Card

Once I had all my card layers die cut, I started layering each piece and building the character and once The Count was ready, I could add his hat and umbrella. When it comes to adding the cloak, I didn't want the collar, so I just snipped this section away to make it look more like coat tails.

I wanted my gent to have a warm winter scarf and for this I cut a strip of Mummy Cloth and spritzed the cloth with Rustic Wilderness Distress Spray Stain. Once the cloth is dry, I wrapped it around the neck of The Count, tying it to secure the scarf into place.

I then used foam pads to attach "Ebenezer" onto my tag, placing him so he stands between the two open gates.

For the hat, I used the dies from The Gent Thinlits Die Set and cut these from black kraft card, adding a red band. I then added the Holly Leaves which is from the Winter Wardrobe Thinlits Die Set and cut from the watercolour card, inked with Peeled Paint, and the berries are inked with Candied Apple Distress Ink.

To complete The Count, I added an umbrella which he has hooked over his arm. I cut the umbrella three times from black card, using dies from The Park Thinlits Die Set and then layered the die cuts to make one thick die cut piece. I hooked the umbrella over his arm and attached with Matte Collage Medium to hold it securely in place.

For the frosty look on The Count's hat, I applied some Snowfall paste and then sprinkled Mica Flakes over the top.

We're nearly there and all that's left is the details...

FINISHING DETAILS

Details are always so important to me and to begin with I added a "Be Joyful" quote chip from the Christmas Baseboard pack and attached this to my crackled ledge. I added a Hardware Head on either side, which I painted with Candied Apple Distress Paint.

On the left of The Count, I added a Clippings Sticker "bah humbug" and attached some Mirrored Stars around it. Each of the stars are inked with Mushroom Alcohol Ink to give them more of a vintage feel.

Finally, I added the December 24 sign which Ebenezer is looking up to, in the top left corner.

This is from the Christmas Ephemera Pack and I mounted the plaque onto a piece of the red Deco Sheet, that was cut slightly larger in size than the ephemera piece. Using foam pads, I attached it to my tag, hammering a tack nail into top. To add that final touch of frostiness, I cut pieces of foliage from green inked cardstock, using dies from the Winter Wardrobe Thinlits Die Set and frosted the die cut pieces with Rock Candy Glitter before arranging them over the top of my sign.

So that completes my project for this week, and I hope you've enjoyed it and love the piece I've made. It was definitely a lot of fun to create Ebenezer using one of Tim's older dies and I'm so happy with how he turned out.

As always, if you make anything, or if you've been inspired by anything that you've seen here on my blog ~ then please, let me know by tagging me on social media or leaving a comment here and I will be right over to take a look!

Don't forget that every week, one lucky random participant has the chance to win a $25 gift voucher from Simon Says Stamp and you can join in up to 5 times, which means you could have 5 chances to winYou have until next Monday at 8am Ohio time. 1pm UK time, 2 pm CET to join in and good luck....


Thank you so much for taking the time to stop by today ~ stay safe and keep well.
Love Emma xxx

Recipe for project:

Distress Paints: Candied Apple, 
Distress Spray Stain: Rustic Wilderness
Distress Inks: Frayed Burlap, Lumberjack Plaid, Peeled Paint, Antique Linen
Powered By Blogger

Total Pageviews