Showing posts with label DieCember. Show all posts

Saturday, 6 December 2025

Simon Says Stamp DieCember® Blog Hop Day 2

Hello everyone and welcome to Day 2 of the DieCember® Simon Says Stamp Blog Hop!

I'm so excited to be joining this hop, and you might have arrived here from Melissa Phillips' blog, but if not, and you want to catch up with everyone who is participating in this hop, then don't worry because you can head back to the beginning, by clicking HERE and if you would like to see the entire product release , then pop on over to HERE.

With so many wonderful new releases for DieCember®, you will be spoilt for choice but hopefully this hop and all the amazing designers are going to inspire you and we can't wait to see your makes. 

For my project, I wanted to create something that wasn't using the traditional colours of Christmas and the holidays and I chose to create a card and matching gift tag using the Blooming Poinsettia Embossing Folder and matching die set, together with another SSS Exclusive, the co-ordinating die and Tim Holtz stamp set, the Scribbly Trees Bundle. Hope you'll enjoy reading all the details of how I created this card.


So, let's get started...it's time to hop along!


To begin with I created the card blank and used white cardstock to make a tent fold card measuring, 14.5 x 18.5cm.

I cut a panel of slate grey cardstock, 14 x 18cm and stitched a border around the outside edge, before matting this onto the card blank.

EMBOSSING FOLDER BACKGROUND

Taking the Blooming Poinsettia Embossing Folder and Matching Die, I place a piece of black card inside the folder and ran it through my die cutting machine.

To accentuate the embossing, I gently brushed a white ink pad over the raised areas. Set aside to dry, or use a heat tool.

Once the ink is thoroughly dry, I started to apply and layer the waxes to the cardstock. For this I used a combination of Lisa Horton and Finnabair metallic waxes.

Using my fingertip, you can use a dauber or blending tool, I started by applying the teal, followed by the rich gold, before adding light touches of the Firebird and White Gold waxes. You don't need a lot of wax, less is more and you can build up the intensity by adding more if needed.

Once I was happy with how the waxes had added the metallic shimmer to the design, I moved onto stamping the border at the top and bottom.

For this I used the Stampers Anonymous Ornate Trims stamp set by Tim Holtz and used clear embossing ink to stamp the border along the top of the card panel. Sprinkle with Fine Detail Gold Embossing Powder before tapping away the excess and heat embossing the powder until molten.

Repeat with a border along the bottom of the card panel.

After adding some machine stitching down the left and right hand sides, I matted the card panel onto gold metallic Kraft card. I then used foam pads to matt the layered panel onto black cardstock.

To complete the background, lightly splatter white paint over the embossed panel and allow to dry.

RIBBON

Cut a strip of ribbon, and using either a splatter box, or a craft sheet, spritz the ribbon with Lumberjack Plaid Distress Spray Stain. Scrunch the ribbon inside a piece of paper towel to remove any excess stain and then heat dry.

Wrap the ribbon around the bottom section of the layered card panels and tie with a bow on the left hand side.

Attach two Holiday Bells to the centre of the bow, using hot glue.

Mount the panel onto the card front.

DIE CUT POINSETTIA

Taking the die from this embossing folder set, cut two poinsettias from black card before embossing both of them using the matching folder.

Using the same technique as I used on the background, apply the waxes to accentuate the embossing ~ start with the white ink pad, and then apply the waxes over the top.

To add dimension to the flower, I began by attaching the first poinsettia to my background panel, using foam pads and slightly offsetting the die cut.

I then took the second poinsettia and cut away some of the petals. I cut away two sections from opposite sides of the die cut before attaching this with foam pads. Place it directly over the top of the previous die cut, before adding a gold metallic droplet in the centre.

Cut 4 individual pine sprigs from more of the black card, using the Pointy Pine Sprig die from this release and once again, I used waxes over the die cuts.

To add some sparkle to the sprigs, smear each of the die cuts with a light touch of Matte Collage Medium and then sprinkle them with Rock Candy Crystal Glitter. Once they are touch dry, arrange and attach them around the poinsettia.

At this stage, I also added some Rock Candy Glitter to the petals of the poinsettia ~ who doesn't love some sparkle?!?

We're nearly there and all that's left is some finishing details....

SENTIMENT

The sentiment, 'Season's Greetings' is from the Stampers Anonymous Tim Holtz, Scribbly Trees stamp set and after stamping and embossing it with gold embossing powder, I used the coordinating die set to die cut the wording before mounting it onto my card with foam pads, placing it in the bottom left hand corner.

To complete the card, add three gold metallic droplets to the background panel.

TAG

To create the gift tag, I used exactly the same techniques as to make the card but this time, I cut the shape from the embossed background using one of the Nested Stitched Ovals, which then mounted onto a gold metallic stitched oval die cut, approx 7cm in width.

I punched a hole in the top of the tag, and threaded more of the ribbon through before stamping and attaching the Merry Christmas sentiment from the Scribbly Trees stamp and coordinating die set.

To complete the tag, and add some more sparkle ~ I applied Glossy Accents around the gold layer, and then sprinkled Mica Flakes over the top. Tap away the excess and allow to dry.

So, that's my card and gift tag complete and I hope you love what I've created.

Simon Says Stamp is giving away a $25 coupon to every stop on the blog hop from the blog comment section! So, this means you can leave a comment here and on every stop along the way to increase your chances. Winners will be notified and they will be posted on the Simon Says Stamp blog on Wednesday, 10th December and all winners will need to contact/email Simon Says Stamp to claim their prize. 

Also, don't forget that you have until the 7th December at 11:59 EDT or whilst stocks last, to grab yourselves the exclusive Bundled Snowman die set which will be automatically added to your cart.

Thank you so much for stopping by today and see you soon, love Emma x


HOP ORDER


Click HERE to shop for products

Monday, 4 December 2023

Santa Baby...

Hello friends...

Another week has flown by and here we are in the final month of 2023 and counting down the days until Christmas!

As always, a new week brings a brand new Simon Says Stamp Monday Challenge and this week our theme is all about Winter Blues and we hope you'll join us and play along!

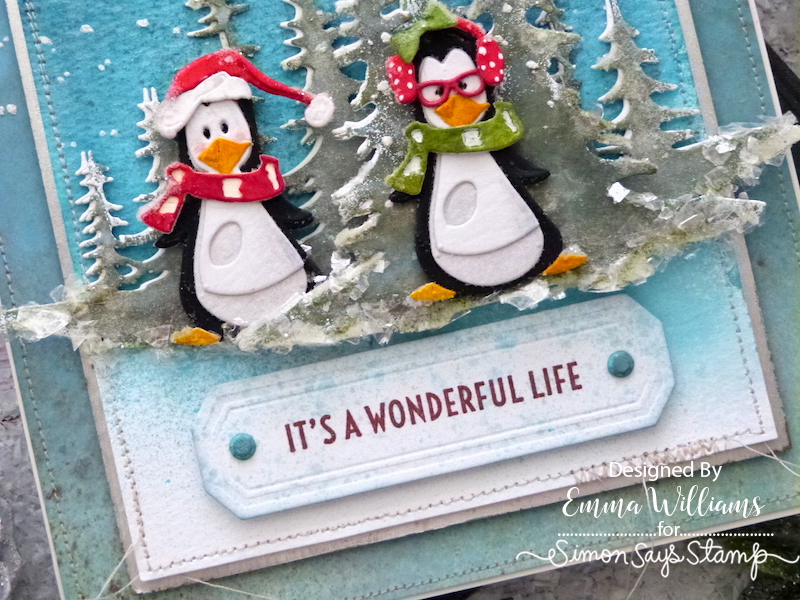
For my make, I chose to create a project using a very special die set, the adorable Walter! This Tim Holtz set is exclusive to SSS and is available for a limited time only, whilst stocks last and all you need to do is add $25 or more of Tim's branded products into your basket, search for Walter and he will be waddling to you as a FREE gift!

So back to my card, where Walter is all dressed up for Christmas, ready to surprise his Santa Baby and little penguin girlfriend, Winifred and here's how I created this card!


To begin with I made a white card blank measuring 20 x 15cm. I then cut a panel of mixed media heavystock card, slightly smaller in size than my card blank and spritzed this panel with a light misting of water.

To add colour, I used the following sprays:

DISTRESS SPRAY STAINS; Walnut Stain, Speckled Egg, Broken China

OXIDE SPRAYS: Speckled Egg

After spritzing more water over the inks to blend them, I heat dried the card panel and machine stitched a border around the outside. I then applied Grit Paste through the Speckles Layering Stencil, placing it at the top of the card, and only applying the paste so that it stops about half way down. Once dry, I mounted the background onto my card blank, leaving a very narrow border around the outside.

LAYERS

Moving onto the main background and for this I cut a panel of Distress Watercolour card, 17 x 12cm.

I spritzed the card with more water and then applied Mica Stains ~ Snow Flurries, Winter Frost, Shiny Bauble. I spritzed the colours to create a slight graduation of intensity, so that the bottom section will remain mostly white, with just a hint of the spray showing. Allow the colours to blend and then heat dry the surface.

Once again, I machine stitched a border around the edge and then applied more of the Grit Paste through the Speckles Layering Stencil to create the look of snow. I added the paste so that it will align with the paste/snow on the background panel attached to the card blank.

When dry, I matted the panel onto silver metallic kraft card and attached it to my card using foam pads.

TREES

To begin with I coloured a piece of mixed media heavystock card using the following combination:

DISTRESS SPRAY STAINS: RUSTIC WILDERNESS, BUNDLED SAGE, SPECKLED EGG

OXIDE SPRAYS: SPECKLED EGG

MICA STAINS: FROSTED JUNIPER

Once the card was dry and the blend was just right, I used the trees from the Forest Shadows Die Set to cut my two separate images to create the background layer and the foreground. I also cut a second layer of white card, which I used as a drop shadow by adhering this piece behind each of the green layers.

To create the snowy effect on the edges of the trees, I brushed the Embossing Dabber very lightly over the tips and then sprinkled White embossing Powder over the top. Tap away the excess and heat emboss the powder.

Because I wanted to add some glitter and snow, I applied a light coverage of Micro Glaze over the top of each die cut. This will stop any ink turning your snow green and bleeding into the Snowfall Paste, which I added along the bottom of the die cut and to some of the branches.

I allowed for the paste to dry, before drizzling some Glossy Accents over the paste. Working quickly, I sprinkled Mica Flakes and Rock Candy Glitter over the top, tapped away the excess and set this aside to dry...

...and once the pieces are dry enough to handle, I attached them to my card front, placing them across the background, slightly overlapping the edges and creating different heights to each piece by adding foam pads.

WALTER AND WINIFRED THE PENGUINS

Both of these adorable penguins are cut from a combination of Black Heavystock card, White Distress Watercolour Card and Mixed Media Heavystock card. Each of these card surfaces will create different effects and that is why I chose to use this combination.

Once all the pieces are cut, I then painted the accessories with Distress Paints ~ Santa's hat, the scarf, the beaks, feet, bows and glasses.

I also gave each penguin a touch of pink of their cheeks.

After assembling each image, I wanted to add an extra accessory to Winifred, some ear muffs.

These are actually die cut using dies from the Chilly and Freeze, which were the DieCember set from Tim, in 2022! This accessory fits perfectly and I just added some tiny white polka dots and the tiny bow.

Attach each penguin onto the project with foam pads.

SENTIMENT

The sentiment, "It's A Wonderful Life", is from the Sketch Greenery Stampers Anonymous stamp set. I stamped the message with Barn Door Archival Ink, onto a die cut Vintage Label, which I lightly spritzed with the Shiny Baubles Mica Stain, just to give a smattering of colour.

I attached the label underneath the scene with foam pads to add height, and then added two Hardware Heads to either side of the label. Each Hardware Head is painted with Speckled Egg Distress Paint.

FINISHING DETAILS

We're nearly there and all that's left is to add the tiny details of the cloud in the sky and the shining star.

The cloud is cut from watercolour card, using the Sizzix Christmas Cutouts Die Set and inked with Lost Shadow Distress Ink. I attached this to my background with foam pads.

Finally, I added the gold star, cut from gold metallic kraft card using the star die from the Holiday Blocks die set.

I cut two of these layers and then cut each layer in half to create four stars, which I then adhered over the top of one another to make one complete star, which I attached to my panel, adding a silver Metallic Droplet in the centre.

...and that completes my Christmas card, which I hope you love and will make you smile to banish those winter blues!

As always, if you make anything, or if you've been inspired by anything that you've seen here on my blog ~ then please, let me know by tagging me on social media or leaving a comment here and I will be right over to take a look!

Don't forget that every week, one lucky random participant has the chance to win a $25 gift voucher from Simon Says Stamp and you can join in up to 5 times, which means you could have 5 chances to win. You have until next Monday at 8am Ohio time. 1pm UK time, 2 pm CET to join in and good luck....


Thank you so much for taking the time to stop by today ~ stay safe and keep well.
Love Emma xxx

Recipe for project:

Tim Holtz for Stampers Anonymous: Sketch Greenery, Speckles Layering Stencil
Distress Paints: Candied Apple, Mowed Lawn, Speckled Egg, Wild Honey, Mustard Seed 
Distress Spray Stains: Walnut Stain, Speckled Egg, Rustic Wilderness, Bundled Sage
Distress Oxide Sprays: Speckled Egg, 
Distress Inks: Walnut Stain
Mica Sprays: Snow Flurries, Winter Frost, Shiny Bauble, Frosted Juniper
Tim Holtz Idea-ology: Hardware Heads, metallic Droplets

Saturday, 3 December 2022

Simon Says Stamp DieCember 2022 Blog Hop ~ Day 2

Hello friends and welcome to Day 2 of the Simon Says Stamp DieCember Blog Hop.

I'm so excited to be joining so many of my talented friends and designers on this hop and if you've arrived here from, Mindy's blog ~ then hello, but if not, and you want to catch up with everyone who is participating in this hop, then don't worry because you can head back to the beginning by clicking ---> HERE.

There are so many gorgeous new products in this release and I can guarantee you’ll be spoilt for choice because every single one of them will have you heading to your craft room to create some festive Christmas magic and sparkle. You can see all the products in this amazing release, HERE!

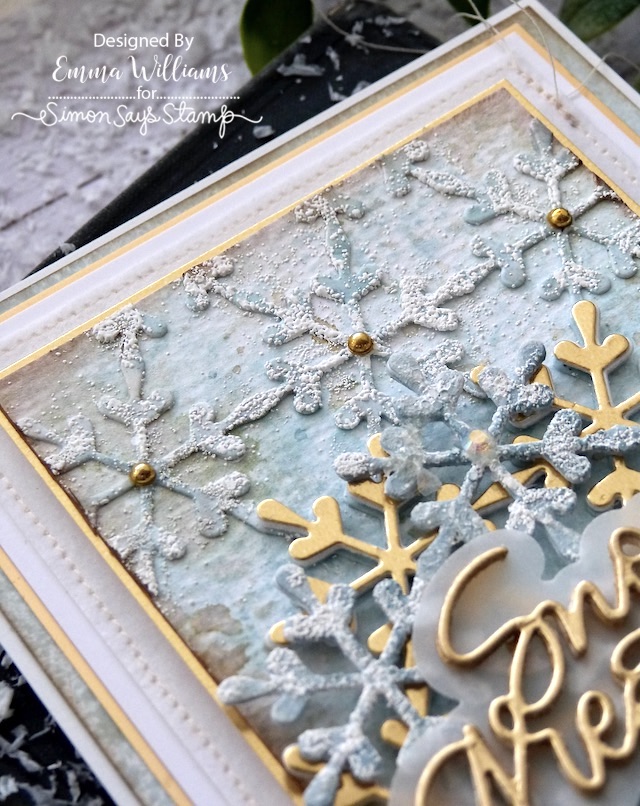
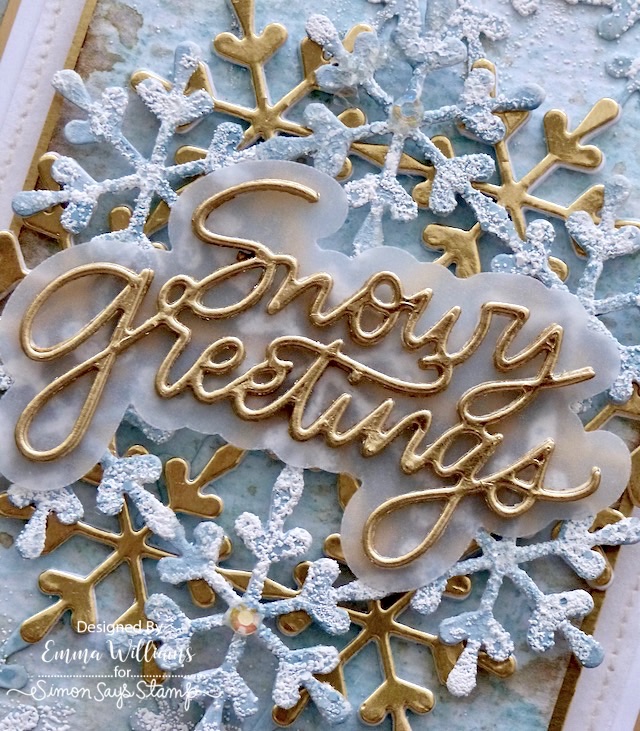
Now, back to my make and I created a winter greetings card using the gorgeous Snowflake Medallion, and combined it with an older die, Snowy Greetings.

So let's get started and here's how I created my card...

To begin with I created a card blank measuring, 11.5 x 18cm using Simon Says Stamp Off White Cardstock.

LAYERS

To create the base layers for my card, I cut a panel of Tim Holtz Distress Mixed Media Heavystock card, 11 x 17.5cm and I spritzed the card with Speckled Egg and Tumbled Glass Distress Spray Stain. After heat drying the card panel, I inked the edges with Frayed Burlap Distress Ink and matted it onto my card front.

I then cut a panel of Pawsitively Velvet cardstock, 9.5 x 16cm and using chalk white cotton thread, I machine stitched a border around the outside.

I matted this panel onto off white card, and then mounted the layered card panels onto the front of my card blank.


SNOWFLAKE BACKGROUND

To create the background for my card, I used a panel of Distress Watercolour card, 8 x 15cm. I spritzed the card with a light misting of water and then spritzed Speckled Egg and Tumbled Glass Spray Stains over the panel. After heat drying the panel thoroughly, I smooshed some Frayed Burlap Ink onto my craft mat, spritzed with a little water and dipped the edges of my card panel into the tiny droplets. After drying the panel once more, I inked the edges with Frayed Burlap ink.

Now to create the raised snowflakes that you can see on the background and for this I used the Snowflake Medallion Die and cut two of the images from Distress Watercolour card that I inked using the same colours and the same technique as I used on the background. TOP TIP: Add adhesive sheets to the back of your card panel so it's easier to adhere the fine detail snowflake.

Place one die cut snowflake at the top of the inky blue card panel and adhere it into place.

Attach the second snowflake along the bottom edge of the panel, aligning it with the previous die cut and stick into place.

Using an Embossing Dabber, gently brush the dabber across the raised snowflake surface of the panel ~ you don't need to add a solid block of the ink, just allow it to kiss the snowflakes where it touches. Sprinkle Cosmic Shimmer Snow Storm over the panel and tap away the excess. Heat emboss and melt the powder.

I matted the finished panel onto a piece of gold metallic cardstock and using foam pads, mounted this onto the card front.

SNOWFLAKE MEDALLION

To create the snowflake, I cut three layers from Mixed Media Heavystock card, before cutting a fourth layer from Watercolour card, again inked in the same colours as the background.

Attach and layer each of the snowflake die cuts, finishing with the coloured die cut on the top to create a substantial snowflake, the thickness of mountboard.

As with the background panel, lightly brush the dabber over the snowflake die cut and once again, sprinkle the embossing powder over the top and gently heat emboss the snowflake.

Layer the finished snowflake over the top of a second snowflake medallion, this time cut from gold metallic card, and attach the blue snowflake at an angle to the gold one to form a complete circle.

I attached the snowflake to my background, placing it in the centre using foam pads, strategically placed so they don't show through.

SNOWY GREETINGS

In the centre of the snowflake, I added a sentiment ~ Snowy Greetings. This die is in two separate pieces, the solid backing and the beautiful greeting, which I cut three times ~ twice from mixed media cardstock and a third time from gold metallic card.

I layered each of the die cuts to form the sentiment before attaching it to a die cut vellum background.

I attached the greeting to the centre of the snowflake using Matte Collage Medium, that I applied behind the lettering so it wouldn't show through the vellum.

Finally to complete my card, I added metallic droplets to the centres of the snowflakes on the background and crystals to the arms of the large snowflake in the centre.

That's my card for this hope finished and I hope you love what I've created....

Simon Says Stamp is giving away a $25 coupon to every stop on the blog hop! This means you can leave a comment here and on every stop along the way to increase your chances. Winners will be posted on the Simon Says Stamp blog on Wednesday, 7th December and all winners will need to contact/email Simon Says Stamp to claim their prize.

Also, last but by no means least ~ if you shop during the DieCember blog hop, then you can get yourself a beautiful Merry On A Line Die FREE with any purchase of $25 or more. The offer is valid until 4th December 2022 at 11:59 ET, or while supplies last and the code you need to use to claim your gift, is: MERRY

Thank you so much for stopping by today and hope you enjoy this fun hop....see you soon, Emma x

RECIPE FOR CARD:

Distress Inks: Frayed Burlap
Distress Spray Stains: Tumbled Glass, Speckled Egg
Tim Holtz idea-ology: Metallic Droplets
Powered By Blogger

Total Pageviews