Showing posts with label Creativation 2020. Show all posts

Monday, 2 March 2020

The Professor of Possibility...

Hi everyone...

Hope you've all had a wonderful weekend and ready for the week ahead! This week, on the Simon Says Stamp Monday Challenge Blog, we are showcasing Tim Holtz products and incorporating them within our challenge theme ~ Tag It!

My project for this week was one that I was so honoured to be asked to create for the Tim Holtz Stampers Anonymous booth at Creativation 2020 and I'm really excited to be sharing this double layered Etcetera tag, because yes ~ *drumroll*, The Professor is back, and he's bigger than ever and twice as much fun and I thought this piece was the perfect project for this week's challenge.
So, let's get started because it's time to tag it!


To begin with I'll start with the tags themselves and I used the small and medium sized Etcetera Tags as my base. I primed both tags with a coat of gesso and once the surface was dry, taking the larger sized tag, I applied the paint layers ~ Ground Espresso as my base colour, followed by Antiqued Bronze and Black Soot, both of which I applied using the dry brushing technique and always making sure that I dry the layers of paint between each application.

Once the painted tag was dry, I added some Evergreen Bough Distress Paint ~ just a touch, here and there, applying it with a palette knife and scraping it over the surface.

Now we move onto the second tag and for this I used a base coat of Evergreen Bough. Once the surface was dry, I started adding more paint layers of Black Soot, Rusty Hinge, Vintage Photo and some white gesso. Each time using the dry brushing technique and just applying the paint randomly to the Evergreen Bough background.

To add some interest to the background, I used the Newsprint Background stamp, inked with Black Soot Archival Ink and again stamped it onto the background, just allowing the stamp to kiss the surface and not create solid blocks of stamping. If you click on the photo below, you can see more detail of the stamping on the background...
Heat dry the tag surface to set the ink and then, using Crackle Paste...I applied the paste to the tag, allowed it to dry and crackle and then accentuated it with the Pumice Stone Distress Crayon.

For the final layer of rusty goodness, I used a combination of Distress Paints and Crayons, Vintage Photo, Antiqued Bronze, Rusty Hinge, Ground Espresso and Black Soot and applied the rust finish around the edges of the tag.

So we now have the tags ready and I just mounted the smaller tag over the top of the larger one, adhering it with Matte Collage Medium and adding a banner of paper that was actually an offset from a larger piece and I just loved the look of the numbers placed behind the smaller tag.
I then attached the hole reinforcer piece which I painted with Candied Apple Distress Paint and added a Sprocket Gear and a Star Adornment ~ both of which I 'rusted up' with a little paint.
Moving on, it's time to get the Professor ready for his outing and I stamped the main image onto a piece of Mixed Media Heavystock card and then watercolored the image with Distress Marker Pens and a water brush.

I then stamped a second image onto scrap paper to create a mask and after fussy cutting around the outline, placed the mask over the top and inked the surface with a combination of Distress Inks and Oxide Inks in Old Paper, Pumice Stone and Frayed Burlap.

After heat drying the surface and leaving the mask in place, I inked up the stamp from the set in Hickory Smoke Archival Ink and stamped the advertising material onto the background, together with a postmark stamp from the Field Notes Stamp Set, inked in Barn Door Archival Ink and stamped in the bottom left hand corner.

I removed the mask and stitched a border around the outside before matting it onto silver metallic kraft stash and a layer of paper from the Correspondence Paper Stash and mounting the layers onto the smaller painted tag.
To complete the stamped panel, I added a strip of metal card, embossed using the 3D Foundry Embossing Texture Fade and placed this across the bottom of the professor, adding a Faucet Knob, again painted with a combination of Candied Apple and Black Soot Distress Paint and some Hardware Heads.
To complete the stamped image, I used the "Agent 29" stamp from the Field Notes stamp set and stamped this onto a label, again stamped with images from the same stamp set. I attached a mini pin to the label and adhered the piece onto the stamped panel.

Finally, I added a Pen Nib which I rusted with Distress Paints ~ Antiqued Bronze, Evergreen Bough, Ground Espresso and Black Soot. I then tied a piece of twine around the nib and attached it with Collage Medium.
The Professor is now in place but he needs his laboratory and for these I crackled a combination of Tiny Corked Vials and Corked Vials. I applied some Matte Collage Medium to each corked vial, allowed it to dry and then applied a generous layer of Rock Candy Crackle Paint over the top. Allow for the crackle paint to do it's thing and once it has, I applied some Alcohol inks ~ Rust, Mushroom and Gold Mixative over the top, letting the inks drip down the bottles and seep into the crackles.

I added labels to each of the bottles and tied some twine around their necks, adding an 'E' Typed Charm to the one.
To make the ledge that the bottles sit on, I used three various lengths of Bracket Etcetera Trims and built these up to create one shelf. I then painted the shelf with gesso, and once it was dry, used the same paint colours as I used on the larger tag.
After heat drying the trims, I then sanded the edges for more of a vintage feel to the ledge and then attached the ledge into place with Matte Collage Medium.
I arranged my corked vials onto the shelf and placed some dyed Mummy Cloth around them and some Sprocket Gears painted with Distress Paints for a rusty finish.
As the final detail on this tag, I used the Tiny Text Stamp Set and stamped the "See Possiblity Everywhere" quote onto some inked card. I then attached the banner to the tag, placing it directly below the shelf and added a couple of Hex Fasteners to either side, again painted with the Candied Apple and Black Soot Distress Paint combination.
Don't forget, if you would like to see more inspiration from my talented teamies over on the challenge blog and every week, one lucky random participant has the chance to win a $50 gift voucher from Simon Says Stamp and you can join in up to 5 times, which means you could have 5 chances to winYou have until Monday 8am Ohio time. 1pm UK time, 2 pm CET to join in and good luck....


Thank you so much for taking the time to stop by today and hope to see you again soon, love Emma xxx


Recipe for project:

Friday, 21 February 2020

The Love Birds...

Hello friends...

Today I'm sharing another of my Creativation 2020 makes created for Tim Holtz's Sizzix booth and this project features dies from the Chapter 1 (shipping now) and 2 release which are shipping soon and combining them with an older Alphanumeric Die, Label! Don’t forget that if you missed Tim’s Facebook Live showing this amazing release and all the fabulous projects that were made, then you can catch up with it here and you can also take a closer look at the booth, HERE!

I fell in love with these Feathered Friends as soon as I saw them, they are just such a beautiful shape, and I love the fact that they're facing one another and looking at each other. So with all this I'm mind, I decided to create a home decor project using my favourite shape of a circle and make an embroidery hoop.

To begin with I began with the hoop which I primed with a coat of gesso before drying it and adding Grit Paste to random areas of the hoop.

After allowing the paste to dry, I usually leave it overnight, I started to apply my paint layers ~ a base coat of Ground Espresso, followed by dry brushing the surface with Antiqued Bronze, Black Soot and Walnut Stain making sure that each layer of paint is thoroughly dry before adding the next one. I then applied Matte Collage Medium to the hoop to seal the painted surface, dried it and then used the Peeled Paint Distress Crayon over the top of the grit paste surface to accentuate the gnarly, crusty finish of the hoop.
Now that the hoop is finished, I moved onto the background which is created by applying a base coat of Antique Linen to the canvas card. I then cut the card into a circle that will fit behind the embroidery hoop once finished.

To add all the layers, I started by attaching torn pieces of tissue tape and applying them to the central area of the circular card. I then scraped some gesso over the taped area and once again heat dried the paint before stamping some script over the top using the stamp from the Toadstools set. To add just a hint of colour, I then took the Pumice Stone, Tumbled Glass and Weathered Wood Crayons and applied them to the taped area, blending out the colour with a damp fingertip.

To add texture to the background, first I applied some Crackle Paste, and allowed that to dry and crackle before then applying Grit Paste through the Dot Gradient Layering Stencil and once again you will need to allow for the paste to dry. To accentuate the paste and the crackles, I used the Pumice Stone Distress Crayon and applied the crayon over the top before using a water brush to create a wash over the pasted areas and allow the colour to sink into the cracks.
I attached the background to the back of the hoop with Matte Collage Medium and then added a layer of kraft card to make sure the back would look nice if it was turned around.

Now for my feathered love birds, sitting on their branch gazing at one another...
...and for this adorable couple, I used Distress Inks and Oxide Inks to colour my die cut layers of watercolour card. If there were any areas that I felt needed more colour or shading, I just applied the ink directly to my craft sheet, picking it up with a water brush and adding the colour directly to the die cut pieces. The first bird was coloured using a colour palette of brown, orange, yellow and a touch of blue on their little underbelly.
The second bird was coloured with blues, brown, oranges and yellow.
Once the birds were painted, I then used foam pads to layer them, creating dimension and added white highlights around the eyes and little dots of white and black pen to the body.
The 'branch' that the birds are sitting on is actually from the Media Marks die set, which I thought was perfect for this and I cut this three times from a piece of kraft card and layered each die cut over the top of one another to create one branch. After inking around the edges with Gathered Twigs Distress Ink, I added some gold foil highlights using Ranger Ink Foil Sheets and then attached the branch to my background, adding the birds so that they sit on top.

I then added some die cut leaves and flowers, all cut using the Funky Florals 3 die set and coloured the flowers yellow and the leaves green, adding Tonic Ebony Nuvo Crystal Drops to the centres of each little flower.

As a little extra touch, I added a Remnant Rub number just beneath the branch.
To create the hearts I used the Falling Hearts die set and cut card that I coloured with Candied Apple Distress Paint. I then attached the hearts directly to the background using Matte Collage Medium and placing them around the birds.

Once the medium was dry, I used a black charcoal pencil to add shading around each heart, blending and softening the intensity with my fingertip.
We're nearly there and all that's left is to die cut the wording that sits around the edge. For this I used the Alphanumeric Label Die to die cut black card, that has a self adhesive backing and once the letters were cut, I just attached them to my background.
As a finishing touch, I added a bow to the top so that you can hang the hoop and hand dyed some crinkle ribbon with Antique Linen and Frayed Burlap Distress Spray Stains before attaching it to my hoop, adding a piece of twine to secure it into place.

...and that completes this project, which I hope you love and have enjoyed reading about all the details of how this project came together.
Thank you so much for taking the time to stop by today and I'll be back asap with another project from my Creativation 2020 adventure!

Love Emma xxx


Recipe for project:

Tim Holtz/Sizzix: Feathered Friends, Falling Hearts, Alphanumeric Label, Media Marks, Funky Floral 3
Tim Holtz/Stampers Anonymous: Gradient Dot Layering StencilToadstools Stamp Set
Distress Paint: Ground EspressoWalnut StainBlack SootAntiqued Bronze, Candied Apple
Distress Spray Stains: Antique Linen, Frayed Burlap
Distress Crayons: Walnut Stain, Tumbled Glass, Weathered Wood
Distress Inks: Various Colours
Embroidery Hoop, Ranger Ink Transfer Foil Sheets Vintage and Tim Holtz Tissue Tape from my own stash

Wednesday, 5 February 2020

Artist At Work...

Hello friends...

Today I'm sharing another of my Creativation 2020 makes that I created for the Tim Holtz's Sizzix booth featuring dies from the Chapter 1 release that are all shipping now! Don’t forget that if you missed Tim’s Facebook Live showing this amazing release and all the fabulous projects that were made, then you can catch up with it here and you can also take a closer look at the booth, HERE!

For this particular piece I was inspired by what I love most, art and with this in mind, I took the Bottled Up die set from Chapter 1 and created a home decor project that would be perfect to display in a studio!
To begin with I started to prep the frame ~ this is the large framed panel from Tim and comes in two separate pieces, the frame and the baseboard backing.

Starting with the frame, I applied a coat of gesso over the surface and once it was dry I painted it with a coat of Walnut Stain Distress Paint. Heat dry the paint and then using the dry brush technique, I loaded my brush with a little Antiqued Bronze Distress Paint, removed the excess on a paper towel and then brush the metallic paint over the surface of the frame. Once this layer is dry, I did exactly the same but this time using Ground Espresso. If you need to add any more of each individual colour, just repeat the process until happy.

I also painted the four edges of the baseboard so that once the frame is adhered onto it, they will match perfectly and to accentuate the beading I used a small amount of Alchemy Wax rubber over the surface.
Placing the frame to one side, I moved onto the background and for this I used Dina Wakley Cotton Watercolour Paper cut slightly smaller in size than the frame itself.

After attaching some torn strips of tissue tape in the central section of the paper, I then applied some Crackle Paste over the top. Once the paste is dry and the cracks have appeared, I went in with some colour and began by spritzing Vintage Photo Distress Spray Stain over the surface, concentrating on the central area to leave some white space around the outside. I then added some stamped text onto the background using the calligraphy stamp from the Toadstools set before applying some Grit Paste through the Gradient Dot Stencil.

Allow the paste to completely dry and then spritz a light misting of Black Soot. When spritzing the colour, I usually move the paper around to create runs and drips and if I need a little more movement, I spritz with a little water.

I heat dried the surface and then watered down a small amount of Broken China Distress Paint and using a paint brush, applied the colour direct to paper ~ the brush allows me to apply the colour just where I need it.
I flicked a few spots of Black Soot Distress Paint across the surface and then stamped the Paris Postmark in the top left hand corner.
Adhere the background onto the baseboard using Matte Collage Medium and attach the frame over the top, sandwiching the background between the two pieces.

I'm now ready to get bottled up and for the bottles I used the die to cut chipboard ~ dependant on how thick your board is, I would cut between two and four layers to make each individual bottle. I layered the chipboard over the top of one another and then gessoed each piece.

I wanted to make these bottles look realistic and does any artist have clean paint bottles ~ I know most of mine, especially the well loved colours have drips down the side and so to replicate this I used hot glue and just dripped the hot glue down the sides of the two smallest bottles.
I then painted each of the bottles so they appear to have paint in them ~ I used Mowed Lawn, Candied Apple, Broken China and Mustard Seed Distress Paints and once they were dry, I then added shading using Pumice Stone and Black Soot Distress Crayons.

I tied some twine around the necks of each bottle and then added labels ~ each label is die cut using the Sizzix Label Die and then mounted onto gold metallic kraft stash. I then used Remnant Rubs to add the words to each bottle.
So the bottles are ready but need a ledge and I used some Pinked Etcetera Trims to create these, painting them with a combination of Ground Espresso, Black Soot and Antiqued Bronze, using the same dry brushing technique as I used on the frame but creating a darker shade of brown.
Attach the Etcetera trims to the background and then attach the bottles ~ I used some foam pads to add even more dimension to this piece, which you can see in the photo below.

I then used the Alphanumeric Tiny Type Upper Thinlits dies to die cut the 'Artist At Work" wording from gold metallic kraft stash. Top Tip: Adhering some adhesive sheets to the back of the card is going to be your friend when it comes to attaching these letters and will save you so much time and stop those sticky fingers!

I also added a couple of Hex Fasteners to either end of the trim.
Finally to complete this piece, I added a Ruler piece ~ I broke the end off the ruler before lightly tinting it with Walnut Stain Distress Spray Stains. I then attached this to the left of the bottles with an old paint brush that I wrapped in wire.
...and here's the finished project, which I hope you love and which I hope has inspired you with some of the ideas I've used!
Thank you so much for taking the time to stop by today and I'll be back asap with another project from my Creativation 2020 adventure!

Hope to see you then, love Emma xxx


Recipe for project:


Friday, 24 January 2020

The Story Teller...

Hello friends...

Hope you are all having a wonderful week!

Today I'm so happy to sharing the first of my Creativation 2020 makes for Tim Holtz. It's been a busy few weeks of making, but I've had so much fun and over the coming weeks, I'll have plenty of inspiration to share with you all, including projects for Stampers Anonymous, Ranger Ink, idea-ology and of course, Sizzix which includes, this particular project made using dies from the Chapter 1 release, available and shipping now. Don’t forget that if you missed Tim’s Facebook Live showing this amazing release and all the fabulous projects, then you can catch up with it here!
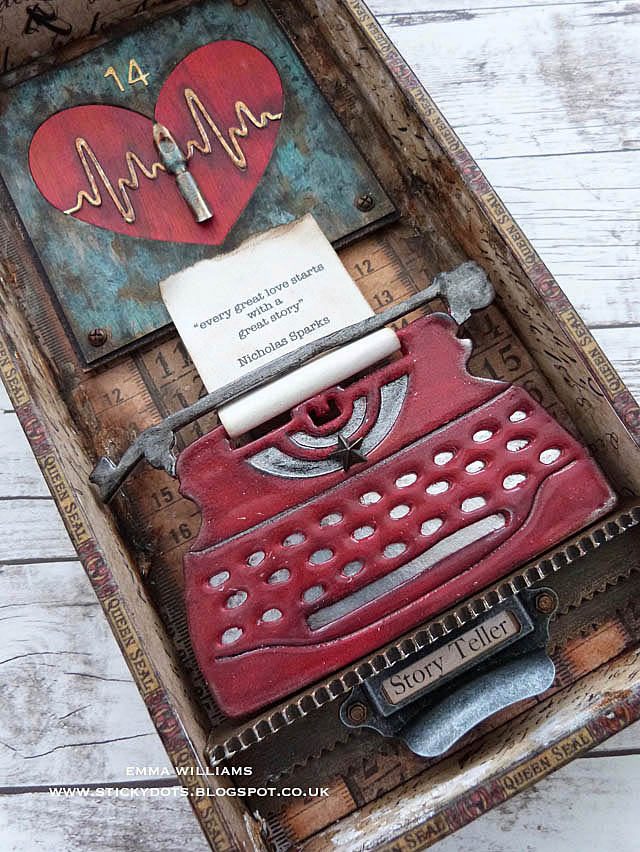
To begin with I'm going to walk you through some of the processes that I used to create this piece using my favourite dies from the release, Retro Type, Tiny Type and the amazing Heartbeat and show you how I combined these dies to make a piece of home decor using a vignette tray which was inspired by a quote from the author Nicolas Sparks ~ "every great love starts with a great story".

What I particularly want to do in this tutorial is concentrate on the techniques that I used to create the typewriter and the Heartbeat, both of which began life as a piece of boring old chipboard.

I started by using the smaller sized Vignette Tray, covering the raw edges of the tray with Humidor Design Tape and then covering the front, back and sides of the tray ~ inside and out with papers from the Dapper Paper Stash.
I particularly love how the ruler paper looks on the back of the tray, it's just perfect. I also added Crackle Paste to both the outside....


...and the inside of the tray, applying it directly over the top of the paper. To add the ageing to the crackle paste, I used Distress Crayons ~ Walnut Stain and Black Soot and then applied a touch of Rusty Hinge Distress Paint and Vintage Photo Distress Crayon to add a touch of rust, which you can just see on the inside of the tray in the photo below.
Inside the box you'll notice that there's a little shelf for the typewriter to sit on and this is made from one of the Pinked Etcetera Trims that I cut down to size so that it would fit across the box. After painting the strip using a combination of Ground Espresso and Black Soot Distress Paints to create the look of dark wood, I attached the shelf inside the tray with Matte Collage Medium.
Now for those dies and let's start with the Heartbeat die...

After die cutting the heart from a square of chipboard that was slightly larger in size than the heart itself, I placed all of the pieces in front of me on my glass mat ~ don't throw anything away as you will be placing the heart section back into the die cut once they are painted. I now want to add the colour, and used Candied Apple Distress Paint to colour the heart pieces. I then dry brushed the surface with Black Soot Distress Paint and set these aside to dry.

For the background the heart, I wanted to create a rusty patina to the surface of the chipboard and painted the chipboard with black gesso. I then started layering my Distress Paints, Evergreen Bough, Ground Espresso, Black Soot, Rusty Hinge and Vintage Photo. I apply each layer of paint individually, using the dry brushing technique to add colour. Just dip your paint brush into the paint, wipe away the excess on a towel and then just gently allow the brush to paint the colour across the surface of black gessoed chipboard. Remember to dry the paint layers between each application.
Once I was happy with the background colour, I matted it onto black chipboard and placed a Hardware Head into each corner, making them a little rusty in appearance with some Rusty Hinge and Ground Espresso Distress Paint.

Place the red heart pieces back into the die and attach with adhesive. For the heartbeat, I cut this from gold metallic kraft stash, running the die through my machine again and snipping away the heartbeat from the main part of the die cut.

After aging the metallic kraft stash with a little Mushroom Alcohol Ink, I attached it to my the die cut, placing it directly over the top of the existing heartbeat that is attached to the die.

I mounted the die cut heart into the top section of the tray, using foam pads and then took a Pen Nib, which I aged with the same colours of Distress Paint that I used on the background of the heart and placed this in the centre of the heart. I also used the Tiny Type die to cut the number 14 from gold metallic kraft stash and attached this.
Now we move onto the Retro Type die. This is a Bigz die so that means it will cut through a thicker substrate and allows me to layer my individual chipboard die cuts to create one substantial die cut image that once placed in the tray will stand alone. The die comes in two sections which are layered together and I began by cutting four layers of larger section of the die from chipboard. I layered 3 of the chipboard die cuts using Matte Collage Medium, keeping back the fourth, which is going to be placed on top. I then cut one smaller section from chipboard.

After painting all the chipboard pieces with gesso to prime them, I started adding colour. To begin with I took the larger die cut piece and the second smaller die cut piece, that will sit over the top the layered section and using a very fine detail paint brush, I handpainted the main key section of the typewriter with 2 coats of Candied Apple Distress Paint. Once the paint is thoroughly dry, I dry brushed the surface with Black Soot Distress Paint, which knocks back the brightness of the red and creates more of a vintage feel. For the paper roller section at the top of the die cut, I used Black Soot and Brushed Pewter Distress Paint. Set this to one side.

Taking the layered solid key section die cut, I painted this with Black Soot Distress Paint and once again, once the paint was dry, I used Brushed Pewter Distress Paint, which I dry brushed over the top. I then cut a small piece of silver metallic paper stash, and placed this over the keys on the bottom section of the layered painted die cut. Take the remaining pieces of die cuts and attach these over the top of the layered die cut. Ink around the edges of the die with Black Soot Distress Crayon, blending out the colour with a damp fingertip and if you need to tidy up any of the paintwork, or fill in spots that might have been missed, this is the time to do it! You can see how I layered the pieces in the photo below and also see the metallic elements that sit behind the keys and the top section of the typewriter.
Once the die and the adhesive is set, I pounced the Versamark Embossing Ink Pad over the entire surface of the painted die cut and then sprinkled it with clear embossing powder. Tap away the excess and then heat emboss the die cut. Allow to cool and then repeat with a layer of clear embossing ink and a layer of clear embossing powder. Heat emboss once more and it will create a beautiful glossy finish to the typewriter.
Using plain copy paper, I typed out the quote on my computer and cut the paper to size so that it would fit into the typewriter. I inked the paper with a little Old Paper Distress Ink and then placed it into the typewriter, securing it at the back of the die cut. 
Using a layer of foam pads, I attached the typewriter into the tray, placing it onto the shelf and slightly overlapping the heartbeat die cut that is above it. To complete the typewriter I attached a small star adornment.
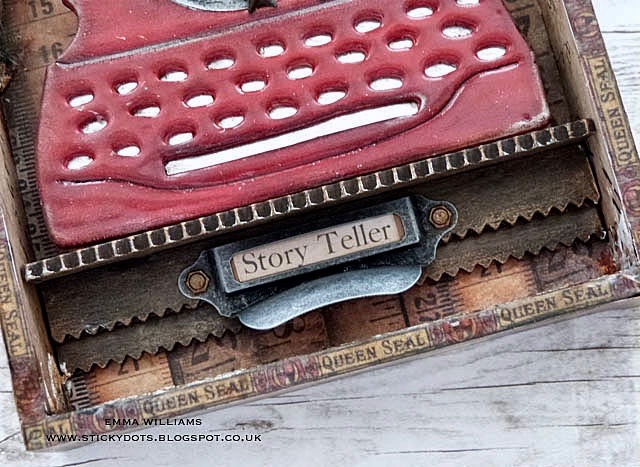
We're nearly there and all that was left for me to do was add the Mini Hardware Pull, complete with Clippings Sticker to tell the story of the Story Teller...
...and then add a handle at the top. I used a Faucet Knob that I aged to create a rusty patina effect using the same paints as I used on the background of Heartbeat Die.
I hope you've loved how I created this Vignette Tray and enjoyed the process of how the piece came together using Distress Paints to create the colour to the die cut elements and add some vintage flair to the project.

Thank you so much for taking the time to stop by today and I just wanted to say a huge thank you to Tim, Paula and Mario for their continued support and for asking me to be a part of Creativation 2020 and join them on their amazing creative adventure! 

Hope to see you again soon, love Emma xxx


Recipe for project:

Powered By Blogger

Total Pageviews