
Hello everyone...
Hope you all had a lovely weekend and as a new week begins, it's time for a brand new Simon Says Stamp Monday Challenge and this week our theme is called Have A Heart and we hope you'll join us and ❤️ this fun challenge theme!
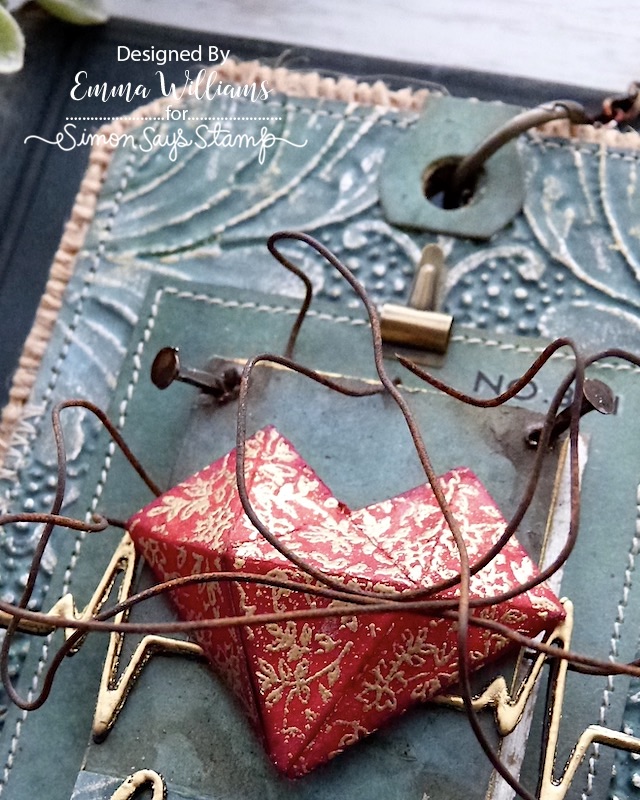
For my make, I used the 3D heart from Tim's Rosette Vault die set by Sizzix and made this the focal point of my tag ~ a heart wrapped in a wire cage and I combined this with an older die set, Heartbeat and the Damask Embossing Folder to bring this piece to life.

So let's get started and here's how I created this piece that needs to be handled with care...


I used a Size 8 Etcetera Tag for this make.
BACKGROUND
For this background, I chose to use the Damask Embossing Folder and I cut a piece of Mixed Media Heavystock Card to fit inside the folder.
I then misted the card with water before placing it inside the folder and running it through my die cutting machine a couple of times.
After removing the embossed card, I then added the colour using a combination of the following Distress Sprays and Oxide Sprays:
DISTRESS SPRAY STAINS: Speckled Egg, Black Soot, Rustic Wilderness, Crackling Campfire
OXIDE SPRAYS: Speckled Egg, Tumbled Glass, Rustic Wilderness
Once again, I misted the surface of the card with water before placing it in my splatter box and adding the colour, spritzing one colour at a time, adding water between each layer to blend the sprays and always drying each layer before continuing onto the next.
Once I was happy, I heat dried the card.
To accentuate the embossing, I applied Foundry Wax. Firstly, I used my fingertip to apply a light touch of the Gilded Wax over the raised areas and then heat set the wax before adding a second layer of Sterling but this time, adding less colour and only allowing the wax to hit some of the raised areas. This will create a beautiful two toned effect.

Heat set the wax and then cut the embossed panel down so that it fits the front of a Size 8 Etcetera Tag. Ink the edges with Walnut Stain Distress Ink and machine stitch a border around the outside.
I then mounted the tag onto a piece of burlap, slightly larger in size than the tag itself so that it shows a border around the outside.

Attach the layered tag onto the front of the size 8 etcetera tag using Matte Collage Medium.

MOSAIC TILE LAYERS
For the layers that are in the centre of the tag, I began by using the same sprays and oxide sprays to colour some more of the Mixed Media Heavystock card.
I then took a rectangular Mosaic Etcetera Tile and covered it with a piece of the inked cardstock. I sanded the edges of the tile before inking with Walnut Stain Distress Ink and then applied some of the Gilded Foundry Wax along each side of the tile. Heat set the wax.
Along the bottom of the panel, I stamped the star border from The Inspector stamp set and embossed it with gold embossing powder before adding a narrow strip, (an offcuts from the embossed panel), and placing this just above the star border.

With the tile complete, I added the rusty wire.
I cut two strips of the wire and hot glued it into position on the back of the tile, leaving the ends free so I can wrap them around the heart.
Add foam pads to the back of the tile and mount it onto a piece of silver metallic kraft cardstock, before then mounting these layers onto a further piece of the inked card which I stitched a border around the outside edge.
I attached the panel onto the centre of the tag using more foam pads and added a small remnant rub number, "No. 861" in the top right hand corner.

To complete the tile I hammered two nail tacks into the top left and right hand corners, bending them with a pair of pliers.
I then altered the metal with a combination of Distress Paints ~ Black Soot, Crackling Campfire and Antiqued Bronze, before adding a watered down solution of the Black Soot and Crackling Campfire paints to create the rusty finish in the corners and along the edge of the tile itself.

Finally, I added a Tiny Clip to the top of the tile.

HEART and HEARTBEAT
Now for the focal point ~ creating the heart.
For this I spritzed a piece of Mixed Media Heavystock Card with Lumberjack Plaid, Barn Door and a hint of Fired Brick Distress Spray Stains.
After heat drying the card, I added my pattern using the Tim Holtz Tiny Prints Background Stamp from Stampers Anonymous. I inked the stamp with Versamark clear embossing ink, stamped the image onto the panel and then sprinkled gold embossing powder over the top. Tap away the excess and heat emboss until the powder becomes molten.
Taking the patterned card panel, I cut out my heart using the die from the Rosettes Vault set, inked the edges with Walnut Stain Distress Ink and then folded along the scorelines to assemble the 3D heart, attaching the flaps with a strong adhesive tape.

As you can see from the photo below, I placed the heart in the centre of the heartbeat, and this is a die cut from the Heartbeat Die Set and next up, I'll share how I created the gold enamelled effect.

I used once of the heartbeat dies in the set, (the die with the heart in the centre) and cut this four times before layering each die cut over the top of one another to make a substantial piece.
I then pounced the Embossing Dabber over the surface of the layered die cut before sprinkling with gold embossing powder and heat embossing it.
I repeated this enamelling technique, a couple more times before I attached the heartbeat across theorised tile section, placing the 3D heart over the top and leaving the ends of the heartbeat to overhang the tile itself.

Taking the four ends of the wire which I had already attached to the back of the tile, I coiled these and wrapped them around the heart.

LOVE SENTIMENT
The love sentiment that is sitting beneath the heart is also from the Heartbeat die set and just as I did to create the heartbeat line, I cut the wording four times and then layered them over one another, cutting away the ends of this to leave me with the LOVE word only.
I then enamelled the sentiment using the same technique as before and attached it to my tile.

We're nearly there and all that's left is the finishing details...
HANDLE WITH CARE
I stamped the Handle With Care label onto a piece of card using the stamp from the SA/Tim Holtz Eccentric stamp set. I used a combination of Barn Door and Black Soot Archival Inks.
After cutting around the edge of the label, I attached it to my tag with foam pads.

Finally, I added two large fasteners either side of the label ~ these fasteners do have legs on the back which I cut away before attaching them directly onto my tag and altering the metal with the same Distress Paint colours as I used on the nail tacks.

To complete the tag, I added a Mini Book Ring through the hole, and hung the Hook Clasp from the ring, all of which are altered with the rusty Distress Paint combination used throughout.

So that completes my make for this week and I hope you love it.

But before I go, I wanted to share another small make ~ tiny keyring charm made from the 3D hearts that I stuck back to back, before placing a memo pin through the top and adding a hook clasp.

As always, if you make anything, or if you've been inspired by anything that you've seen here on my blog ~ then please, let me know by tagging me on social media or leaving a comment here and I will be right over to take a look!
Don't forget that every week, one lucky random participant has the chance to win a $25 gift voucher from Simon Says Stamp and you can join in up to 5 times, which means you could have 5 chances to win. You have until next Monday at 8am Ohio time. 1pm UK time, 2 pm CET to join in and good luck....


Recipe for project:


This piece is absolutely beautiful. Thank you for the inspiration and hard work.
ReplyDeleteBrilliant. Simply brilliant. ❤️
ReplyDeleteBeautiful’. Trying to replicate as of now! Don’t have many spray stains but all inks and most oxides! It should be close… fingers crossed 🤞🏻
ReplyDeleteHi Emma! So I did this tag in the likeness of yours... I posted on IG as sasssykatz... I didn't have the "heartbeat" so I substituted an arrow. I stamped the "stripes with star center" a bit too high on the tile element, so I added a piece of wire underneath the stamped image... thought about some gold thread or re- doing it, but instead decided to work with it.
DeleteThis gave me the opportunity to work with materials I own, but hadn't used, to use my new "from the vault die", to think a little outside the box, and upcycle some materials (which I enjoy). I appreciate you sharing your talent and projects and for all the inspiration so I can hope to create with the stuff I buy! :) ] For once I sat and did a project upon the purchase of a die instead of putting it off till I "needed to use it". This was fun! Thank you!
Oh Emma this ist so beautiful! I can't stop looking at it from every possible angle 😃. I would like to express my heartfelt thanks for your meticulous directions and products used, I am in awe! Your art is eye candy at its best!
ReplyDelete