
Hello and Happy Monday!
Hope you've all had a wonderful weekend and you're now ready for a brand new Simon Says Stamp Monday Challenge!
This week our theme is called SPARKLE AND SHINE and we can't wait to see how you'll interpret the challenge and you'll come and join us and play along!
For my make, I chose to create a project that is inspired by the quote 'Shine Like The Stars" and I used products from Tim Holtz, Stampers Anonymous and Ranger Ink together with one of the brand new Sizzix Die Sets that Tim has bought back from the vault and shared in his live launch last Saturday ~ the amazing Rosettes Thinlits Dies. This project has shine in the quote, the gold stars, the pearls and the frame...

So let's begin, it's time to shine like the stars....


This decorative panel begins life as one of the Etcetera Facades but I love the shape so much, that I decided not to mount this onto a panel, but to use it as a standalone piece and create a decorative shield.

ETCETERA FACADE
Keeping the central circular section in place, I covered the facade back and front with a panel of kraft heavystock card and attached the pieces using Matte Collage Medium. Using the sanding tool, I sanded the edges to make sure they were smooth.
For the stars that create the raised design on the background, I used the Falling Stars Die Set to cut Mixed Media Heavystock card, and cut three layers for each of the raised stars. I attached each of the stars over the top of one another to form one thick star, and then attached the completed star onto the covered facade, arranging them so that they slightly overlapped some of the edges of the shield shape.

With all my stars in place, I then applied a coat of gesso over the surface and around the edges.
Heat dry thoroughly before adding the next layer of paint, Speckled Egg Distress Paint, again applied over the entire surface of the facade, and also the edges.
Again, allow for the paint to dry and then I used a dry paintbrush to dry brush the surface.
I then sealed the surface with Matte Collage Medium before taking the Juniper Berry Mica Pearl Crayon. which I ran over the surface, to accentuate the stars.

For this technique I use Picket Fence Distress Paint, squeezed out onto my glass mat. I then dip my brush into the paint to pick up the smallest amount on the tips and dab away any excess paint on the brush ~ you only need a minimal amount left on the bristles. I brushed the paint across the surface of the facade, just kissing the raised areas of the stars.

On the left hand side of the facade, I placed a tiny piece of Ephemera from the Snippets pack, and just added a few rips and creases on the corners of the piece. I then attached it and added a tiny safety pin clip through the corner.

After a light splatter of Picket Fence Distress Paint across the surface, the facade is now ready to decorate, starting with the rosette.
ROSETTE
For the rosette, I used one of the map design papers from the idea-ology Backdrops Vol 5 set and I cut three separate strips using the Rosette Die in the set.
I then pieced the strips together to form one long strip, folded along the scorelines, making valley and mountain folds as I went along and attached the two ends to form a circle.
Push down in the centre and using hot glue, I placed a die cut seal in the centre to secure the rosette.
I love this die set and YES, IT REALLY IS AS SIMPLE AS THAT!
I attached the rosette using foam pads and placing it on the right hand side of the

PHOTO AND FRAME
I began by adding some texture to the frame by smearing on a small amount of Translucent Grit Paste. Once the paste was hard and set, I then created the shine on my frame and started by altering the metal using Statue and Sterling Foundry Wax, applied in separate layers, and heat set between each application. I always apply a solid coverage of Statue, before then applying a lighter coverage of Sterling over the top, never applying it to completely cover the surface.
To complete the frame, I used some Mushroom Alcohol Ink, which I drizzled over the surface before finally adding a final layer of the Statue Wax, this time to highlight the paste areas. Heat set the wax.

I chose this photo because it was one of my favourites in the idea-ology Photomatic pack by Tim, but don't forget you could always use a family photo if you prefer.

After applying a coat of Matte Collage Medium over the surface of the photo, I colour tinted the image with a waterbrush and Distress Crayons. I used the following:
Hat and Coat: Barn Door
Background: Faded Jeans,
Skin tones: Tea Dye, Aged Mahogany
Hair: Gathered Twigs
After attaching the completed photo to the back of the frame, I mounted a piece of mountboard onto the back to add more stability and then attached the framed image over the top of my rosette.
To add the finishing touch to the photo, I adhered two tiny gold stars into position, both of which are cut from metallic gold kraft card, using the Falling Stars die.
The "Shine Like The Stars' quote is taken from the Theories Quote Chip pack and after sanding the edges and inking with Walnut Stain Distress Ink, I wrapped some red cotton thread around both sides of the chip, securing the end at the back before I then attached it, placing it underneath the rosette arrangement.

DIMENSIONAL STARS
To create the gold dimensional stars, I used a combination of dies ~ the larger star is from the Rosette Thinlits Die Set and I cut two of these stars and then the smaller stars are from the Holiday Vault Die Set 2021.

To begin with I made the larger stars using the die cuts from the Rosette set and began by folding along the scorelines before adding any colour.
With my stars made and folded, I wanted to make them gold and for this I used the same Foundry Waxes as I used on the frame, and applied them in exactly the same way, each time heat setting the layers between applications.
I then placed my shiny gold stars onto the project, attaching them with hot glue and placing them in a cluster on the left of the photo.
For the smaller stars that are intermingled with the stars I've already attached, these are all cut from metallic kraft stash using the Holiday Vault 2021 set and this size of star works so well alongside the stars from the Rosette Set. I made four further stars of various size.
Once again, I folded along the scorelines and then attached them, 2 on the left of the photo...

...and the two of the smallest size on there right.

The photo below shows how the stars cascade across the project.

FINISHING DETAILS
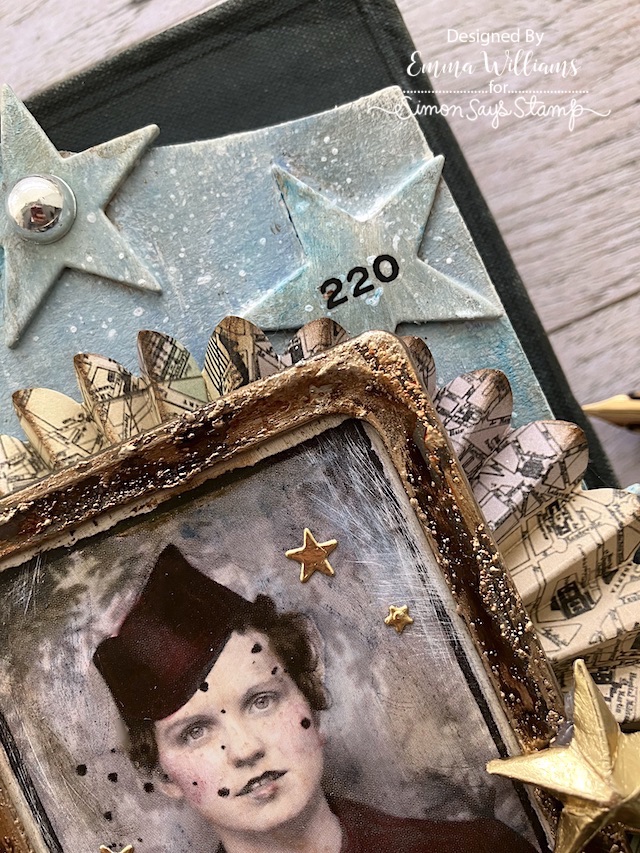
To add the final touch of sparkle and shine, I used Metallic Droplets and pearls from the Christmas Droplets pack.
I chose various sizes and then glued them into position, onto the centres of the raised stars on the background.

Finally, I added a small remnant rub, the number 220 from the eclectic Remnant Rub set, which I placed in the centre of the star in the top right corner.
So that's my make finished for this week and I hope you love what I've created and will be inspired by the techniques, the quote and the piece itself.

Don't forget that every week, one lucky random participant has the chance to win a $25 gift voucher from Simon Says Stamp and you can join in up to 5 times, which means you could have 5 chances to win. You have until next Monday at 8am Ohio time. 1pm UK time, 2 pm CET to join in and good luck....


Recipe for project:


Love your style, such inspiration thanks
ReplyDelete