
Hello friends and welcome to a brand new week on the Simon Says Stamp Monday Challenge Blog. This week our theme is called MAKE YOUR MARK and we hope you'll join us and play along.
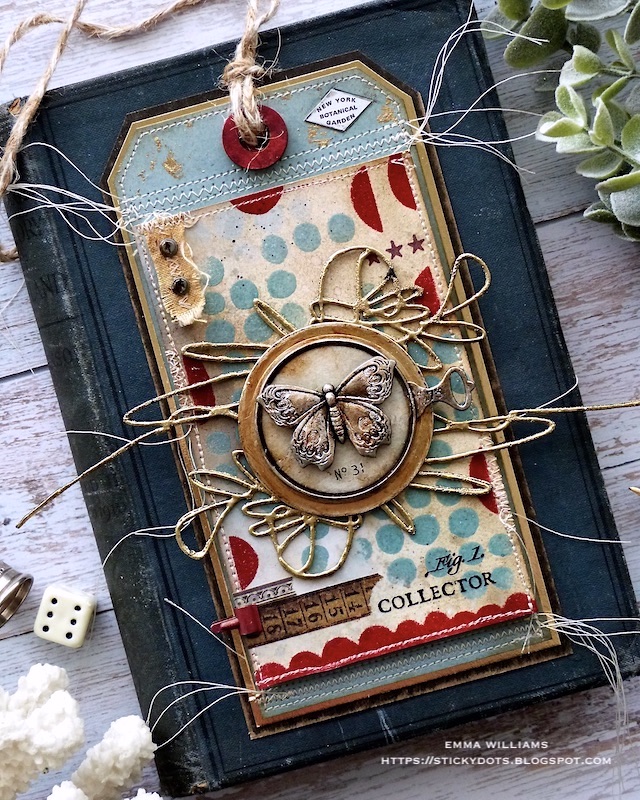
For my make, I was inspired by Tim Holtz's new Everyday Art Element Stencils and thought these would be perfect to make my mark on the background of this tag project. I combined these marks with some of my favourite techniques to create layers of dimension and some vintage shine.


TAG and LAYERS
I covered the Size 8 tag with a panel of paper from Backdrops Vol 5 and adhered this with Matte Collage Medium before adding a stitched border around the edge and also adding stitched detail along the bottom and top of the tag itself.
After inking the edge of the tag with Walnut Stain Distress Ink, I matted it onto Gold Metallic Kraft cardstock, followed by a layer of black kraft cardstock, each time leaving a border showing around the edge. I also added some gold foil flecks to the tag, just concentrating on the top section only.

To complete the tag, I added a Curator Ephemera label in the top right hand corner before adding the hole reinforcer piece.

I had an unused hole reinforcer piece that I have leftover from an Etcetera Tag which I then painted with Candied Apple Distress Paint. Once dry, I attached it to the hole on my tag and then threaded a piece of rope through the hole and securing it into place.

STENCILLED BACKGROUND PANEL
To begin with I used Antique Linen, Speckled Egg, and Frame Burlap Distress Spray Stains to add colour to my Mixed Media Heavystock card panel. I then misted them with water before I applied Lost Shadow and Speckled Egg Oxide Sprays. Allow the sprays to blend together and heat dry thoroughly.
I cut the card panel to size, 7.5 x 12.5cm and then started to add my marks using the stencil. I blended Speckled Egg Oxide Ink through the repeat circle stencil and then sprinkled Speckled Egg Distress Glaze over the top. Tap away the excess and heat emboss.

I then moved onto the red marks and began by applying Lumberjack Plaid Oxide Ink through the scalloped border stencil, adding this along the bottom edge of the panel. Again sprinkle Distress Glaze, this time Lumberjack Plaid, over the top of the inked area and heat emboss.

Now for the final marks on the background, and again I applied Lumberjack Plaid through one of the stencils, adding them around the outside of the panel. I used the arches this time and then sprinkled the glaze over the top before heat embossing.
Using the line of 3 stars from the Eccentric Stamp Set, I stamped these in the top right hand corner with Fired Brick Archival Ink...

...before adding a strip of torn linen from my stash, placing this down the left hand side and attaching two hardware heads over the top.

Finally, to complete the background, I tore strips of Design Tape and placed these in the bottom left hand corner of the panel and then painted a Tiny Clip with Candied Apple Distress Paint and clipping this onto the side of the panel.

Now for those scrawly scribbly gold media marks, and for this I used the Media Marks Die Set from Sizzix and Tim Holtz and cut three layers of the scribble, from Mixed Media Heavystock, 6 scribbles in total to make the two marks. I adhered and layered each die cut over the previous one and then applied an Embossing Dabber over the surface. I sprinkled Gold embossing powder over the top of each scribble before heat embossing them to create the enamelled effect.

I attached each scribble to my tag, placing them directly onto the background and allowing the ends to overhang each side.

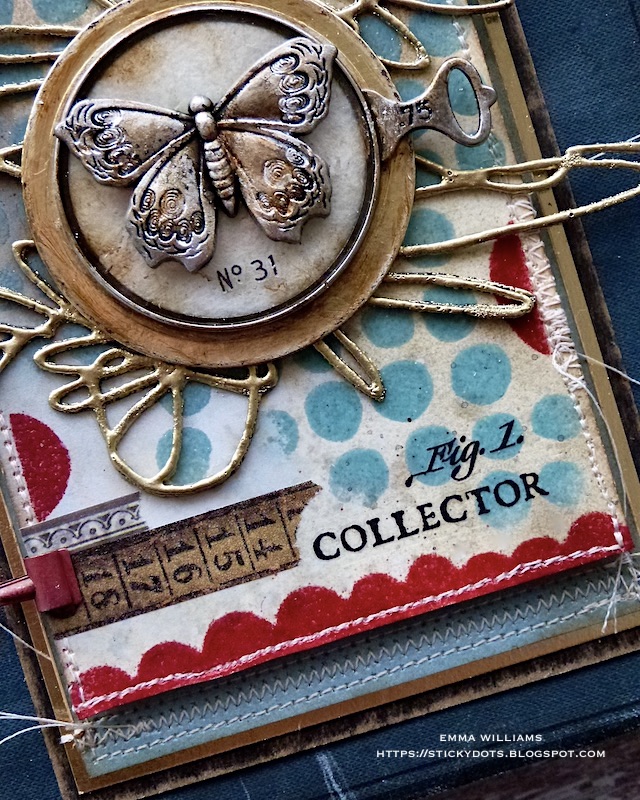
BUTTERFLY FOCAL POINT
I then cut a circle of gold metallic kraft card using the Sizzix Framelits Circle Die Set. I have this in my stash but if you don't have this particular set, don't worry you can use any circular die to create this layer.

I mounted the die cut gold circle onto a piece of card to make it more substantial and sturdy before sanding the edges and inking them with Walnut Stain Distress Ink. Using foam pads, I mounted the circle in the centre of my scribbly marks.

Using one of the Optical Lens' from the pack, I began by applying some Statue Foundry Wax to the metal around the edge. I only wanted a light touch, just to make the metal look more vintage in it's appearance. I then applied a drizzle of Mushroom Alcohol Ink over the top to create a vintage effect to the glass. I then placed the lens over a circle of ivory felt and attached this to my gold circle.
BUTTERFLY
To add a hint of colour to the butterfly, I applied Foundry Wax over the surface ~ I used a combination of Sterling and Statue to create the burnished finish to the metal.
After heat setting the wax, I attached the butterfly to the optical lens, adding a Specimen Remnant Rub beneath it.

We're nearly there and all that's left is the finishing details....
FINISHING DETAILS
I added the Collector and Fig 1 Remnant Rubs in the bottom right hand corner of the panel.

So, that's my project for this week and I hope you've loved this make.
Don't forget that every week, one lucky random participant has the chance to win a $25 gift voucher from Simon Says Stamp and you can join in up to 5 times, which means you could have 5 chances to win. You have until next Monday at 8am Ohio time. 1pm UK time, 2 pm CET to join in and good luck....


Recipe for project:


Absolutely gorgeous Emma!
ReplyDeleteThis is such an inspiring and creative project!
ReplyDelete