Hello friends...
Hope you all had a wonderful weekend and you're ready for the brand new challenge over on the Simon Says Stamp Monday Challenge Blog, where we are celebrating Spring and Easter with our fun theme. If you'd love to join us, then all the details are at the end of this post and the DT can't wait to see what you'll be creating.
For my make, I decided to create a vintage style home decor project for Easter using products from Tim Holtz's idea-ology collection and inspired by the illustrations and stories of Beatrix Potter's Peter Rabbit and Benjamin Bunny, I invite you to join me as I tell the tale of this mischievous little rabbit who is looking for that illusive supersized prize carrot, that he knows is hiding somewhere in this make...
So, let's get started because it's time to share how I created my project for this week.
BOX
To begin with I used the smallest sized vignette box in the Vignette Set of 3 and I combined this with a couple of older products from the idea-ology range, the Vignette Frames and the Vignette Panels, which many of you will probably have in your stash. If you haven't got these products, then don't worry as you can easily use chipboard to make the lid for the box, as I did in a previous project that you can read about
HERE and you can either replace the frame with
Etcetera Trims to create a decorative edge or just not use it.
Taking the box itself, I began by covering the box using papers from Backdrops Volume 5 set and cut each piece to fit the four sides and adhered them with Matte Collage Medium.
I applied Design Tape Trim around the top edge of the box to give a nice finish and then sealed the paper and the trim with another coat of collage medium. Setting the box to one side, I moved onto the lid.
As I said, if you don't have the vignette panels to fit these boxes, it's not a problem just follow my steps from the previous post and this will give you a really substantial lid for your box.
If you do have the lid, then that's a bonus and all I did was cover both sides using more of the same paper that I used to cover the sides of the box and added the tape trim around the edge. Once again seal with a coat of collage medium.
At this stage, I placed my box over the framed panel that creates a decorative base and then added Mini Foundations to add feet to the base of the frame. Again, should you not have the framed panel, you can use Etcetera Trims which is something I have done in the past. I would paint using the same colours as I did for the frame, Walnut Stain and Antiqued Bronze, and then I would attach the trims around the bottom edge of the box. They will be slightly deeper but they do create a lovely finish to the box.
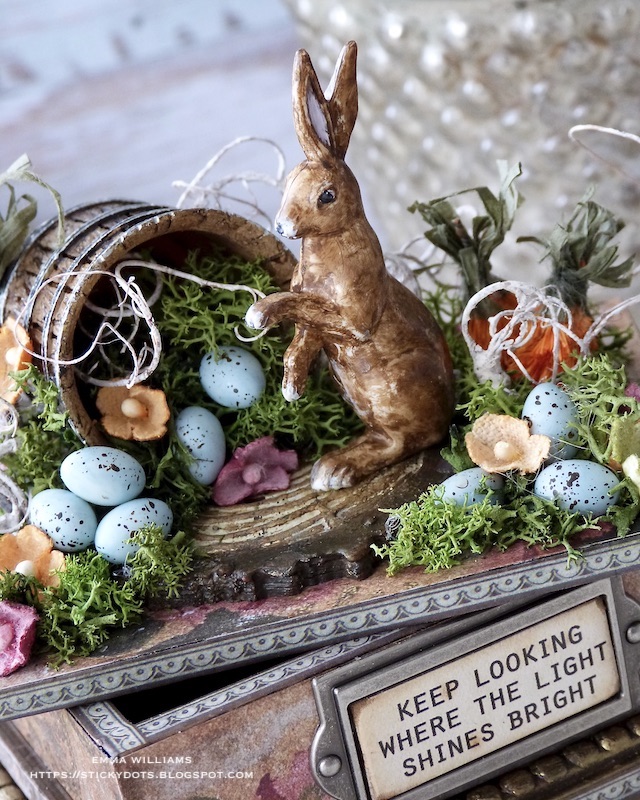
On the front of the box, I added the Quote Chip Label ~ "Keep Looking Where The Light Shines Bright", which was perfect for the scene and story I wanted to tell. I sanded the edges of the chip, before inking with Walnut Stain Distress Ink and then placed the chip in a co-ordinating size Label Frame. I actually left this frame it's original colour, as I wanted a fresh feel to this piece and didn't want to dull the project too much.
Attach the frame to the front of the box.
We now have the box ready to decorate, so let the fun begin...
CREATING THE SCENE
PAINTING THE SALVAGED RABBIT
For this make, I used one of the Salvaged Rabbits and began by applying a coat of Ground Espresso Distress Paint over the surface. The paint will self level but I wanted to create a slightly textured look, so I took a dry brush and whilst the paint was still wet, I dabbed the brush over the surface of the rabbit, to create the stippled finish I was looking for.
I then painted the insides of the bunny ears with Spun Sugar Distress Paint, used Black Soot on his eyes and Antique Linen on his paws, tummy and feet.
Set the rabbit to one side to dry throughly before attaching to the top of the box, placing him to the right of the barrel.
SPECKLED EGGS
To colour the salvaged tiny eggs, I used (clue is in the title, lol) Speckled Egg Distress Paint and once the paint was dry, I used the Splatter Brush to splatter Ground Espresso paint flecks over the surface. Leave these to dry...
MAKING THE CARROTS
The tiny little carrots that can just be seen on the right hand side and then the prize carrot behind the barrel are all made using Woodland Trees. Tim has a fabulous
tutorial for making these and he takes you through the process of making them, and all I did was downsize my trees for this project and used the smallest tree size from the Woodland Lot set before adding the raffia carrot tops.
TREE RINGS BASE
As a base for my scene, I used the Tree Rings Bigz Die and Texture Fade to die cut four pieces of Mountboard. I layered three of those die cuts over one another before taking the fourth and running it through the texture fade to create the embossed tree rings.
I attached the final layer to the other layers and then painted the die cut with a combination of Gathered Twigs and Ground Espresso Distress Paints for the outer section and for the inner section, I used Antique Linen Distress Paint. To accentuate the embossing, I ran Walnut Stain Distress Crayon over the top, blending it with my fingertip. You can see the layers for the tree ring in the photo below.
I adhered the die cut to the left hand side of the lid.
Using hot glue, I attached an idea-ology Barrel on top of the tree ring, placing it on it's side and then added some moss around the base of the barrel and also over the surface of the lid.
SPRING FLOWERS
For my tiny individual flower heads, I used Bouquet Findings that I cut from the bunches. I spritzed the flowers using three separate colours fo Distress Spray Stain ~ Victorian Velvet, Scattered Straw and Shabby Shutters before I heat dried the flowers ready to use.
ADDING THE DETAILS
We now have everything ready to add to the project and bring this rabbit's tale to life...
...and I adhered the tiny speckled eggs and the spring flowers inside the barrel, and around the outside.
I attached two of my carrots and buried these in some moss to look as if they are growing and then...
...I attached the 'prize carrot' behind the barrel, placing it out of sight of this mischievous bunny, ready for him to find.
Finally I added some curly moss in around the all the embellishments to create movement to the whole piece.
So, that's my Easter project finished and I hope you love what I've made and will be inspired by all the elements and techniques I've used.
As always, if you make anything, or if you've been inspired by anything that you've seen here on my blog ~ then please, let me know by tagging me on social media or leaving a comment here and I will be right over to take a look!
Don't forget that every week, one lucky random participant has the chance to win a $25 gift voucher from Simon Says Stamp and you can join in up to 5 times, which means you could have 5 chances to win. You have until next Monday at 8am Ohio time. 1pm UK time, 2 pm CET to join in and good luck....
Thank you so much for taking the time to stop by today ~ stay safe and keep well.
Love Emma xxx
Recipe for project:
Tim Holtz Idea-ology:
Backdrops Volume 5,
Barrel,
Vignette Set,
Tiny Eggs,
Salvaged Rabbits,
Label Frame,
Woodland Tree Lot,
Bouquet Findings,
Design Tape Trim, Vignette Panels, Mini Foundations and Vignette Frames from my stash
Distress Paint:
Black Soot, Antiqued Bronze, Ground Espresso, Speckled Egg, Walnut Stain, Spun Sugar, Antique Linen Moss and Raffia from my own stash


Stunning creation!!! Anesha x
ReplyDeleteLove love love this! Your vision is amazing and the project is fantastic! Thank you so much for sharing your talent!
ReplyDeleteWow Emma, this has got to be one of the most complex and intricate creations I have ever seen - it is totally incredible!! The amount of detail is absolutely amazing - stunning!
ReplyDeletePauline xx
Yep, I love it too. I've used the rabbit and the eggs too and they are supercute.
ReplyDeletegr. Yvonne