
Hello friends...
I was so excited to receive my Tim Holtz 12.5" Rotary Media Trimmer as the perfect addition to it's smaller friend, the Mini Guillotine! They now proudly sit on my craft desk, side by side ready for action.


1. During my crafting journey, I've owned a lot of trimmers and guillotines and I've also managed to write off quite a few when I push them too far ~ I can't tell you how many trimmers and guillotines I've managed to ruin with mountboard/chipboard!!
But no more, that will be a thing of the past because this little beauty is a real workhorse and it did everything I asked of it ~ wherever you put that substrate, top or bottom, the geared, rotary blade just glided through a variety of substrates and media effortlessly including the mountboard ~ even that tiny strip was a perfect cut and all without any effort or pressure.

I also tried it out on yupo, vellum, Sizzix Texture Roll, cork, burlap and heavyweight acetate with no problem whatsoever and even managed to cut through 3 sheets of card at one time, each time creating a supersmooth, clean cut ~ no raggedy edges which is a pet hate of mine!

2. The trimmer is so lightweight and the size of the machine will fit comfortably in any craft space which is something that really appeals to me. As you can imagine there are times when I'm quite limited for crafting space, I can fill a table and a floor with work and end up crafting in a 5" square on my desk. It's also really solid when you place it on the desk, which is all down down to the placement of the pads on the base of the trimmer ~ this will not rock and roll when you try to cut!
3. I love the fact this has imperial and metric measurements. Here in the UK, we do tend to work in centimetres, so this is perfect for me as I no longer have to keep converting my measurements dependant on the trimmer I'm using.
4. On the majority of trimmers and guillotines that I've owned in the past, you will find that you get one extending ruler arm but this one has two, which makes life so easy when working with 12' x 12' papers.
5. If you've watched some of Tim's YouTube Lives, and seen some of my makes, then you might have heard that I do tend to make "Emma sized cards" and now I have a piece of machine that is perfect for cutting and making my own Emma sized cards with ease and here you can see card blanks that I've cut from Mixed Media Heavystock, White Heavystock and Kraft Heavystock, all measuring 20 x 15cm.

So with my trimmer ready to put to work, I made an "Emma sized card" and hope you love the results...

One thing I've found difficult in the past with my previous trimmers, is being able to cut through pasted surfaces. Usually when I make the cut, the paste will flake away, or the trimmer will pull it off the card, so I wanted to see how this trimmer coped...

...and there were no surprises about the results, they speak for themselves ~ it did the job perfectly and it cut tiny 3cm square tiles with no effort, no flaking of the paste ~ just clean lines that I could use for my tiled effect card.


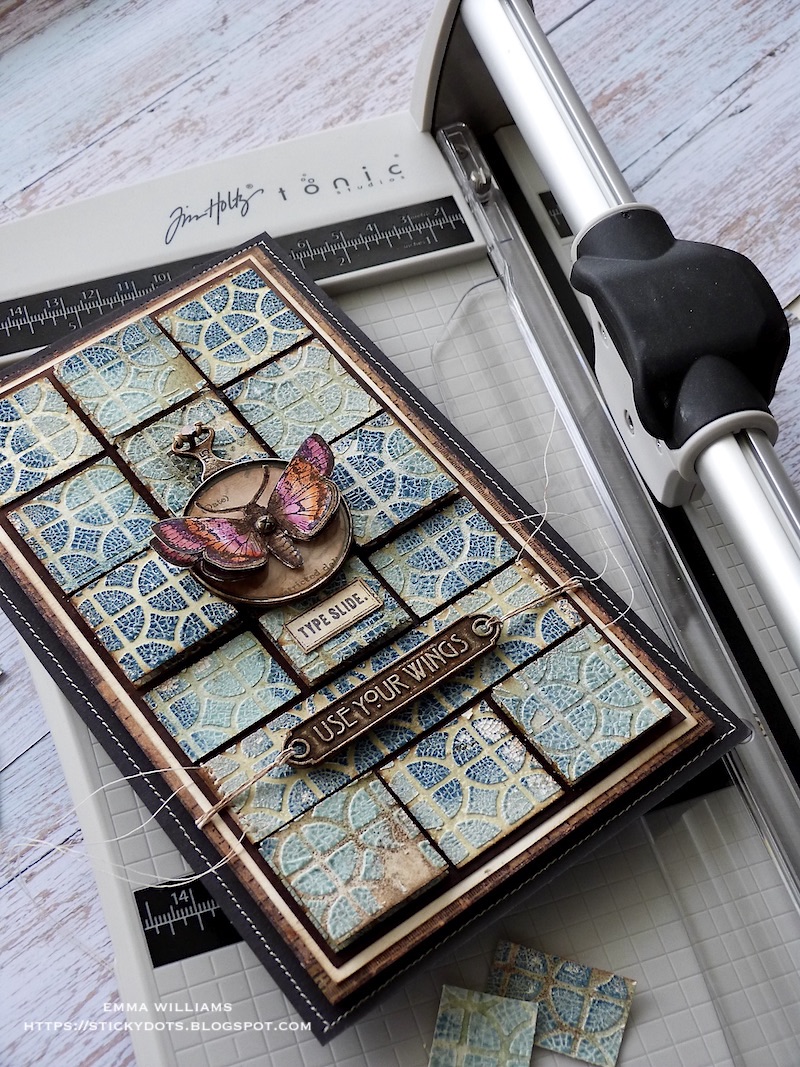


I hope you love the card I've made and found my findings with this trimmer useful! I can't recommend it enough but if you need more information about this trimmer, then head on over to Tim's blog where he talks you through all the details of what you can expect from this.
See you again soon and thanks for stopping by today...love Emma x


I love love the stained glass effects and how brilliant you made the “lead” for the panels; popping a few up gives great interest and depth.
ReplyDeleteStunning creation. Anesha
ReplyDeleteWhat a lovely idea with the tile effect. I never tire of your good ideas and talent. Thank you for sharing.
ReplyDelete