
Hello friends and welcome to this week's brand new Simon Says Stamp Monday Challenge.
Our theme for the start of a new month is called EMBOSS IT and we are showcasing the fabulous products of our very own Simon Says Stamp within our makes ~ so, if you'd love to join us and play along, then we're excited to see what you create.
For my make, I used embossing techniques on many of the pieces I've used to create a vintage style product inspired by the Art Deco era and of course, I couldn't resist using some of the amazing new products from Tim Holtz's brand new 2023 idea-ology collection.

So, let's get started because it's time to share how I created my project for this week.


To begin with I flipped a Mini Sized Etcetera Tag upside down to use as my base and I covered the edges on the left and right hand side with some Design Tape before moving onto that background. This particular design is one of Tim's older sets of tapes, but I can't remember which set it came from but you can use any you choose or have to hand.

BACKGROUND
To create the background for my tag, I began by cutting a panel of Mixed Media Heavystock card and the spritzing it with a very light mist of water. I then added my colours using Tim Holtz Distress Spray Stains and Oxide Sprays ~ Rustic Wilderness and Black Soot Spray Stains and Rustic Wilderness and Cracked Pistachio Oxide Sprays. I layered the colours to create the blend I was happy, adding more water if needed before I allowed the inks to dry thoroughly. You can use a heat gun to set the inks before moving onto stamping and embossing the background.
Once the inked cardstock is dry, I used clear Embossing Ink to ink up the Simon Says Stamp Parallelogram stamp which I stamped directly onto the background. I then sprinkled gold embossing powder over the top and heat embossed the powder until molten.
Because the background is slightly longer in length than the stamp, I repositioned the stamp and stamped a repeat pattern to cover the whole panel of card.

After I cut the panel to the shape of the tag, inked the edges with Walnut Stain Distress Ink, I machine stitched a border around the outside edge and then adhered the panel to my etcetera tag.

Where I repeat stamped the background, the image doesn't match up completely, so to hide this I cut a strip from my background and attached this across the join, adding Design Trim Tape, top and bottom.

PHOTOGRAPH AND FRAME
We'll start with the photograph and for this I used an image from the Photomatic set of a beautiful lady from the 1920's/30's era.

I applied a coat of clear gesso onto the surface of the photo, allowing it to dry before applying the colour using Distress crayons and a water brush.
Once I was happy, I then allowed the photo to dry before dabbing a clear embossing ink pad over the surface. For this particular techinque and because I've painted the photo and don't want to smudge it, I find it's better to use this way of adding the ink rather than using the dabber but for all other applications, I like the embossing dabber.
Whilst the ink is still wet, I sprinkled Frosted Crystal over the top, tapped away the excess and then heat embossed the powder until it melted.
This leaves the most beautiful finish to the image and also seals the colours.
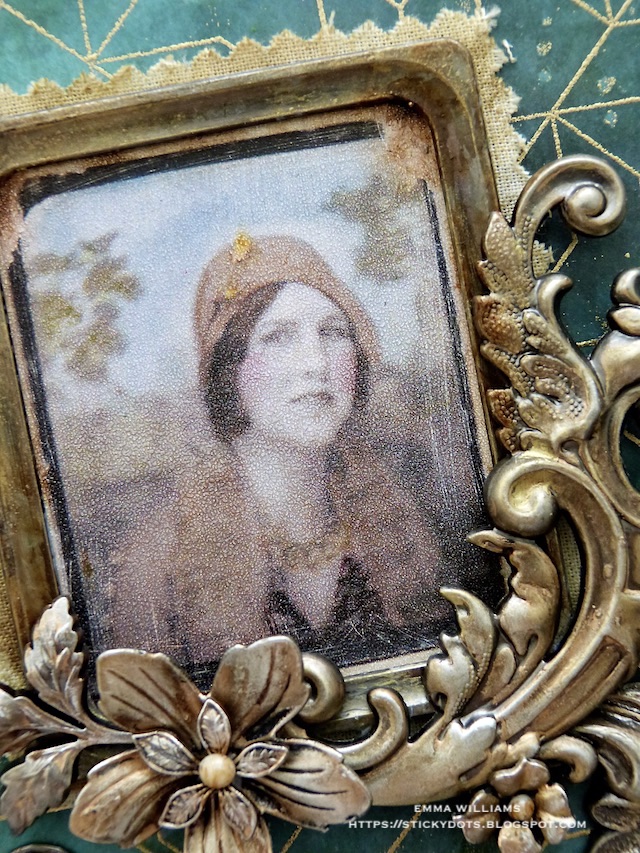
Setting the photo to one side, I moved onto the frame and this is one of the gorgeous new metal frames from the idea-ology release. These come in a pack of 4 and in two sizes, I've used the larger one and they match the Photomatic images perfectly, so can be used in conjunction should you choose to do so.
I altered the metal by adding a smear of gesso, wiping away the excess and then dribbling some Mushroom Alcohol Ink over the top. I then finished by applying Rust Alcohol Ink and Black Soot Distress Paint to create a worn finish to the metal frame.
I attached the frame over the image and then layered this over a piece of linen, dyed with Frayed Burlap Distress Spray Stain and cut with my Nan's old pinking shears.
I adhered the layered frame onto my tag using Matte Collage Medium.
To the right of the frame, I added a separate piece of linen. This was an offcut that I rolled and then attached to the edge of the frame.

I then clipped a mini pin to the material and hung a Hook Clasp complete with a word key, "Heart' hanging from the end. The key is altered using the same technique as I've used on the frame in the next stage.

METAL FLOURISHES AND FLOWERS
Moving onto the metal flourishes and flower arrangement, and for these I combined the new Foliage Adornments with Flourish and Floral Adornments but altered the metal for each piece, in exactly the same way.

To do this I took my selection of metal and then applied a small amount of Foundry Waxes over the surface. I used a combination of Statue, Sterling and Gilded, layering each colour one at a time and heat setting the wax between applications.
TOP TIP: You don't need to apply a solid coverage when applying each layer as this won't give you the variation in colour ~ just allow your finger to touch areas and then move onto the next layer. Less is more and you can always add if you need to.
With my metal nearly ready, all I had to do was add some of the definition back into each piece and for this I used Mushroom Alcohol Ink and Walnut Stain Distress Crayon. Apply the alcohol ink first, just allowing it to pool onto the surface and dabbing away the excess before then rubbing the crayon over the top and blending out any harsh colour with a soft cloth.
I arranged the metal to cascade around the frame, adhering it with Matte Collage Medium and adding foam pads if I needed a little extra height.

You can see how the three sets of new and old, blend together seamlessly and that gorgeous leaf sprig on the left is the perfect finishing touch.

QUOTE
We're nearly there and all that's left is the quote and the final details.

For the quote, I used one of the new Quote Chip Labels and after lightly sanding the edges and inking them with Walnut Stain Distress Ink, I placed the chip inside a Label Frame, again altered with little of the Foundry Waxes. The chip fits perfectly with inside the frame ~ I love Tim and Paula's attention to detail to bring us these pieces that work so well together!
I attached the framed chip to my tag, placing it beneath the arrangement of metal.

FINISHING DETAILS
For the finishing details, I added a Machinery Head on the left hand side of the frame and metal arrangement. I altered this using the same technique to apply colour as I've used on the frame.
Finally, I added a label, Style No.302 in the top right hand corner. This is cut from the Collage Strips set and just adhered to the corner to complete the project.

...and that is my project finished for this week, and I hope you love what I've made and the embossing techniques that I've used.

As always, if you make anything, or if you've been inspired by anything that you've seen here on my blog ~ then please, let me know by tagging me on social media or leaving a comment here and I will be right over to take a look!
Don't forget that every week, one lucky random participant has the chance to win a $25 gift voucher from Simon Says Stamp and you can join in up to 5 times, which means you could have 5 chances to win. You have until next Monday at 8am Ohio time. 1pm UK time, 2 pm CET to join in and good luck....


Thank you so much for taking the time to stop by today ~ stay safe and keep well.
Love Emma xxx
Recipe for project:
Tim Holtz for Stampers Anonymous: Mini Etcetera Tag
Distress Paints: Black Soot
Distress Spray Stain: Rustic Wilderness, Black Soot Frayed Burlap
Distress Oxide Sprays: Rustic Wilderness, Cracked Pistachio
Distress Inks: Walnut Stain
Tim Holtz Idea-ology: Photomatic, Photo Frames, Foliage Adornments, Flourish Adornments, Machinery Heads, Floral Adornments, Quote Chip Labels, Label Frames, Collage Strips, Hook Clasp, Word Key, Design Tape Trim
Linen and Design Tape from my stash


I would have never tried all three colors of Foundry Wax on the metal pieces...now I have to give that technique a go! Just beautiful! Paula
ReplyDeleteAmazing vintage style piece Emma - there are just so many fabulous details in your background and embellishments - really showcases the Tim Holtz vibe. Thanks so much for having me as March's guest designer on Simon Says Monday Challenge
ReplyDeletePauline xx
Absolutely gorgeous!! I love the teal colored background!
ReplyDeleteThis is stunning! So very beautiful.
ReplyDelete