Monday, 27 March 2023

The Easter Parade...

Hello everyone....

As always, a Monday brings a brand new Simon Says Stamp Monday Challenge and this week, we are asking you to STENCIL IT with our fun challenge theme. With so many stencils available, I'm sure you'll all be spoilt for choice and we can't wait to see how you will interpret our challenge and hope you'll join us and play along.

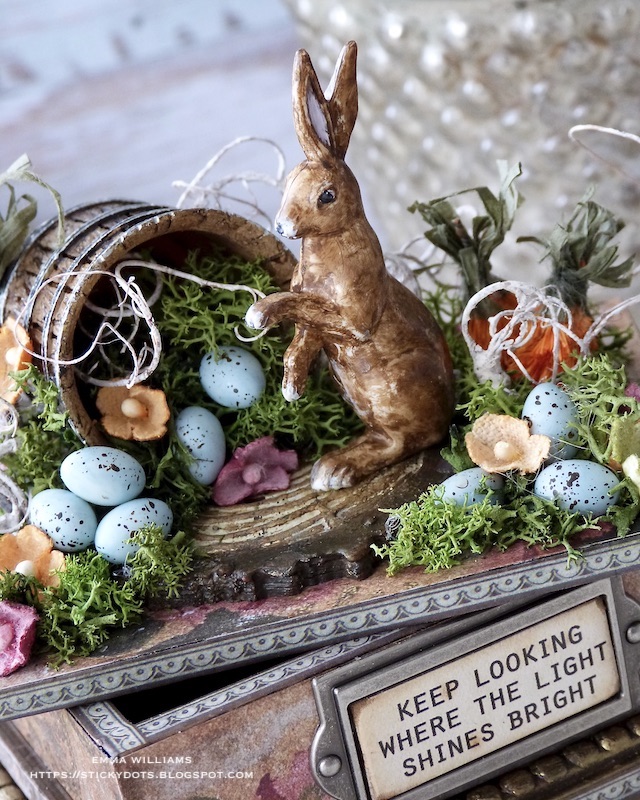
For my project, I wanted to create one last Easter make and with this in mind, there was only one Easter Bunny that would feature on this project and he is the coolest bunny in town ~ say a big hello to Hippity Hippity the Hipster Bunny from Tim Holtz and Stampers Anonymous!

So, lets' start making and here's how I created my Easter Tag...

To begin with I created the background for my Mini Sized Etcetera Tag. I cut a panel of Kraft Heavystock Card the same size and shape as the tag and applied Grit Paste through the Polka Dot Layering Stencil. After I'd allowed for the paste to dry I machine stitched a border around the outside and adhered it to my tag using Collage Medium. You can use the Polka Dot Stencil that comes with the stamp set but because I wanted to cover a larger area, I used the larger layering stencil.

I dragged the Frayed Burlap Oxide Ink pad around the edge of the background panel, and smudged the ink with my finger.

To complete the tag, I painted the hole reinforcer with a combination of Black Soot and Walnut Stain Distress Paint and then attached over the hole.

I then threaded some rope through the hole.

We're now ready to say hello to the Hipster Bunny...

HIPSTER BUNNY

I cut a panel of Watercolour Cardstock to measure 10 x 16cm and stamped the image of the Hipster Bunny onto the card.

I watercolored the image with Distress Watercolour Pencils but then added some 'fur and fluff' detail with Polychromos Pencils.

To add colour around my image, I smooshed some Tumbled Glass Distress Ink onto my glass mat, spritzed with water and then used a paint brush to pick up the colour and added a colour wash across the background.

I then heat dried the ink before dipping the edges into the remaining droplets of ink on my mat, being careful not to get anything on the bunny.

Once the panel was dry, I then added the grungy, vintage edging and for this, I smooshed Frayed Burlap Oxide Ink onto my mat, spritzed with water and then dipped the edges of the card into the ink.

After drying my card, I inked the edges with Walnut Stain Distress Ink and then added some text stamping using the newsprint part of the stamp from the Botanical Collage, just adding tiny snippets around the card edge.

To add some more detail and another layer to my background, I applied Speckled Egg Oxide Ink through the Polka Dot Stencil that comes with the Hipster Bunny.

With my panel ready, I machine stitched the artwork to a piece of burlap and then mounted it onto my tag using foam pads.

At the top of the panel, I added a little "Handle With Care" Label. This is from the Eccentric Stamp set and I stamped it onto heavystock card using Fired Brick Archival Ink and then cut it out before mounting it onto my panel.

HIPPITY HOPPITY

To create the sentiment, I stamped Hippity Hoppity onto a strip of vellum using Versamark Ink and then sprinkled with white embossing powder. Tap away the excess and heat emboss.

I layered the vellum strip over a panel of card that I coloured using Tumbled Glass and Speckled Egg Distress Spray Stains. The edges of the card are inked using Frayed Burlap Oxide Ink, in exactly the same way as the background panel. I secured the vellum at the back of the card panel, machine stitched an edging around the panel and then mounted the sentiment onto my tag, placing it just below the bunny.

To add some detail to the panel, I had some tiny little die cut stitches on my desk that were left over from a previous project, using the Bunny Stitch Die Set and I just stuck these on either side of the sentiment.

After stamping his little bow tie onto a piece of watercolour card, I coloured it with Tumbled Glass Distress Watercolour Pencils and then fussy cut around the edge before attaching it under the bunny's chin.

DIE CUT FOLIAGE

Now this little bunny is hiding behind the foliage, and to create that foliage I used my all-time favourite leaf die from the Funky Florals Die Set. You'll have seen this used on so many occasions since it's release and I love it because of the layers and detail it creates on a project and it's so simple to put together.

I spritzed a piece of Heavystock Card with Rustic Wilderness and Peeled Paint Distress Spray Stains and once dry, I cut all my foliage pieces which I layered.

I then arranged the foliage around the bunny, attaching it to either side. To complete the arrangement, I added twigs, some curly moss and reindeer moss from my stash.

For the finishing touches, I hammered a Tack Nail into either side of the panel....

...and then finally, I added his little glasses.

I used the stamp from the stamp set and stamped them in Black Soot Archival ink onto the cardstock. I then sprinkled Lumberjack Plaid Distress Glaze over the top, heat embossed the glaze before I fussy cut them around the outline, and removing the centres. I then attached them to my bunny, popping them onto his nose with a dab of Collage Medium.

So that is my project finished and ready to be displayed at Easter...

I hope you enjoyed the make and the techniques I used to bring this piece together.

As always, if you make anything, or if you've been inspired by anything that you've seen here on my blog ~ then please, let me know by tagging me on social media or leaving a comment here and I will be right over to take a look!

Don't forget that every week, one lucky random participant has the chance to win a $25 gift voucher from Simon Says Stamp and you can join in up to 5 times, which means you could have 5 chances to winYou have until next Monday at 8am Ohio time. 1pm UK time, 2 pm CET to join in and good luck....


Thank you so much for taking the time to stop by today ~ stay safe and keep well.
Love Emma xxx

Tuesday, 21 March 2023

Tim Holtz Rotary Media Trimmer

Hello friends...

I was so excited to receive my Tim Holtz 12.5" Rotary Media Trimmer as the perfect addition to it's smaller friend, the Mini Guillotine! They now proudly sit on my craft desk, side by side ready for action.

The Rotary Trimmer arrived in the morning and by lunchtime, I'd already put it to work and tested out exactly what it could do. I'd cut multiple surfaces and backgrounds of all different sizes and thicknesses to see how it would cope and yes, it definitely lived up to my expectations ~ it is amazing and here are 5 reasons that I love this trimmer!

1. During my crafting journey, I've owned a lot of trimmers and guillotines and I've also managed to write off quite a few when I push them too far ~ I can't tell you how many trimmers and guillotines I've managed to ruin with mountboard/chipboard!! 

But no more, that will be a thing of the past because this little beauty is a real workhorse and it did everything I asked of it ~ wherever you put that substrate, top or bottom, the geared, rotary blade just glided through a variety of substrates and media effortlessly including the mountboard ~ even that tiny strip was a perfect cut and all without any effort or pressure.

I also tried it out on yupo, vellum, Sizzix Texture Roll, cork, burlap and heavyweight acetate with no problem whatsoever and even managed to cut through 3 sheets of card at one time, each time creating a supersmooth, clean cut ~ no raggedy edges which is a pet hate of mine!

2. The trimmer is so lightweight and the size of the machine will fit comfortably in any craft space which is something that really appeals to me. As you can imagine there are times when I'm quite limited for crafting space, I can fill a table and a floor with work and end up crafting in a 5" square on my desk. It's also really solid when you place it on the desk, which is all down down to the placement of the pads on the base of the trimmer ~ this will not rock and roll when you try to cut!

3. I love the fact this has imperial and metric measurements. Here in the UK, we do tend to work in centimetres, so this is perfect for me as I no longer have to keep converting my measurements dependant on the trimmer I'm using.

4. On the majority of trimmers and guillotines that I've owned in the past, you will find that you get one extending ruler arm but this one has two, which makes life so easy when working with 12' x 12' papers.

5. If you've watched some of Tim's YouTube Lives, and seen some of my makes, then you might have heard that I do tend to make "Emma sized cards" and now I have a piece of machine that is perfect for cutting and making my own Emma sized cards with ease and here you can see card blanks that I've cut from Mixed Media Heavystock, White Heavystock and Kraft Heavystock, all measuring 20 x 15cm. 

So with my trimmer ready to put to work, I made an "Emma sized card" and hope you love the results...

One thing I've found difficult in the past with my previous trimmers, is being able to cut through pasted surfaces. Usually when I make the cut, the paste will flake away, or the trimmer will pull it off the card, so I wanted to see how this trimmer coped...

...and there were no surprises about the results, they speak for themselves ~ it did the job perfectly and it cut tiny 3cm square tiles with no effort, no flaking of the paste ~ just clean lines that I could use for my tiled effect card.


The background for this card is made by applying Crackle Paste through the Stampers Anonymous/Tim Holtz Focus Layering Stencil onto a panel of Mixed Media Heavystock. Whilst the paste was wet, I sprinkled a combination of Weathered Wood and Prize Ribbon Distress Glaze over the top. After allowing the paste to crackle and do its thing, I then gently heat embossed the glaze on the paste until shiny.
Now for some trimming and I cut the background into panels of various sizes. The majority are 3cm square and then there is a smaller line of 2 x 3cm and a strip that goes across the card.
I inked the edges of each tile with Walnut Stain Distress Ink and then layered them onto a panel of black card, cut with the trimmer.
I also popped some of the tiles onto foam pads, layering them over the top of the first layer to add extra height and detail.
I layered the complete panel onto further mats of card before mounting it onto my card blank.
For the focal point of the card, I stamped a butterfly from the Entomology stamp set and coloured it with Distress Watercolour Pencils. I layered the butterfly onto a Optical Lens and attached it to my card front.
Finally, I added the "Use Your Wings" Word Plaque to my card and a tiny stamped 'type slide" label.

I hope you love the card I've made and found my findings with this trimmer useful! I can't recommend it enough but if you need more information about this trimmer, then head on over to Tim's blog where he talks you through all the details of what you can expect from this.

See you again soon and thanks for stopping by today...love Emma x


Monday, 20 March 2023

Once Upon A Time...

Hello friends...

Hope you all had a wonderful weekend and you're ready for the brand new challenge over on the Simon Says Stamp Monday Challenge Blog, where we are celebrating Spring and Easter with our fun theme. If you'd love to join us, then all the details are at the end of this post and the DT can't wait to see what you'll be creating.

For my make, I decided to create a vintage style home decor project for Easter using products from Tim Holtz's idea-ology collection and inspired by the illustrations and stories of Beatrix Potter's Peter Rabbit and Benjamin Bunny, I invite you to join me as I tell the tale of this mischievous little rabbit who is looking for that illusive supersized prize carrot, that he knows is hiding somewhere in this make...


So, let's get started because it's time to share how I created my project for this week.

BOX

To begin with I used the smallest sized vignette box in the Vignette Set of 3 and I combined this with a couple of older products from the idea-ology range, the Vignette Frames and the Vignette Panels, which many of you will probably have in your stash. If you haven't got these products, then don't worry as you can easily use chipboard to make the lid for the box, as I did in a previous project that you can read about HERE and you can either replace the frame with Etcetera Trims to create a decorative edge or just not use it.

Taking the box itself, I began by covering the box using papers from Backdrops Volume 5 set and cut each piece to fit the four sides and adhered them with Matte Collage Medium.

I applied Design Tape Trim around the top edge of the box to give a nice finish and then sealed the paper and the trim with another coat of collage medium. Setting the box to one side, I moved onto the lid.

As I said, if you don't have the vignette panels to fit these boxes, it's not a problem just follow my steps from the previous post and this will give you a really substantial lid for your box.

If you do have the lid, then that's a bonus and all I did was cover both sides using more of the same paper that I used to cover the sides of the box and added the tape trim around the edge. Once again seal with a coat of collage medium.

At this stage, I placed my box over the framed panel that creates a decorative base and then added Mini Foundations to add feet to the base of the frame. Again, should you not have the framed panel, you can use Etcetera Trims which is something I have done in the past. I would paint using the same colours as I did for the frame, Walnut Stain and Antiqued Bronze, and then I would attach the trims around the bottom edge of the box. They will be slightly deeper but they do create a lovely finish to the box.

On the front of the box, I added the Quote Chip Label ~ "Keep Looking Where The Light Shines Bright", which was perfect for the scene and story I wanted to tell. I sanded the edges of the chip, before inking with Walnut Stain Distress Ink and then placed the chip in a co-ordinating size Label Frame. I actually left this frame it's original colour, as I wanted a fresh feel to this piece and didn't want to dull the project too much.
Attach the frame to the front of the box.
We now have the box ready to decorate, so let the fun begin...

CREATING THE SCENE

PAINTING THE SALVAGED RABBIT

For this make, I used one of the Salvaged Rabbits and began by applying a coat of Ground Espresso Distress Paint over the surface. The paint will self level but I wanted to create a slightly textured look, so I took a dry brush and whilst the paint was still wet, I dabbed the brush over the surface of the rabbit, to create the stippled finish I was looking for.

I then painted the insides of the bunny ears with Spun Sugar Distress Paint, used Black Soot on his eyes and Antique Linen on his paws, tummy and feet.
Set the rabbit to one side to dry throughly before attaching to the top of the box, placing him to the right of the barrel.
SPECKLED EGGS

To colour the salvaged tiny eggs, I used (clue is in the title, lol) Speckled Egg Distress Paint and once the paint was dry, I used the Splatter Brush to splatter Ground Espresso paint flecks over the surface. Leave these to dry...

MAKING THE CARROTS

The tiny little carrots that can just be seen on the right hand side and then the prize carrot behind the barrel are all made using Woodland Trees. Tim has a fabulous tutorial for making these and he takes you through the process of making them, and all I did was downsize my trees for this project and used the smallest tree size from the Woodland Lot set before adding the raffia carrot tops.

TREE RINGS BASE

As a base for my scene, I used the Tree Rings Bigz Die and Texture Fade to die cut four pieces of Mountboard. I layered three of those die cuts over one another before taking the fourth and running it through the texture fade to create the embossed tree rings.

I attached the final layer to the other layers and then painted the die cut with a combination of  Gathered Twigs and Ground Espresso Distress Paints for the outer section and for the inner section, I used Antique Linen Distress Paint. To accentuate the embossing, I ran Walnut Stain Distress Crayon over the top, blending it with my fingertip. You can see the layers for the tree ring in the photo below.
I adhered the die cut to the left hand side of the lid.

Using hot glue, I attached an idea-ology Barrel on top of the tree ring, placing it on it's side and then added some moss around the base of the barrel and also over the surface of the lid.
SPRING FLOWERS

For my tiny individual flower heads, I used Bouquet Findings that I cut from the bunches. I spritzed the flowers using three separate colours fo Distress Spray Stain ~ Victorian Velvet, Scattered Straw and Shabby Shutters before I heat dried the flowers ready to use.

ADDING THE DETAILS

We now have everything ready to add to the project and bring this rabbit's tale to life...
...and I adhered the tiny speckled eggs and the spring flowers inside the barrel, and around the outside.

I attached two of my carrots and buried these in some moss to look as if they are growing and then...
...I attached the 'prize carrot' behind the barrel, placing it out of sight of this mischievous bunny, ready for him to find.
Finally I added some curly moss in around the all the embellishments to create movement to the whole piece.

So, that's my Easter project finished and I hope you love what I've made and will be inspired by all the elements and techniques I've used.

As always, if you make anything, or if you've been inspired by anything that you've seen here on my blog ~ then please, let me know by tagging me on social media or leaving a comment here and I will be right over to take a look!

Don't forget that every week, one lucky random participant has the chance to win a $25 gift voucher from Simon Says Stamp and you can join in up to 5 times, which means you could have 5 chances to winYou have until next Monday at 8am Ohio time. 1pm UK time, 2 pm CET to join in and good luck....


Thank you so much for taking the time to stop by today ~ stay safe and keep well.
Love Emma xxx

Recipe for project:

Sizzix/Tim Holtz: Tree Rings Bigz Die
Tim Holtz Idea-ology: Backdrops Volume 5, BarrelVignette Set, Tiny Eggs, Salvaged Rabbits, Label Frame, Woodland Tree Lot, Bouquet Findings, Design Tape Trim, Vignette Panels, Mini Foundations and Vignette Frames from my stash
Distress Paint: Black Soot, Antiqued Bronze, Ground Espresso, Speckled Egg, Walnut Stain, Spun Sugar, Antique Linen
Distress Spray Stain: Victorian Velvet,  Shabby Shutters, Scattered Straw, Spiced Marmalade
Distress CrayonsWalnut Stain
Powered By Blogger

Total Pageviews