Happy Monday friends...
Hope you all had a wonderful weekend and ready for a creative week ahead and what better way to start than joining us for the Simon Says Stamp Monday Challenge. This week, the DT have been inspired by our FABULOUS FALL mood board, which you can see HERE and would love for you to join us and play along!
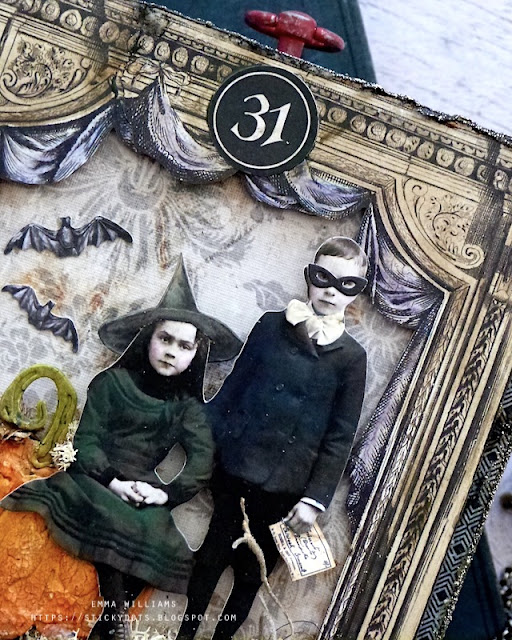
Over my many years of crafting, I have made a lot of autumnal/fall projects and I've listed just a few of my favourites at the end of this post. But today's make was inspired by Halloween, something I always associate with autumn, a time when the nights start to draw in, the leaves turn golden and the sight of pumpkins and all things that go bump in the night suddenly make their appearance and with this in mind, I'm sharing a home decor piece that I made, and was going to share a few weeks ago ~ yep, when things get busy, I really do work that far in advance. But the days flew by and I just never got around to sharing...until today, when I introduce you to something dreadfully wicked, my vignette project that features a wannabe witch and wizard, all dressed up for the masquerade ball and ready to create havoc and mischief ~ say hello to Harry and Hermione!
It's time to grab your broomsticks, put on your witches hat and here we go, let's get started...
SQUARE VIGNETTE
To begin with I used the largest size of the set of 3 Square Vignette Boxes as my base, flipping it over so I can use the solid side to work on. I covered the sides of the box with paper from the Halloween Backdrops. I used a neutral coloured paper which I cut to size and adhered the panels using Matte Collage Medium, to each of the four sides.
On the front of the box, I used one of my favourite designs from the Halloween Worn Wallpaper pack, and once again, I went for a fairly neutral colour tone. I cut the paper to fit my panel and once again, used Matte Collage Medium to adhere it.
Around the edges of the box, I added strips of the Halloween Design Tape Trim, and chose two different patterns ~ the Poison Caution tape...
...and the black and white design.
I applied a coat of Matte Collage Medium over the entire box to seal the paper and then ran the Walnut Stain Distress Crayon around the edges to cover any of the white core from the paper.
My box is now ready to decorate and we'll start with the curtains...
SCENE
The curtains I used are from the Halloween Layers Pack and I used both on this piece. I coloured the two pieces with Distress Watercolour Pencils, Villainous Potion on the curtains and Walnut Stain on the facade.
Once I was happy with the colour, I then placed foam pads on the backs of each curtain and attached them to the front of my covered box. When placed together they do slightly overlap in the centre, but I trimmed away and excess and just secured them in the middle with a dab of glue. You can see below how I overlapped the curtains, and where they are joined.
In the centre of the curtains, I attached the number 31 from the Halloween Ephemera Pack. I applied a coat of the medium over the top and once dry, I ran the Walnut Stain Crayon around the edge, blending out the colour with my finger.
On the left hand side, just tucked underneath the curtain, I placed a Numbers Strip Ephemera piece.
Now to add all that grunge around the edges and I used Translucent Grit Paste which I roughly applied with my finger. Set the box to one side to dry and once it is dry, I took a fine detail paint brush and painted the paste with Black Soot Distress Paint. I allowed for the paint to dry before I applied some gilding wax along the edges to accentuate the texture of the grit paste.
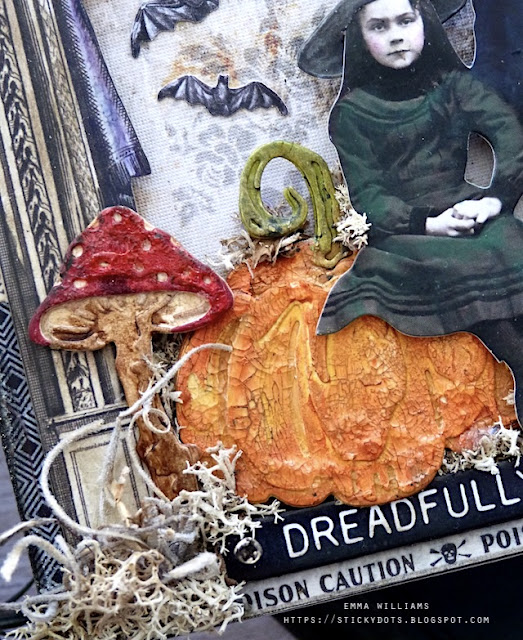
Along the base of the box, I added the Dreadfully Wicked Quote Chip from the Halloween Baseboards pack. I sanded the edges of the chip before inking them with Walnut Stain ink. I then attached the chip to my box with collage medium.
I hammered a Tack Nail into either side of the quote chip and applied a combination of Crackling Campfire and Black Soot Distress Paint over the surface of the metal to create a rusty finish.
PAPER DOLL
With the box drying I moved onto my paper dolls. These two trick or treaters are from the Halloween set and I colour tinted them with Distress Watercolour Pencils and a water brush. I then added the witches hat to the girl ~ the hat is from the Curiosities Sticker Book and I cut a slit into the hat so that I could slide the paper doll's head underneath so it looks as if she's wearing it.
On the little boy, I added a masquerade mask and also placed a Curator Ephemera piece in his hand.
PUMPKIN AND TOADSTOOL
Now for the pumpkin and toadstool and what I love to do is mix Tim's brands and as you can see, on this occasion, I chose Sizzix and idea-ology. So we'll start with the pumpkin and I used the smaller sized pumpkin from the Pumpkin Colorize set.
After die cutting each piece for my one pumpkin, I painted them with a combination of Rusty Hinge, Antique Linen and Wild Honey Distress Paints for the pumpkin itself and Peeled Paint and Rustic Wilderness for the stalk. Once the pieces were painted, I then layered them to form the pumpkin. Over the top of the finished pumpkin, I added a coat of Rock Candy Crackle Paint, which I allowed to dry before scribbling my Walnut Stain Distress crayon over the top, and blending the ink into the crackles to accentuate them.
The toadstool is from the Myron Colorize Die Set and after painting the individual pieces: Candied Apple, Antique Linen and Frayed Burlap, I added the crackle paint over the top, and just as before for the pumpkin, I allowed it to dry before adding the Walnut Stain crayon over the surface.
My pieces are now ready and I started by attaching the pumpkin and toadstool to the left hand side using foam pads.
I then sat my paper doll onto the pumpkin, again using foam pads to add dimension.
Around the base of the embellishments, I used moss ~ reindeer moss and Spanish moss that I have in my stash and adhered this into place with a hot glue gun.
Finally, I added two different sized bats from the Halloween Ephemera pack, and adhered these directly onto the background with collage medium.
We're nearly there and all that's left is the metalware that I attached to the top of my box.
HANDLE
This handle/knocker is from the Mini Hardware Findings set and painted the surface with Candied Apple Distress Paint. Once the paint was dry, I scratched at the surface to create the chippy paint look to the metal and then attached the handle to the top of my box....
...and finished with two droplets, one either side.
So that's this week's project made and ready to display for Halloween ~ I really loved working on this one and love how the two brands work seamlessly together.
As always, if you make anything, or if you've been inspired by anything that you've seen here on my blog ~ then please, let me know by tagging me on social media or leaving a comment here and I will be right over to take a look and if sometimes I miss it ~ just keep nudging me!
Don't forget that every week, one lucky random participant has the chance to win a $25 gift voucher from Simon Says Stamp and you can join in up to 5 times, which means you could have 5 chances to win. You have until next Monday at 8am Ohio time. 1pm UK time, 2 pm CET to join in and good luck....
Recipe for project:


Love your work and look forward to every post. Just commenting here (no way to contact you otherwise) to leave a minor suggestion regarding the paper dolls whose factory outline can sometimes be clumsy. Using an x-acto knife to cut away some of the round areas (sometimes all it takes is a tiny v-cut) can really help as does outlining the edges with black only where there is black (avoid arms, faces, lightest areas).
ReplyDeleteNice post thank you Leann
ReplyDelete