
Hello friends...
Hope you all had an amazing weekend and now ready and refreshed for another week that will be packed full of inspiration because as many of you know, Tim Holtz's brand new Halloween release from Sizzix is now available worldwide and if you watched Tim's epic live, (click here for replay) you know you really do need it ALL!
But to kick the week off, we have a brand new Simon Says Stamp Monday Challenge and this week our theme is SPRITZ AND SPLATTER!
Now of course, when it comes spritzing there is one product that I love and that's Tim's sprays and to celebrate the launch of Halloween, I created a card using a couple of the new die sets, Mischievous and Bold Text Halloween and combined the new with old because they work together so well!


BACKGROUND
We'll start with the background and for this I used a couple of the brand new colours of Mica Spray, Iron Gate and Decayed. These are available to reserve now at Simon Says Stamp, so if I were you, I would get ahead of the game, and put them in your shopping basket ASAP!
After cutting a panel of black card, I spritzed the two colours onto the surface, together with Antique Linen Oxide Spray. I always allow my Mica Sprays to dry naturally as I think it really enhances that shimmer and shine, but if you can't wait ~ then you can heat dry.
I love the effect of these sprays and love how it resembles a Halloween sky so perfectly. I machine stitched a squiggly border around the outside before adding the swathe of stars that go across the top of the card.
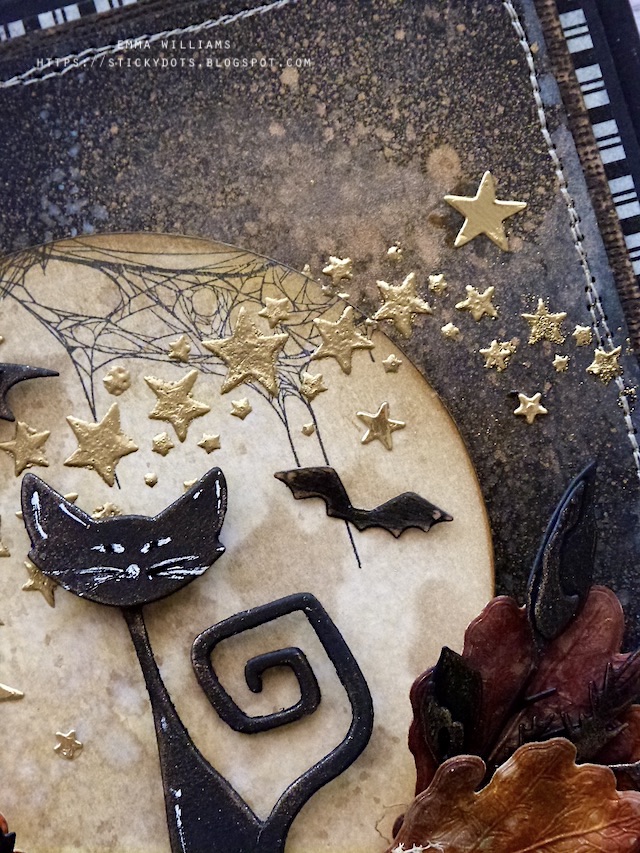
For this I used the Hocus Pocus Layering Stencil and placed it onto my spritzed background before applying Translucent Paste through the stencil. Whilst the paste was still wet, I sprinkled gold embossing powder over the top and set it to one side for about 30 mins before I used my heat gun to melt the powder until glossy and molten. I then mounted the panel onto black kraft stash before matting the layers onto a panel of card where I applied a border of Design Trim around the edge, which just creates a decorative border before mounting all the layers onto my black card blank.

Now we're ready to decorate and create the magical scene of the black cat and his two batty friends...
MOON
To begin with I made my moon and for this I cut a circle, approx 9cm diameter and inked the circle with a little Antique Linen Distress Ink. I then placed the largest sized Moon Mask over the top of the circle and used Frayed Burlap to ink through the mask to create the craters. After stamping some cobwebs across the top of the moon using the Tangled Webs Stamp Set and inking the edges with a little Fossilised Amber, I wanted to add the stars which will also continue and match up with the spritzed background.
So for this I laid down my moon onto the background, placing it centrally onto the card and then positioned the Hocus Pocus Layering stencil onto the moon, applying the paste through the stencil onto the moon section only to create the continuous flow of stars. Sprinkle the gold embossing powder over the top and heat set.

Attach the moon into position with foam pads to add a little dimension.
LEAVES
I used the Oak Leaf 3D Impresslits Die for the leaves and cut them all from Mixed Media Heavystock card. I spritzed the card with a combination of distress sprays; Spiced Marmalade, Aged Mahogany, Crackling Campfire, Mustard Seed, Gathered Twigs, Peeled Paint and after a light misting of water, I allowed the colours to blend and heat dried the card before die cutting each leaf.
I only used the smaller leaf of the two die cuts for this make and inked the edge with Gathered Twigs.

With my leaves cut, I then cut some foliage from black card, using the Festive Bouquet die set.

To give an little more shimmer to each card, I splattered the foliage with some of the Mica Spray that I used on the background and then highlighted the detail using the matching Distress Crayons.

CAT
Now to add the star of the show and for this I cut the cat three times from black card using the Mischievous die set and layers the die cuts to make one solid image that has quite a bit of dimension.

I added the facial details with a white gel pen and then ran the Decayed Distress Crayon around the edge to add some shimmery highlights.

I had the bats cut from a previous project, so if you have any of the previous Halloween die sets from Tim, and they feature the bats, then you can use these ~ they all work perfectly!
So we're good to go and can now build the scene...
I arranged all the foliage across the bottom of my moon, and then placed my black cat in the centre, sitting him on a bed of shredded Mummy Cloth that I dyed with Frayed Burlap and Antique Linen Distress Stain.

I added the bats and then some extra stars, which again were on my desk from a previous make. They are cut from the Falling Stars Thinlits die set.
BOO!
We're nearly there and all that's left is the beautiful Bold Text which sits at the bottom of the card.
For this I used the Bold Text Halloween die set and cut three layers, two from gold metallic kraft card and one from silver. I layered the gold letters over the top of one another before adhering them to the silver layer, slightly offsetting them to create a drop shadow. I didn't want the letters to be too bright in colour, so I knocked them back slightly by adding a smear of Espresso Distress Paint over the top, wiping away the excess before adding some Vintage Photo crayon. I then attached each letter to my card front to complete the card....

...and that's my project for this week's challenge finished and I hope you love what I've made.

As always, if you make anything, or if you've been inspired by anything that you've seen here on my blog ~ then please, let me know by tagging me on social media or leaving a comment here and I will be right over to take a look and if sometimes I miss it ~ just keep nudging me!
Don't forget that every week, one lucky random participant has the chance to win a $25 gift voucher from Simon Says Stamp and you can join in up to 5 times, which means you could have 5 chances to win. You have until next Monday at 8am Ohio time. 1pm UK time, 2 pm CET to join in and good luck....


Recipe for project:


Super cute! I love how you did the stars across the moon and background. So many cool details!
ReplyDeleteWhat a stunner!! Absolutely gorgeous card Emma :-) the background is fabulous and I love the kitties, I ordered this set recently! can't wait for it to arrive! :-)
ReplyDeleteHope you have a great week!
luv
Lols XXX
Just amazing as always Emma!! Thanks for sharing your works of art! You do so much, I hope you never get tired of it!!
ReplyDeleteYour kitty meowing at the moon is so, so cute...love it!
ReplyDeleteOMGosh!!! Love this card. Trying to not spend but this card is go great I just have to have all of the needed items. You made my day. Thank you so much for sharing.
ReplyDeleteGreat card!! Wonderful colors, design, and so much texture! Love it!
ReplyDeleteWow! This is the most beautiful use of these products that I've seen!
ReplyDeleteAmazing! I love all the details, this is one of the best projects ever
ReplyDeleteI adore this card and keep coming back to it. So unique and beautiful.
ReplyDelete