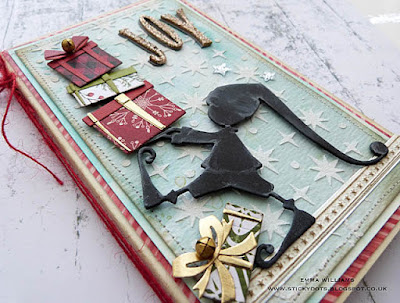
It's been a busy week here on my blog and thank you so much to everyone who's visited ~ it's always nice to read your comments and I'd like to take the opportunity to welcome all my new followers and say a big hello! Today, I'm back to share another of the projects that I made using the Chapter 3 dies and this particular project is more than just a card because it opens out into a gift card wallet. So, I hope you'll enjoy the process of how I created this piece and I hope it inspires you with some ideas to create similar projects of your own!
Creating the wallet:
To begin with, cut three pieces of Mixed Media Heavystock card to measure:
23 x 18cm ~ Card Folder
8.5 x 10cm ~ Present Pocket
Take the card folder and with the longest edge placed horizontal in front of you and measuring from the left hand side, score two lines vertically at 11cm and 12cm. Fold along scorelines to create your folder. Ink the edges of the cardstock with Frayed Burlap Distress Ink.
Cut two panels of decorative patterned paper and matt onto kraft card before mounting each panel onto the inside of the wallet.
Cut two further panels of patterned paper and attach these to the front and back on the outside of the wallet.
Place the present pocket in front of you, longest side horizontal and score the panel of card at 1cm, 9cm. Measure and score at 1cm from the bottom edge of the card. Fold along the score-lines.
To form the present pocket, cut away and remove an angled corner section on the bottom left and right hand corners, across the scorelines and then fold them in before placing adhesive tape along the flaps. Ink the edges of the present holder with Frayed Burlap Distress Ink.
Attach the present pocket to the right hand side on the inside of the wallet. You'll notice that I added a trim at the top and bottom of the pocket and these were cut using the Star Trim 3D Impressilits Embossing Folder. This folder is fantastic for creating finishing trims that just give a professional look to the project and after cutting the trim from Mixed Media card, I lightly inked over the embossing with Walnut Stain ink, before accentuating the raised areas with a little Vintage Gold Alchemy Wax that I applied with my finger. I then attached the trim to the top and bottom of the pocket.
On the front of the pocket, I added a panel of mixed media cardstock, which was slightly smaller in size than the pocket and which I'd coloured with a combination of Antique Linen, Walnut Stain and Frayed Burlap Distress Inks. I applied the inks to my glass mat and spritzed them with water, before dragging the card panel through the inks to pick up the colour. Once happy, and you can always double dip if you think it needs more colour ~ I then heat dried the card, inked the edges with a little more Walnut Stain and then adhered it to the front of the pocket, adding small brad fasteners to each corner.
Using the Alphanumeric Die to die cut black kraft card, I cut out the letters to spell out 'A Gift For You At Christmas' and attached these to the panel on the front of the pocket.
I used the Christmas ribbon die set to die cut the bow which I cut from watercolour card coloured with Candied Apple Distress Inks and then using the embellishing dies of presents, sweets and candy canes, I cut a selection of these pieces to fill up my pocket, so that they appear to be spilling out.
To create the gift card that sits on the left hand side, I used the Gift Card Bag die from Tim Holtz and cut some more of the Mixed Media Heavystock card, which I coloured with the same inks as I used on the pocket on the right hand side. After assembling the pocket and inking the edges, I attached it to my wallet holder and then adhered a stitched panel of decorative patterned paper and another of those gorgeous star trims onto the front.
Now that the wallet is all finished inside and ready to decorate on the outside...
Start by cutting a panel of watercolour card, slightly smaller in size than the cover of the wallet and after applying Tumbled Glass, Antique Linen and Evergreen Bough to my glass mat, spritzed the inks with water and then dragged the card through to pick up the colours. Heat dry the card and when it is thoroughly dry, I then placed the Starry Layering Stencil over the top of the card panel and applied a layer of Grit Paste through the stencil. Whilst the paste is still wet, sprinkle some Rock Candy Glitter over the top and set aside to allow for the glittery paste to dry.
I added a border of machine stitching around the outside of the glittery card panel, inked the edges with a little Frayed Burlap DI and then matted this onto a second panel of card, that I coloured using the same Distress Inks combination as I used on the glittery background. I then attached this to the front of my wallet.
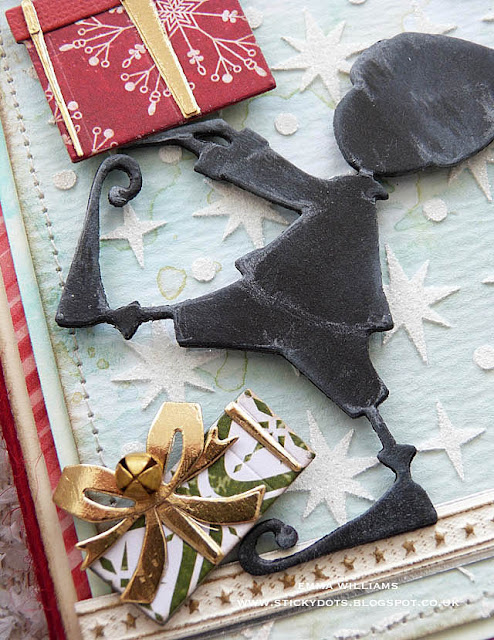
To create Santa's Helper, cut him twice from black card and then layer the pieces over the top of one another to make one solid die cut. I added some shading to my little man using a white pencil before attaching him to the cover with foam pads, placing him on a border of the star trim to ground him.
Now for the presents and all the presents are cut using dies in Santa's Helper Die set and use a layering system of die cutting ~ everything you need to create one present comes on one singular die. All you need to do is choose your colours and die cut the pieces. I chose to use patterned papers from the 2018 Christmas Paper Stash and then cut some of the bows from Metallic Kraft Stash and some from Classic Kraft Stash.
Once I had my selection of presents, I used four in total, I added three for my little man to carry, complete with Jingle Bell topper...
...but added one that had been put in his way and just about to trip over! This present also had a little jingle bell attached to the bow.
We're nearly there and all that's left is to add the lettering. I used the Handmade Die to die cut the word 'JOY' cut from chipboard three times and layered over one another to create solid chipboard lettering. To glitter the letters, I applied a good layer of Matte Collage Medium over each letter and then sprinkled them with a dusting of Vintage Platinum Dust. Set these aside to dry, probably overnight and once they are, all I did to complete them was create a shadow using black card. Cut each letter from the card and then layer the glittered lettering over the top, slightly offsetting each letter to create the drop shadow. Attach the letters to the front of the wallet.
Finally, add two mirrored stars onto the background...
...and some red twine, wrapped around the spine and tied into a bow.
So, that's it for this project and I hope you've loved the creative journey of how this piece was created ~ it's such a fun project to work on and is just a little different from sending a Christmas card to loved ones!
Thanks so much for stopping by and hope you'll visit again very soon! xxx
Recipe for project:
Tim Holtz/Sizzix: Santa's Helper, Christmas Ribbon, Handmade, Alphanumeric Label, Star Trim 3D Impresslits Embossing Folder
Tim Holtz Layering Stencil: Starry
Distress Inks: Frayed Burlap, Walnut Stain, Festive Berries, Candied Apple, Antique Linen, Tumbled Glass and Evergreen Bough
Tim Holtz Layering Stencil: Starry
Distress Inks: Frayed Burlap, Walnut Stain, Festive Berries, Candied Apple, Antique Linen, Tumbled Glass and Evergreen Bough
Idea-ology: Tiny Bells, Mini Screw Fasteners
Mediums: Matte Collage Medium, Grit Paste, Rock Candy Glitter, Vintage Platinum Glitter Dust
Surfaces: Mixed Media Heavystock, Watercolour Card, Black Card, Metallic Kraft Stash
Foam Pads, 2018 Tim Holtz Christmas Paper Stash, Distress Watercolour Card, Black Chipboard
Vintage Gold Alchemy Wax
Tim Holtz Media Glass Mat
Surfaces: Mixed Media Heavystock, Watercolour Card, Black Card, Metallic Kraft Stash
Foam Pads, 2018 Tim Holtz Christmas Paper Stash, Distress Watercolour Card, Black Chipboard
Vintage Gold Alchemy Wax
Tim Holtz Media Glass Mat


Again mind blowing my inspirational friend! This is just a perfect gift!
ReplyDeleteYou’ve got some incredible talent bestie! I love how you brought everything to life. All the layers and textures- LOVE ♥️♥️♥️
ReplyDeleteSo lovely - your style is so unique!
ReplyDeleteI love this! I've just purchased Santa's Helper die and so this has given me lots of ideas of what to create with him.
ReplyDeleteLorraine
What a fabulous card in and out...love the gift holder! I will be pinning!
ReplyDeleteThis is really special! So pretty; love all the fun details.
ReplyDeleteAbsolutely fabulous! Emma. Love the idea of it being a gift wallet and love too that it could be stood up as a card due to your ever so charming front cover - the elf just makes me smile ! As always your A.T.D and finishing touches are spot on .
ReplyDeleteBig hugs x
Such a fun card Emma. I made a version of this as a regular card. When one of my friends was visiting. she fell in love with Santa's helper, so this is her card. thanks as always for sharing. Merry Christmas to you and your family.
ReplyDelete