Tuesday, 27 May 2014

What A Wonderful World... 12 Tags of 2014

Hello everyone...

It's a quick visit from me today, as I have a million and one things to do and the clock is ticking...*cue Mission Impossible theme*...but I just wanted to pop by to share my latest tag that I've created for Tim Holtz's 12 Tags of 2014. You can see Tim's fabulous tag, HERE and for this one, Tim challenged us to use our must loved, much treasured, precious trinkets and embellishments...so, that's what I did and this is what I created, *points below*...as always, I hope you love it!

There's plenty of close up photos to show all the detail and quite a few lovely techniques all on one little tag. So, without further ado, enjoy the journey of May's tag.
I will admit, I'm already in love with those ShadowPress folders...they are wonderful! 


This is my favourite part, my little crackled corked vials, filled with a handmade paper flower.


So, that's it from me for today, I have nine cards to create for a magazine commission but thank you, so much for all the lovely visits and for the comments you left on yesterday's post...I really do appreciate them!

See you soon and have a lovely day!
Emma xx


Monday, 26 May 2014

The Artsy Stamp ~ Simon Says Stamp Monday Challenge

Hello everyone...

Hope you've all had a fun weekend and now ready for the week ahead!! As always, Monday means the start of a brand new challenge over at the Simon Says Stamp Monday Challenge blog and this week the challenge is all about The Artsy Stamp. It might be a background, a hand drawn image or maybe, a sketchy texture stamp. Whatever you choose, we challenge you to get out your artsy stamps and play!

Now I've got quite a few "artsy stamps" but as soon as I saw the challenge, I knew exactly which one I wanted to use. As a fan of Brett Weldele's work, I wanted to combine the image with some of my favourite Tim Holtz products and I really hope you love what I've created...
...and this is how I did it!

To begin with I had this frame in my stash which was the perfect size for the stamped image. So, after a lick of Distress Paint around the sides, I cut a piece of paper from the Tim Holtz Collage Mini paper stash to fit the outside of my frame and attached it with Glue N' Seal. I then sanded the edges back to give a distressed, vintage feel to the frame. To create the embossed section for the background, I used the Gears folder from the Blueprint and Gears Texture Fade set and embossed a piece of card, covered with Metal Foil tape. I then applied a layer of Black Soot Distress Ink over the top and allowed the paint to pool into embossed areas before wiping away the excess to create the look of metal. I then added the embossed metal to the recessed area of the frame.

The next stage was to use my artsy stamp, which I inked with Black Archival Ink and stamped onto water colour paper. I coloured the image with Distress Marker Pens, using a water brush to pick up the colour and blending the colours to give light and shade to the image.
I cut the image out and layered it over the top of a painted piece of Frameworks die which I had attached to the embossed metal.
I then wanted to add some dimension and elements to surround my Time Traveler and for this, I stamped a piece of card with a text stamp from my stash and then using the Rosette Die by Tim Holtz for Sizzix, I die cut the stamped card, inked the edges and created my rosette, which I then attached to the bottom left hand corner.

For all the cogs, I covered a piece of Grungeboard with some more of the metal foil tape and used the Gadget Gears die to die cut the metal. I then applied some alcohol ink over the top to create a rusty look and added some Idea-Ology gears and mini gears over the top of the die cuts and attached them to my frame.
To age the Word Band and make it look rusty and vintage, I used some more Broken China, Antique Bronze and Peeled Paint Distress Paint, building up the colours to create the look I wanted, then threaded some paper string through the holes and attached this to the frame.
As a finishing touch, no gentleman would be complete without his monocle. I attached this to a Hinge Clip which once again, I made rusty using Distress Paint and also added a Swivel Clip which I then connected to some dome studs that I'd attached to the frame and let the monocle hang free down the side.
...and that completed my piece for this week!
I really hope you've enjoyed today's photo tutorial of how I incorporated my "Artsy Stamp" within my project and that you loved what I've shared with you all. As always, for more great ideas and inspiration, then you need to look no further than the blog to see all the wonderful creations from my very talented Design Team members and every week, one lucky random participant has the chance to win a $50 gift voucher from Simon Says Stamp. Good luck....
Products used:

Distress Inks ~ Frayed Burlap and Walnut Stain

Thank you so much for all your visits today and I'll see you all very soon!!
Bye for now...love Emma xx


www.simonsaystamp.com

Saturday, 24 May 2014

Life Is A Story...

Hello everyone...

Hope you've all had a great week and looking forward to the weekend, even if it does look as if it might be typical Bank Holiday weather.

Before I share today's post, I just wanted to say a big thank you for all the lovely comments on Botanical Bliss tutorial that I shared over on the Simon Says Stamp Monday Challenge Blog, earlier this week. I'm thrilled that you loved the piece that I made and I appreciate every single word that was left. Thank you!!

I also wanted to say a big thank you to the lovely and extremely talented Tammy Tutterow who mentioned a project of mine, HERE on her wonderful blog! I am so honoured to have a mention from Tammy, who is someone that I admire greatly and have always loved her work, and this really did mean the world to me...so, thank you Tammy!

Now, back to today's share and as I promised earlier in the week, this is the second card that I made for a commission for Making Cards Magazine and I was so proud to see this card featured on the front cover.
As with the first card that I shared earlier this week, I used the Hero Arts Dotty Flower and stamped these onto vellum, then embossed them with white embossing powder. Each stamped image was then painfully cut out by hand and coloured using Distress Inks.
The flowers are added to another painted corrugated background and I added one of my favourite Tim Holtz quotes.
Close up details of the card...

...and the finished piece!
So, that's it from me for today and I hope you all have a wonderful Bank Holiday weekend!!
See you on Monday with my Simon Says Stamp piece.
Bye for now...love Emma xx

Wednesday, 21 May 2014

Simon Says Stamp Botanical Bliss Tutorial

As you all know, this week's challenge over on the Simon Says Stamp Monday Challenge blog is all about Botanical Bliss and was chosen by the very talented Suzz who was in the mood for flowers. So will you choose to use a botanical paper pad from Tim Holtz, butterflies floating around the warm spring sunshine or just flowers waiting to bloom. However you choose to interpret this theme, we can't wait to see what you create and see your wonderful artwork.
Above is a sneaky peek of what I've created for this challenge because today, I'm sharing my very first step by step tutorial over at the Simon Says Stamp Monday Challenge blog, just click HERE! I really hope you'll pop over and enjoy what I created using Wendy Vecchi stamps and I can't wait to read all your lovely comments...

As always, there's plenty of inspiration over on the blog and I hope you'll take a look at my fellow Design Team members fabulous artwork. Remember that one lucky participant will win a $50 gift voucher from Simon Says Stamp.
Thank you for stopping by today and I will see you very soon...love Emma xx

Tuesday, 20 May 2014

Happy...

“The most important thing is to enjoy your life—to be happy—it's all that matters.” ~ Audrey Hepburn


Hello everyone...

Well, I finally made it through my marathon crafting session that I've been on over the last four weeks!! At times, I didn't know how I was ever going to get it all done and yes, there were moments that if you lived within a 10mile radius of West London, I'm sure you probably saw smoke rising and the distant sound of my head banging against the table but...I made it through and got there bang on time and in the words of Pharrell Williams, I'm now clapping along because....I'm happy!!

Saying that, just don't ask me to look at my diary to see that it will all be starting again in a couple of days time, lol!!

But...back to today and I'm sharing the first of two cards, (the next one will be here later this week) that I made for the April issue of Making Cards Magazine using a Hero Arts stamp to create stamped vellum flowers with lots of inky/painty techniques to make my background, and all set against the beautiful backdrop of my favourite Tim Holtz stamp, Papillon. As always, I hope you love it...

The vellum is stamped using a clear embossing pad, embossed with white powder before being inked with Distress Inks on the reverse of the flower. I then layered these together to create these delicate blooms.
The Papillon image is stamped onto an inked tag and then added to my much loved corrugated card background, painted with Distress Paints and PaperArtsy Fresco Finish paints.

I finally added the gorgeous pink shabby bow to complete the card.
As always, thank you so much for stopping by today and for all the lovely comments you've been leaving me over the last week! I love reading them all and you always blow me away with your kind words! Thank you everyone!!

Hope you'll pop back tomorrow afternoon to see my first tutorial for Simon Says Stamp but until then, have a great day!
See you soon, love Emma xxx


Monday, 19 May 2014

Botanical Bliss...

Hello everyone!

I'm just popping by today to let you all know that we have a brand new challenge starting over on the Simon Says Stamp Monday Challenge Blog and this week's challenge was chosen by the talented Suzz, and is all about Botanical Bliss.
On Wednesday, I will be sharing my first tutorial on the Simon Says Stamp Monday Challenge blog, for a Botanical Wallhanging and hope you'll join me then. In the meantime, there's plenty of inspiration from my lovely Design Team members over on the blog and if you can't wait until Wednesday, then above is a little sneaky peek of what I've created!

As always, one lucky participant will win a $50 gift voucher from Simon Says Stamp, so I really hope you'll join in the fun of this week's challenge.
See you Wednesday for my tutorial.
Love Emma x

Monday, 12 May 2014

M Is For... Simon Says Stamp Monday Challenge

Hello friends...

There's a brand new challenge starting over at the Simon Says Stamp Monday Challenge blog and this week's challenge and is all about ~ M Is For....?? So what are you going to create?  M could stand for the month  of May, mist, markers, magenta, mowed lawn, metal, millinery, a masculine project or mounted stamps! There are so many options and we can't wait to see what you come up with!!

For my piece, I chose M is for...mini matchbox and I'm taking you on a seaside adventure and tried to encapsulate everything about a beautiful day on the beach, collecting seashells and having the sand between your feet. As always, I really hope you love what I've made...

To begin with, I had to make my matchbox and because I don't own Tim's wonderful Matchbox die from Sizzix...YET (I'm sure it will slip into my collection sooner or later)...I used kraft card and created the wraparound section and the slider box from scratch. The finished box measures 5.75" in height x 3" in width.
I then started to paint the outside of the box with a combination of PaperArtsy Fresco Finish paint in Snowflake and Tim Holtz Distress Paints in Broken China, Tumbled Glass and Brushed Pewter. I would also recommend that you paint the outside of the box when it's flat and not constructed, you can do it afterward, but I just found it easier.

The next stage was to add some texture and I used Wendy Vecchi's Crackle Embossing Paste and applied it with a palette knife onto random areas of the front and sides of the box and then used the white Embossing Paste through a PaperArtsy stencil to add the look of the bubbles.
To highlight the bubbles, I used a touch of Treasure Gold over the top and then inked the edges with Frayed Burlap Distress Ink.
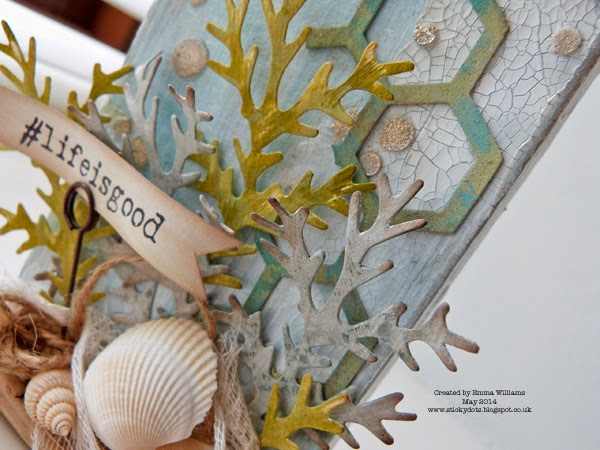
Once everything is dry, you can now form the basic shape of the wraparound section and decorate it. For this I chose to use Tim Holtz's Honeycomb Frameworks die which I painted with Evergreen Bough and Shabby Shutters Distress Paint and then aged slightly with some more Treasure Gold and Frayed Burlap DI.
I added the Frameworks die cut together with some die cut fronds from the Tattered Pinecone die which I then painted using Shabby Shutters and Peeled Paint Distress Paint. The shells and driftwood came from my own crafty stash and I attached these onto the front of the box together with some cheesecloth and twine.
The final touch on the front of the box was a stamped #lifeisgood Hashtag from Tim's fabulous stamp set which I added to the arrangement using a Memo Pin.

So, now we need to decorate the inside of the box and this is where my inspiration came from to create this piece, Tim's Nautical Blueprint stamp set. As soon as I saw this, I was in love and knew I needed it and if I was lucky enough to get it, I knew exactly what I wanted to create with it.
I stamped the seashell image onto watercolour card and then painted it using Distress Marker Pens and a waterbrush. I gently flicked some speckles of Antique Linen over the top to give the appearance of sand and then attached the image onto the inside of my box.
I added the #wishyouwerehere Hashtag onto the inside together with some more cheesecloth which I attached around the sides and some die cut fronds.
To complete the box, I added a Vintage Trinket from Prima to the top of my closed box.

So, I really hope you've enjoyed today's photo tutorial of how I made this little seaside scene and that you loved what I've shared with you all. As always, for more great ideas and inspiration, then you need to look no further than the blog to see all the wonderful creations from my very talented Design Team members and every week, one lucky random participant has the chance to win a $50 gift voucher from Simon Says Stamp. Good luck....
Products used:


Distress Inks ~ Frayed Burlap
Wendy Vecchi Embossing Paste ~ Crackled Texture and White
Idea-Ology ~ Memo PinJute String
Shells and Driftwood from my crafty stash


Thank you so much for all your visits today and I'll see you all very soon!!
Bye for now...love Emma xx


Powered By Blogger

Total Pageviews