Showing posts with label wreaths. Show all posts

Monday, 6 October 2025

Don't Stop Believing...

Hello everyone...

As another week flies by, it's time for the brand new Simon Says Stamp Monday Challenge and this week, we challenge you to use the colour PINK for Breast Cancer Awareness Month. The DT are also showcasing Dylusions products within their makes.

Now, I will admit I'm not a pink girl, never have been...it's just one of those colours that I'm never drawn to! Give me blue, or the autumnal rusty tones and I'm there but pink, lol....but with the theme in mind, I created a tag with a message for Breast Cancer Awareness Month ~ "Hope Is Never Lost" and for all those women, and men out there who have fought, beaten or even if you are still fighting breast cancer, I hope you love the piece I've made.

So, let's get started and here's how I created this tag!

For this make I used a size 8 Mixed Media Heavystock tag.

TAG BACKGROUND

For the background, I chose to use the Stampers Anonymous Roses Layering Stencil by Tim Holtz and using blending brushes, I inked through the design with the following colours of Dylusions inks:

Rose Quartz, Peony Blush, Dirty Martini and Fresh Lime

Once my inking was complete, I added some text using the script stamp from the Tiny Toadstools stamp set by Tim Holtz before I laid the stencil back over the areas that I had inked. With the stencil i place, I then applied Translucent Grit Paste. Remove the stencil and wash immediately and leave the paste to dry.

When my paste was thoroughly set, I added a neutral colour to the background using Antique Linen Distress Spray Stain. I dabbed away any heavy areas of colour, gently heat dried the tag and then inked the edges with Frayed Burlap Distress Ink and together with some gold watercolour paint, I added a few splatters of the gold paint and the Frayed Burlap ink across the surface of the tag.

After machine stitching a border around the edge of the tag, I mounted it onto a piece of Kraft card, cut slightly larger than the tag itself. Around the outside edge of the Kraft card tag, I applied some Dylusions Washi Tapes, that I had in my stash.

WREATH

Moving on, I used two of my favourite, and very well loved Sizzix/Tim Holtz dies ~ Funky Wreath and Garden Greens. Once again, I wanted to keep this fairly neutral, ensuring the pink on the background stood out.

I cut all my pieces from black cardstock and then, applied Copper, Bronze Rose and Rich Gold Metallic Waxes by Lisa Horton onto the surface of each die cut piece.

I then assembled my wreath, building up the layers and placing the foliage pieces from the Garden Greens die set, to follow the curve.

For the flowers, I used exactly the same technique and die cut these from black card using the Vault Foliage Wreath. Once I'd adhered the floral die cuts into position, I added Metallic Droplets to the centres of each of the flowers.

PAPER DOLL

The image of the woman that I used as my focal point, is from the Paper Doll Poses set and I colour tinted the image using Distress Crayons.

I attached her with foam pads, positioning her to my sit on my wreath and then added the quote, "Hope Is Never Lost". This is from the idea-ology Metallic Sticker Book and I mounted the strip onto gold metallic Kraft card before attaching it to my tag.

FINISHING DETAILS

We're nearly there and all that's left is to add those tiny finishing details...

I added a stamp from the ephemera stamp in the top right hand corner, together with a Remnant Rub, "Oct 18".

I then cut a strip of Crinkle Ribbon from my stash. I coloured the ribbon with a combination of Victorian Velvet and Antique Linen Distress Inks, spritzing the inks directly onto the fabric. After heat drying the strip, I threaded it through the reinforcer hole and then attached an idea-ology mini pin.

Finally, I added some Cello Sticker tape...

One in the bottom left hand corner, and one in the top right hand corner.

So, that's my project for this week completed and I hope you'll be inspired by the strong message in this piece.

As always, if you make anything, or if you've been inspired by anything that you've seen here on my blog ~ then please, let me know by tagging me on social media or leaving a comment here and I will be right over to take a look!

Don't forget that every week, one lucky random participant has the chance to win a $25 gift voucher from Simon Says Stamp and you can join in up to 5 times, which means you could have 5 chances to winYou have until next Monday at 8am Ohio time. 1pm UK time, 2 pm CET to join in and good luck....


Thank you so much for taking the time to stop by today...
Love Emma xxx

Recipe for project:

Stampers Anonymous: Roses Layering Stencil, Tiny Toadstools
Distress Ink: Walnut Stain, Frayed Burlap
Distress Spray Stains: Antique Linen, Victorian Velvet
Lisa Horton Metallic Waxes: Rich Gold, Copper and Bronze Rose
Dylusions Washi Tapes and Archival Inks

****These are not affiliate links****

Monday, 2 December 2024

Mr Frostie and his shining stars....

Hello friends ~ remember me?!? It's definitely been a while and not the easiest six months. If you don't know why I've been absent from the challenge blog, then you can read all about it HERE and I would just like to say a huge thank you to every single person who has supported me and reached out to me during my darkest days ~ it really has been appreciated and I am so grateful to you all.

✨✨✨✨✨✨✨✨

Anyway, back to today, and welcome to the brand new Simon Says Stamp Monday Challenge which this week is called Make It Sparkle and the DT are showcasing the products from PAPERARTSY within their makes.

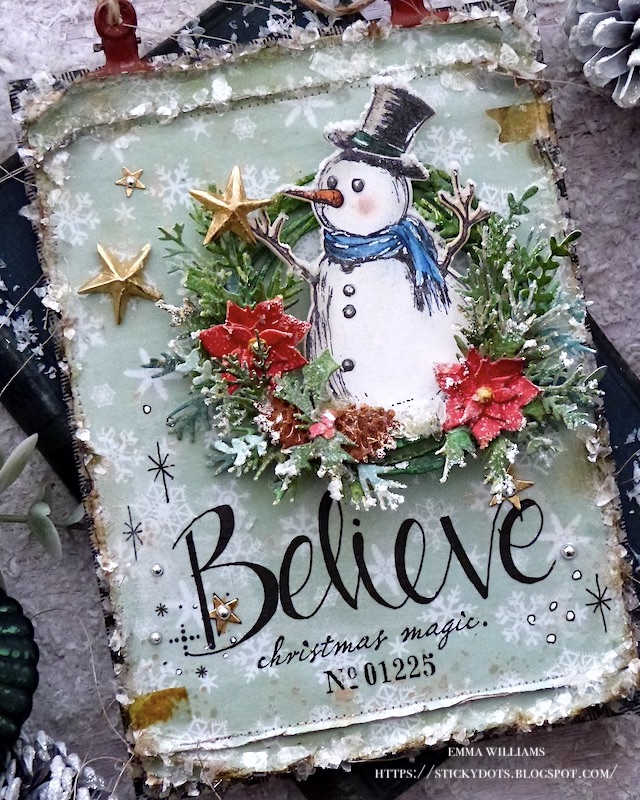
Now, since I've been absent from this challenge there have been quite a few new releases from Tim Holtz and they have all been spectacular including Mr Frostie from the Christmas release of Stampers Anonymous 2024. He just stole my heart immediately and with this theme in mind, I chose to use one of the images of this beautiful snowman, which I placed in the Festive Wreath from Sizzix.

So here we go...it's time to make it sparkle and bring this scene to life!

For this make I used the smaller sized Rectangular Etcetera Panel by Stampers Anonymous and began by covering the edges with the black and white gingham tape from the Christmas Tape pack.

BACKGROUND PANEL

With my panel prepped and ready, I chose a piece of decorative paper from the Christmas Backdrops pack and because I wanted a frosty feel to this piece I went with the mint green snowflake design.

I cut the paper into three pieces ~ one piece that will be placed across the centre and then two extra pieces that I will be attaching at the top and bottom. I did this so that it creates the look of multiple layers of paper on the background and also adds detail and texture.

I stitched the three pieces together to form one whole piece that will cover the panel, leaving 0.5cm around the outside edge to show the design tape.

After ripping and tearing around the edge of the paper and also along the joins where I've attached the panels at the top and bottom, I machine stitched a border before adhering it to my panel using Matte Collage Medium.

Now to add the wording and for this I used a combination of three products, including:

  • Believe and surrounding sparkles ~ PaperArtsy Jofy Printed Tissue
  • Christmas Magic ~ Mr Frostie Stamp Set
  • No.01225 ~ Christmas Remnant Rubs from my stash

I began by applying the word 'Believe" and for this you will need a water brush or a brush dipped into water. Remove any excess water from the brush, you only need it damp and draw a line of water around the word believe before gently tearing it from the sheet. Once you have piece of tissue, using a Collage Brush, apply a thin layer of Matte Collage Medium to the back of the tissue and place it directly onto the background paper. Very gently use the collage brush with a little more medium to brush over the tissue to create a seamless finish. 

Apply the sparkles/stars to the background using exactly the same technique.

Underneath the word believe, I stamped the Christmas Magic sentiment from the Mr Frostie stamp set, using Black Soot Archival Ink and then beneath that I applied the remnant rub, No.01225.

To complete the background I added two tiny pieces of idea-ology Cello Sticker Tape to the opposite top right and bottom left hand corners.

The background can now be set to one side whilst moving onto making the wreath.

WREATH

To begin with I cut the base of my wreath from Mixed Media Heavystock card using the Sizzix Vault Festive Wreath die set by Tim Holtz, and cut the card that I coloured using the following colours of Distress Spray Stain:

  • Greenery and Base: Iced Spruce, Evergreen Bough, Peeled Paint and Rustic Wilderness
  • Poinsettia: Lumberjack Plaid and Barn Door
  • Pinecones: Gathered Twigs and Walnut Stain

Once dry, I began die cutting the base, which I cut twice to form a substantial base, together with enough pieces to form the all the greenery. I wanted to add some extra frosty sparkle to each of these pieces and for this I used white embossing powder. I just gently dab the ends of each piece into a clear embossing ink pad, and then sprinkle the white powder over the top, tapping away the excess. After heat embossing the powder, I take one piece at a time and begin to build up the wreath, layer by layer.

Once all the greenery is in place, I die cut the poinsettias from the red inky card and layered these to form two flowers. I added gold Metallic Droplets in the centres of each before placing them onto the wreath.

To complete the wreath I used a brush to very gently apply touches of Matte Collage Medium over the tips before sprinkling Rock Candy Glitter over the finished piece, tapping away excess glitter before allowing it to dry.

The wreath is ready and now we can move onto the star of the show... Mr Frostie.

MR FROSTIE

After stamping the image of Mr Frostie onto watercolour card, I then used the co-ordinating die set from Simon Says Stamp to cut the stamped image. If you don't have this die set, then you can fussy cut the image.

I then watercolored the die cut image using Distress Pencils and a watercolour brush. Once I was hapy with the colours, I added some white pen details.

To complete Mr Froste, I used Snowfall Grit Paste, which I just applied with my fingertip to the top of his hat, onto his arms and of course, on the tip of his nose.

I placed Mr Frostie into the wreath before I placed him onto my panel using foam pads to add height and dimension.

STARS ✨

For the dimensional stars, the one that Mr Frostie is holding and the one that is also on the background, I used the die from the Vault Christmas 2020 set and cut the two stars from gold metallic kraft card. I then assembled each star by folding along the score lines on the die cut before placing them onto my panel and into his hand.

I then cut a few more gold stars that you can see dotted around the background. Once again I used gold metallic kraft card as my surface and cut the stars using the Falling Stars die by Tim Holtz. I then adhered each star into position with a dot of collage medium, before adding a silver metallic droplet to each of the centres.

We're nearly there and all that's left is the finishing touches and all that Mica Flake sparkle....

MICA FLAKES

All around the outside of the panel, I added some extra sparkle using Mica Flakes.

I personally always use Glossy Accents for this process, as I find this doesn't dull the sparkle and using the fine nozzle on the bottle, I just drizzle the adhesive around the edge, then sprinkle mica flakes over the top. Tap away the excess before adding some more Glossy Accents along the two joins in the paper and once again, sprinkle the flakes over the top.

Always apply the mica flakes and adhesive in sections, don't try to do it all at once because you will get into a bit of a mess.

HOW TO CREATE THE HANGER

Finally, with the panel complete, I added the hanger so that this piece can be displayed.

For this I used two Hinge Clips which I painted with Candied Apple Distress Paint. Once the clips are dry, I clipped them along the top edge of the panel before adding rope.

I finished this piece by hanging two Holiday Bells from the rope, both of which are painted using Candied Apple Distress Paint and then hung using an idea-ology loop pin.

So that's it from me for today and I hope you've been inspired by this project, as it really is so much fun to make...

As always, if you make anything, or if you've been inspired by anything that you've seen here on my blog ~ then please, let me know by tagging me on social media or leaving a comment here and I will be right over to take a look!

Don't forget that every week, one lucky random participant has the chance to win a $25 gift voucher from Simon Says Stamp and you can join in up to 5 times, which means you could have 5 chances to winYou have until next Monday at 8am Ohio time. 1pm UK time, 2 pm CET to join in and good luck....


Thank you so much for taking the time to stop by today...
Love Emma xxx

Recipe for project:

PaperArtsy Jofy Printed Tissue

Distress Paint: Candied Apple
Distress Spray Stains: Iced Spruce, Evergreen Bough, Lumberjack Plaid, Peeled Paint and Rustic Wilderness, Gathered Twigs and Walnut Stain
Hot Glue Gun
Rope from my own stash

****These are not affiliate links****

Monday, 20 December 2021

Holly Jolly Christmas...

Hey everyone...

Hope you've all had a wonderful weekend and ready for the final push ahead of the big day! There's still plenty to be done here but with the year we've all had, I just want to make sure that this Christmas is going to be a safe and happy one for my family.

But back to today and as always on a Monday, it's time for the Simon Says Stamp Monday Challenge and this is the last challenge of this year! I can't quite believe how fast 2021 has flown by but the DT are going to have a couple of weeks off and then will be back again on the 3rd January!

Our theme for this challenge is all about PARTY and even though here in the UK I don't think there will be many Christmas parties because of the latest outbreak of Covid, I'm sure we'll all try to celebrate the best we can and if you are going to a party or small gathering, then I thought it would be the perfect time to make some handmade gift wrap, a present topper and tags…because every celebration, needs some pretty gift wrap!


So let's get started...

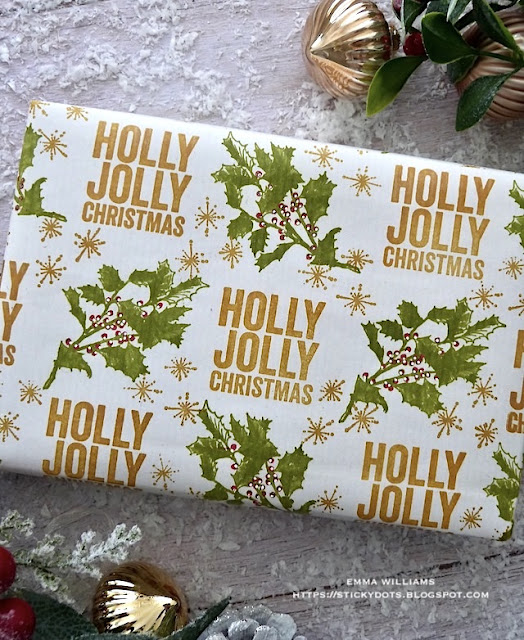
So for this gift wrap and tag set, I used plain white kraft gift wrap which I had in my stash and three sets of Stampers Anonymous stamps by Tim Holtz ~ Bold Tidings Mini, ChristmasTime 3 and Holiday Things.

GIFT WRAP

With the paper in front of me, I started stamping the pattern and began with the Holly Jolly Christmas sentiment from the Bold Tidings set.

I inked the stamp with Stazon Metallic Gold Ink and stamped it in a continuous pattern on the paper, leaving enough space in-between for the second image, the holly stamp from the Holiday Things stamp set.

With the sentiment stamping complete, I then stamped the holly. I inked this stamp with Fern Green Archival Ink and again repeatedly stamped across the paper. I used a red pen to add the berries to the holly.

Finally, I used the starbursts from the ChristmasTime 3 stamp set and stamped these in gold onto the white spaces between the holy and sentiment, and this completes the pattern.

The paper is now ready for wrapping up the gift...

WREATH TOPPER

But this present definitely needs a topper and to make this I used Funky Wreath Die which will form the base. This die set has ten separate pieces, five of the dies make up the twiggy wreath, which I cut from Mixed Media Heavystock card spritzed with Gathered Twigs, Ground Espresso and Walnut Stain Distress Spray Stains, and the remaining dies create the leafy wreath, which I cut from card spritzed with Peeled Paint, Iced Spruce, Rustic Wilderness and the  Frosted Juniper Mica Spray.

Once both my wreaths are assembled and I'd added all the extra little die cut pieces, I then layered the leafy green wreath over the top of the twiggy one to form my topper. At this stage, I cut a few more of the singular pieces of twigs and leaves which I added to make the wreath a little 'fluffier'.

To give the wreath a frosty finish, I used my finger to smear some Matte Collage Medium over the top and then sprinkled the Rock Candy Glitter over it. Tap away the excess and allow to dry.

I then tied two strips of candy cane twine around the wreath topper. These will be used to tie the finished topper onto my present.

SENTIMENT SEAL

To create the seal in the centre of the topper, I used the Seal Thinlits Die and Switchlits Embossing Folder to cut and emboss a piece of card from my scrap box that I had previous stamped with the same holly design as on the paper. I then cut a circle from Mixed Media Heavystock, slightly smaller in size than the seal and stamped the Holly Jolly Sentiment onto the centre in the same gold metallic ink as before.

I attached the sentiment onto the centre of the seal using foam pads, before attaching the completed layers to the centre of my wreath and adding four gold metallic droplets around the circle.

FLOWERS

The flowers are all die cut from card inked with Candied Apple, Barn Door and Peppermint Stick Mica Spray, using the small spiky flower die in the Funky Nordic Thinlits Die set by Tim Holtz.

I then assembled each of the flowers, which comes in two die cut sections and gave them a dusting of Rock Candy Distress Glitter before attaching them to my wreath topper.

I completed the wreath by adding drops of Tonic Nuvo Crystal Drops, placing them in the centres of the flowers and onto the wreath itself.

Attach the topper to the gift using the candy cane twine that I attached to either side of the wreath.

TAGS

Now that the gift is wrapped, I decided to also make some tags to match the paper. I stamped the tags using the same holly and starburst stamps as I used on the gift wrap and then stamped different sentiments from the Bold Tidings set onto Mixed Media Heavystock. I layered the sentiments onto gold metallic kraft card before attaching them to my tags with foam pads and mounting the tags onto glitter card.

I added small drops of the Tonic Crystal drops into the centres of the stamped starbursts and used a red pen to add the berries to the holly.

To complete the tags, I added small bows die cut from the same card as I inked for the flowers, and using the bow die from the Christmas Vault Series die set.

Shape the tiny paper bows before attaching them to the tags and adding some more candy cane twine.


So that completes my final project of 2021...it's been a really busy making season but I've enjoyed every single minute and hope you've enjoyed everything I've made! Thank you to everyone who has left me comments and for all the love you've shown me and my work ~ it really has meant the world!


As always, I hope you love the card I've made and the techniques I've used and if you make anything, or if you've been inspired by anything that you've seen here on my blog ~ then please, let me know by tagging me on social media or leaving a comment here and I will be right over to take a look!

Don't forget that every week, one lucky random participant has the chance to win a $25 gift voucher from Simon Says Stamp and you can join in up to 5 times, which means you could have 5 chances to winYou have until next Monday at 8am Ohio time. 1pm UK time, 2 pm CET to join in and good luck....


Thank you so much for taking the time to stop by today ~ stay safe and keep well.
Happy Christmas everyone and hope 2022 brings us peace and happiness!
Love Emma xxx

Recipe for project:

Distress Ink: Gathered Twigs, 
Distress Spray Stain: Rustic Wilderness, Iced Spruce, Candied Apple, Barn Door, Iced Spruce, Walnut Stain, Ground Espresso
Tim Holtz Idea-ology: Metallic Droplets
Twine, red marker pen and gift wrap from my stash
Powered By Blogger

Total Pageviews