
Hello everyone and welcome to a brand new week over on the Simon Says Stamp Monday Challenge Blog. This week the DT have been asked to showcase Spellbinders products and combine it with our AT THE MOVIES theme and even though it wont be necessary for you to use Spellbinders, we can't wait for you to join us and play along with this fun challenge!
For my project, I will admit this wasn't the original idea that I had in mind as I was going to something very, very different using completely different dies but unfortunately, due to a few delivery problems, the dies didn't arrive on time and my original film theme ~ Sherlock Holmes went out of the window and I had to have a rethink! But these beautiful dies from Tammy Tutterow came to the rescue and after going through my extensive film library, I thought of one of my favourite movies ~ Pretty In Pink and created a card, inspired by the title! As always, I hope you love what I've made and that you enjoy the process behind it...

So, here we go...


To begin with I created a 18 x 15cm card blank from white card and placed it on the desk with the fold at the top.
I then took a piece of manila card and using Distress Paints in Cracked Pistachio and Peacock Feathers, I applied the paint over the surface of the card, blending them together with my fingers. Once dry, I then added some highlights of colour using Distress Crayons to create a really worn, shabby feel to the background.

I then used an old credit card to scrape some gesso over the surface of the painted background and added a few flicks of gesso and Black Soot Distress Paint before stitching around the outside of the card.
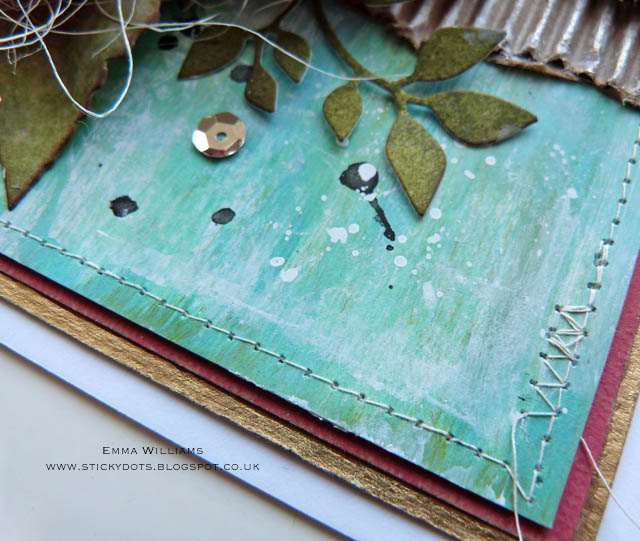
I matted the background onto core'dinations card, followed by a layer of gold card and them mounted the matted layers onto my card blank.
To create the central section, I tore a piece of corrugated card and applied some Picket Fence Distress Paint over the top of the corrugations.
I then cut a strip of film ribbon and lay this across the centre of the card, attaching it with the Tiny Attacher at both ends but leaving some of the film ribbon to overhang the edges.
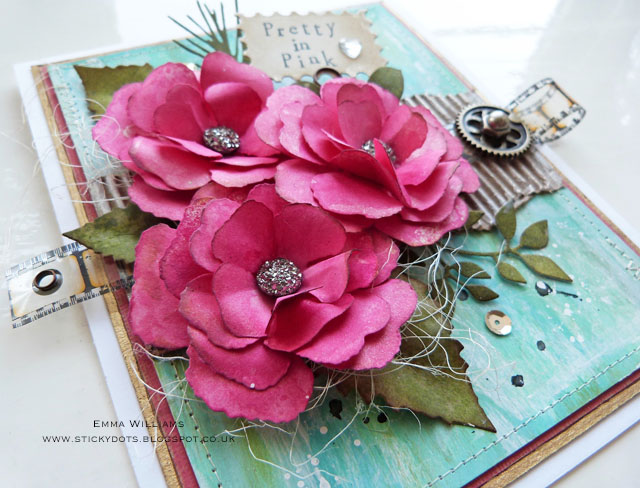
For the little loop of ribbon on the right hand side, I cut a separate piece of film tape and curled it over, again attaching it with the Tiny Attacher and then attached this into place.

Attach the corrugated strip across the centre of the card blank and then I added a little metal Rustic Gear embellishment, together with a Mini Hardware knob to create the look of a film reel.

Now for the fun part, to create those pink blooms...

For this, I used the Shabby Posies die and used the four dies to die cut some lightweight card stock, cutting enough to create three separate flowers. I then spritzed the die cut petals using a combination of Spun Sugar and Picked Raspberry Distress Spray Stains and dried the petals until the card was just damp, not wet...
Scrunch each of the die cuts up and then, unfurl them and shape each of the petals around a pencil. Ink the edges of the flowers with Frayed Burlap Distress Ink and then, layer the four individual die cuts to create one bloom, shaping each layer as you go to create a more realistic flower. Repeat to make a further two and then add Prima Druzy Stones to the centres.

Using the Fall Foliage and Garden Greens dies, die cut a selection of leaves and foliage from card coloured with Peeled Paint Distress Stain. Attach the leaves and flowers in a cluster onto your card, together with some floristry sisal.

Finally, I die cut a piece of card inked with Antique Linen Distress Ink using the Labels dies from Tim Holtz and then stamped the wording, Pretty In Pink using the Hero Arts lowercase type stamp set and added a small mirrored heart.
Attach the label to a memo pin and tuck the pink into the floral arrangement.

As a finishing touch, add some gold sequins to the background...

So, I really hope you've enjoyed the creative process behind this card and as always if you do need any further inspiration, then you need look no further than our blog to see all the wonderful creations from all the very talented Design Team members and every week, one lucky random participant has the chance to win a $50 gift voucher from Simon Says Stamp. You have until Monday 8am Ohio time. 1pm UK time, 2 pm CET to join in and good luck....




Products used:
Spellbinders Dies: Tammy Tutterow Shabby Posies
Tim Holtz Dies: Fall Foliage, Garden Greens, Labels
Spellbinders Dies: Tammy Tutterow Shabby Posies
Tim Holtz Dies: Fall Foliage, Garden Greens, Labels
Distress Paint: Picket Fence, Black Soot, Cracked Pistachio and Peacock Feathers
Distress Crayons Set 1
Distress Ink: Antique Linen, Frayed Burlap
Distress Stains: Picked Raspberry, Spun Sugar, Peeled Paint
Distress Crayons Set 1
Distress Ink: Antique Linen, Frayed Burlap
Distress Stains: Picked Raspberry, Spun Sugar, Peeled Paint
Idea-ology: Memo Pins, Film Ribbon, Mirrored Hearts, Textured Surfaces
Embellishments: Rustic Gears, Mini Hardware, Prima Rossibelle Druzy Stones
Embellishments: Rustic Gears, Mini Hardware, Prima Rossibelle Druzy Stones
Surfaces: Manila Card, Tim Holtz Core'Dinations Kraft Core Classic Paper Stack, Kraft Core Metallic Paper Stack
Mediums: Jet Black Archival Ink
Blending Tool
floristry sisal from my own stash
floristry sisal from my own stash


