
Hello friends...
Today, I'm sharing another of my Christmas idea-ology makes that I created for Tim Holtz's YouTube Live Launch! If you didn't see the LIVE or just want to watch the replay again, and again...then you can catch up with it HERE!
This make was inspired by the book ~ The Snowman by Raymond Briggs and is all about the morning that James wakes up and looks outside his window to see the snow, and then precedes to build the Snowman who becomes his friend and takes him on an adventure, walking in the air!
So let's get started and I hope you enjoy your stroll around this miniature winter wonderland...


The base of this make was two vignette boxes that I flipped over to have the solid side uppermost. The boxes are both covered in co-ordinating papers from the Christmas Backdrops stash, and I covered the tips and the sides. I loved that ‘Christmas Tree advertising paper’ from the set and when cutting it into panels, it was just perfect on the front of the boxes, combined with different patterns on the sides. I used a Collage Brush to apply Matte Collage Medium to adhere each panel of paper to each box. I then always seal my covered boxes with a coat of the medium over the top and also added some Hardware Heads to my boxes.
I ran the Walnut Stain Distress Crayon around each of the box edges to create more of a vintage feel to the boxes and blended out any harsh lines with my fingers.

Taking a third vignette box, I again covered the back and the top of this box in a tartan design, but left the sides bare as I wanted it to resemble a natural looking wooden window frame.

I also covered the inside of this box with more of the paper and added curtains made of Mummy Cloth dyed with Speckled Egg and Antique Linen Distress Spray Stain. Once the stain is dry, I attached the cloth around the inside of the box.
On the back wall of this box, I placed a Christmas Ephemera piece, ‘Compliments of the Season’.
This small box that will become the window frame, contains a small cluster of lights that I put into a Decorative Dome, so before I attached and stacked the boxes, I drilled a hole through the bottom of each of the larger sized boxes, aligning the holes so that I can feed the wire of the tiny lights up through each box and then drilled a hole in the bottom of the small box which is going to be placed upright on the top of the stack.
With the wires running up through the boxes, I can now attach the boxes to form the stack ~ placing them and adhering them on top of one another and slightly offsetting each box, adhering the final box upright on the top.

I attached the battery compartment to the base of the box on the bottom, so that you can access it easily to switch it on and off. At this stage, I placed the tiny lights into the glass section of the Decorative Dome. I didn’t use the metal base. If there are too many lights, cut away the excess and then fix the dome into place with Matte Collage Medium. You can see the dome behind the window in the photo below.


Now to add the window frame.

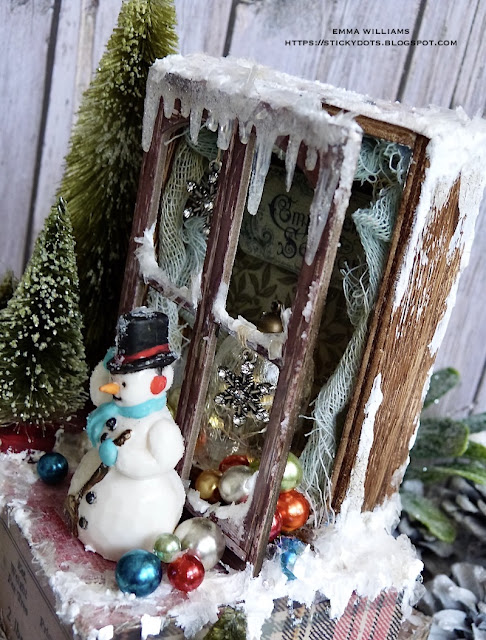
To begin with I attached the icicle across the top of one of the frames. To create the frosty look to the icicle, I smeared some Glossy Accents over the surface and then sprinkled with Rock Candy Glitter before I attached it along the top of the frame. I also added some Grit Paste along each quarter section of the frames to create the look of the snow drifts along the wood.

Hanging down in each of the window frames, I attached two of the Snowflake Adornments. I used cotton thread which I wound round the window frame and then secured them with a dab of Matte Collage Medium.

With the icicle and snowflakes in place, I attached the completed frame at a slight angle to make it look as if it was open. I then used Matte Collage Medium down the edge and along the bottom of the frame to secure it in place.
Leave this to dry and set in place before even trying to move onto adding any embellishments but whilst the drying time is happening, I moved onto bringing each embellishment to life....
...and started with the trees, using a selection of different sized Woodland Trees, which I sprayed with Peeled Paint and Bundled Sage Distress Spray Stains.
Once they were dry, I painted the wooden bases with Candied Apple Distress Paint and then added a frosting of ice over the tips of the trees by rolling them in Glossy Accents that I applied to my Glass Mat and then sprinkled some Rock Candy Glitter over the top.

I attached the glittery trees to my stacked boxes, placing three on the left...

...and one on the right.

I also just tweaked the top of the one tree, so that it was just tipping over.

I painted the Salvaged Snowman, (which comes in a pack together with Santa), with Distress Paint ~ I used Black Soot, Spiced Marmalade, Broken China, Ground Espresso, Frayed Burlap and Candied Apple, all applied with a fine detail paint brush and once he was dry, I attached him onto the box, applying a frosting of Rock Candy Glitter and a sprinkle of Mica Flakes over the top of the snowman.

The Bauble Adornments are all inked with Alcohol Inks ~ I used a combination of Gilded Alloy, Silver Metallic, Mushroom, red, blue and green alcohol inks but this is your make, so use the colours you love!

To complete the boxes, I added some Grit Paste snow. I placed this around the edges of the boxes, over the flat surfaces and dripping off the edges...

...and I also added some around the back of the box, where I placed some wood slices cut in half. Whilst the paste is still wet, sprinkle Rock Candy glitter over the top.

Adhere all the baubles in place using Glossy Accents...

...adding them to tumble out of the window, and all around the trees and snowman.

To finish my make, I added a final dusting of Mica Flakes over the top of the snow and baubles.

So that completes this home decor project that is ready to light up and display for Christmas time. I hope you've enjoyed reading all about this project and as always, if you make anything, or been inspired by anything that you've seen here on my blog ~ then please, let me know by tagging me on social media or leaving a comment here and I will be right over to take a look!
Thank you so much for taking the time to stop by today ~ stay safe and keep well.
Love Emma xxx
Recipe for project:
Distress Crayon: Walnut Stain
Distress Paint: Black Soot, Spiced Marmalade, Broken China, Ground Espresso, Frayed Burlap and Candied Apple
Distress Spray Stain: Speckled Egg, Peeled Paint, Bundled Sage, Antique Linen
Tim Holtz Idea-ology: Christmas Backdrops, Woodland Tree Lot, Christmas Ephemera, Window Frame Baseboards, Bauble Findings, Hardware Heads, Snowflake Adornments, Vignette Boxes, Mummy Cloth, Wood Slices, Mini Icicles, Salvaged Snowman, Tiny Lights, Decorative Glass Dome


