Recipe for project:
Friday, 17 December 2021
The Snowman...
Monday, 13 December 2021
Little Deer...
Hello friends and Happy Monday...
Hope you all had a wonderful weekend and you're enjoying the magic of the festive season!
As always, it's the start of a brand new week, and that means there's a brand new Simon Says Stamp Monday Challenge. This week our theme is called COLD AS ICE and the DT are excited to see what how you will interpret this wintery theme.
For my project, I created a Christmas card which features a combination of Sizzix dies together with Stampers Anonymous stamps and masks, all from Tim Holtz. I thought these dies worked perfectly together to bring to life my woodland theme Christmas card to life, a make that was inspired by Walt Disney's Bambi, which is one of my favourite films, mainly because I have a soft spot for Thumper!
So let's get started and here's how I created my card...
To begin with I cut a white card blank, and matted a layer of white card onto the front which had Christmas Design Tape from my stash, ( I think this tape was from about two years ago) but you can use patterned paper or any design of tape you think works. I adhered around all four of the edges to create a border for my finished card.
BACKGROUND
I then started creating the background for the scene and placed the medium size of the set of 3 Stampers Anonymous Moon Masks on the left hand side of a panel of White Heavystock card, 12.5 x 17cm.
With the moon mask in place, I used Stormy Sky and Chipped Sapphire Distress Inks and a blending tool, I inked the top 2/3rds of my card panel, leaving the remaining section white.
I then applied Villainous Potion Distress Ink over the top, gradually working from the outside towards the moon, so that it would be a slightly darker shade around the edge.
Now my sky is complete, I removed the moon mask, replaced it with the second mask and used Hickory Smoke to ink the second layer onto the inside of the moon to form the craters. I also added shading around the edge of the moon with the same ink.
After flicking water over the top and dabbing away the drips with a paper towel, I heat dried the inked surface to set the inks and then applied Grit Paste through the Speckles Layering Stencil to add the snowy effect.
On the white section I added some shading to give the look of snow drifts using Speckled Egg Distress Ink and then completed the panel with some machine stitching around the outside.
I then stamped the sentiment, "Best Wishes for the Holiday Season" onto the bottom section of the panel in Black Soot Archival Ink. This is one of my all time favourites from Tim ~ I just love that font so much, it's perfect for capturing some vintage magic.
I matted the finished panel onto a piece of navy blue card, followed by silver metallic kraft card and then, using foam pads I mounted it onto the card blank.
TALL PINE TREES
For the trees, I spritzed some Distress watercolour card with a light mist of water before spritzing a combination of Rustic Wilderness and Iced Spruce Spray Stains with a touch of Frosted Juniper Mica Spray Stain thrown into the mix.
Once dry, I cut two separate die cuts of the trees using the Tall Pines Thinlits Die.
I then cut into the trees to separate them into smaller sections. I used three separate pieces to create the depth and width of the trees that I placed across my card.
With the edges inked in a little Peeled Paint Distress Ink, I blended a small amount of Micro Distress Glaze over the surface. This will act as a resist and stop any bleeding from the inks when you apply the white snow or the glitter.
With the glaze over the surface of the trees, I used a palette knife to apply some more of the grit Paste through the Speckles Layering Stencil to add some snowflakes to the trees and set them to one side to dry.
DARLING DEER
I used one of the deers in the set of four for my card and cut this majestic figure twice from Mixed Media Heavystock card. I then layered the two dies over the top of one another to form a substantial die cut and inked the deer with a combination of Gathered Twigs, Frayed Burlap and Antique Linen to add the shading to my die cut.
I added white pen details and a tiny eye to bring him to life.
Now we can put the card together and I arranged my Tall Pines across the card, attaching some directly onto the background, adhering them with Matte Collage Medium, and then taking the remaining tress and layering these over the top using foam pads to add height and dimension.
I attached the trees so they had an opening in the middle and that's where the deer will be placed.
I then attached the deer to the centre of the trees, again using foam pads for dimension.
To add the icy touch to the trees, I smeared them with a little Matte Collage Medium and then sprinkled Rock Candy Glitter over the top, tapping away the excess.
I then added some Mica Flakes for an added touch of frost. I always attach my flakes with Glossy Accents, this helps to keep the sparkle and not dull the flakes.
To add even more frosty magic and to also ground the trees, so they aren't floating in mid air, I added some more flakes together with some Grit Paste and applied this with a palette knife along the baseline of the trees...
I also added some Grit Paste, building it up to form little snowy mounds, underneath the little deer's hooves.
Allowing for the paste to dry, I then added some Glossy Accents over the top and sprinkled with more of those gorgeous Mica Flakes. Let the flakes just cling where they fall, and once dry and securely in place, tap away any excess little flakes.
To complete the card, I used die cut stars which I cut from silver metallic kraft card using the Falling Stars die and attached them to them in the sky, and placed three around the sentiment.
I finished with some silver Metallic Droplets, that I placed in the centres of the stars...
...and that is the final detail for my icy winter wonderland card!
As always, I hope you love the card I've made and the techniques I've used and if you make anything, or if you've been inspired by anything that you've seen here on my blog ~ then please, let me know by tagging me on social media or leaving a comment here and I will be right over to take a look!
Don't forget that every week, one lucky random participant has the chance to win a $25 gift voucher from Simon Says Stamp and you can join in up to 5 times, which means you could have 5 chances to win. You have until next Monday at 8am Ohio time. 1pm UK time, 2 pm CET to join in and good luck....
Recipe for project:
Sunday, 12 December 2021
Night Before Christmas Treat Box for Simon Says Stamp
Hello friends and Happy Sunday!
Today, I'm so happy to be back on the Simon Says Stamp Store blog to share my latest Christmas project with you all and if you love the sneak peek below and want to see more of this piece, then you can head over to their blog, CLICK HERE to check out the step by step process of how I created this piece!
Monday, 6 December 2021
Here Comes Santa Claus...
Hello friends...
Hope you've all had a wonderful weekend and your Christmas preparations are underway! I must admit, I'm slightly behind, I usually have the decorations and my tree in place by the first week of December but after a crazy week of booster jabs and their not so welcome side effects, it's now time to get my Santa's hat on and decorate the house!
In the meantime, we are celebrating all things Christmas over on the Simon Says Stamp Monday Challenge Blog and this week, our theme is SANTA! The DT are also showcasing the amazing products of the one and only Tim Holtz and as always, if you'd like to join us and play along, we can't wait to see what you will be making!
For my project, I'm sharing a piece that I made using Tim's brand new Christmas 2021 idea-ology products and I can't wait to show you around Santa's Grotto. It's packed full of details and plenty of Christmas magic from Tim and I hope you'll enjoy your visit! Remember, Santa knows if you've been good, or bad...
SHRINE
I used the idea-ology Vignette Shrine for my base. This comes in three pieces, the shrine and the 2 platforms which you attach to the base. But I wanted to add an extra piece to my shrine so that I had a wider base and for this I used a piece of wood that actually came of the side of a Vignette Box that arrived smashed into pieces. I covered this base with the wood planks design paper from the Christmas Backdrops set.
You can also use mount board for this or you can use an offcut of wood, it will create the same effect! I attached the extra width to the base with collage medium and then I placed a Pinked Etcetera Trim, covered with more of the Backdrops paper that was die cut using the Decorative Trims Thinlits Die set by Tim Holtz and I placed the trim over the top of the join to cover and strengthen this base section.
Now to decorate and to begin with I painted the back with Peeled Paint Distress Paint and adhered some Christmas Design Tape around the edges, just to create a neat finish.
Moving onto the sides and for this I used the Collage Tiles which fit perfectly. I arranged the tiles down each side and onto the roof, adhering them with Matte Collage Medium and trimming away the excess. I then applied a coat of the medium over the top to seal them and once dry, I ran some Walnut Stain Distress Crayon around the edges and over the joins of the Collage Tiles.
Inside the shrine, I used some of the Christmas Backdrops paper on the back wall, I used a combination of the red weathered wood design and the wood planks tape that I used on the base. I covered the sides with Candy Stripe paper from the Christmas Worn Wallpaper.
Along the raw edges on the front of the shrine, I cut some more of the Worn Wallpaper into narrow strips that would fit the edges and then adhered it to my structure. I then applied some Crackle Paste over the front edges, allowed this to dry before applying Walnut Stain Distress Crayon over the top to accentuate the texture.
HANDLE
On the side of the box, I placed a handle. The handle is from the Mini Hardware Set and Handle and after applying a small amount of Translucent Grit Paste, which I allowed to dry ~ I then painted the handle red, with Candied Apple Distress Paint.
I then attached the handle to the left hand side of the box and placed two Hardware Heads into teh holes before I then tied a tag to the handle. This is from the Christmas Ephemera pack and I just crumpled it slightly and then smoothed it out before inking it with Walnut Stain Distress Ink and then tying it to the handle.
SHELF INSIDE SHRINE
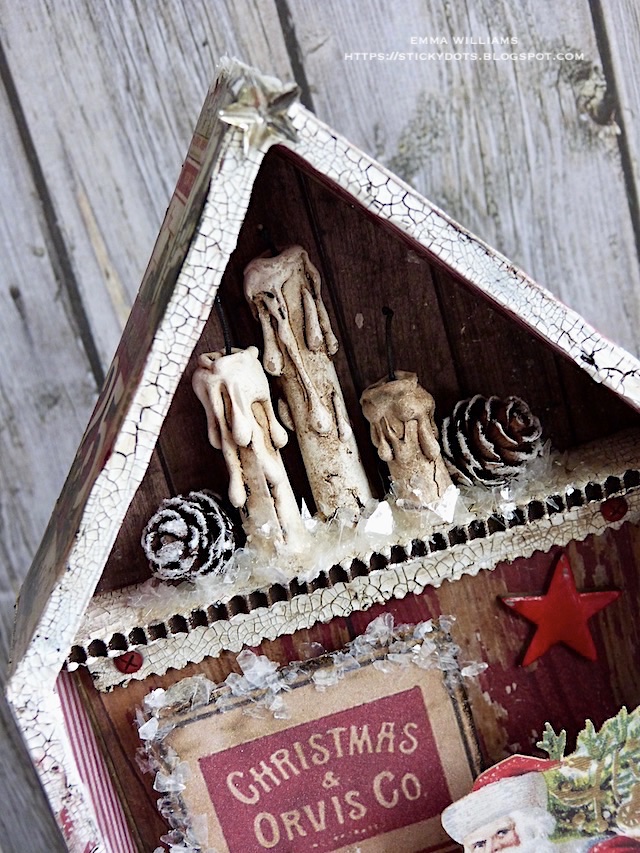
For the shelf across the top of the shrine, I used two Pinked Etcetera Trims that I trimmed so they would fit inside the box and then adhered together to form a 'L' shape. I covered the trims with Crackle Paste and once this was dry and the crackles had appeared, I ran the Walnut Stain Crayon over the top and rubbed the colour into the cracks to accentuate them.
Attach the shelf inside the box with Matte Collage Medium and allow to dry.
On this shelf I placed three different sizes of Drippy Candles and hot glued them into place. I added some pine cones from my garden that I frosted with Rock Candy Distress Glitter and then surrounded the arrangement with Mica Flakes, adhered into place with Glossy Accents. Place a Mirrored Star on the top of the shrine.
I adhered two Hardware Findings to either side of the shelf, rusting them with a little Crackling Campfire, Ground Espresso and Black Soot Distress Paint to make them look slightly rusty.
SANTA'S GROTTO
Now for Santa's Grotto and the first thing was to make the sign that stands behind him. This is cut from one of the Christmas Backdrops paper and I trimmed this section down so that it would fit inside the box. One the surface of the paper, I applied the embossing dabber and then sprinkled with Frosted Crystal Embossing Powder. Tap away the excess powder and heat emboss until the powder becomes crystallised. I then backed it with a piece of mountboard to make it substantial so that it won't collapse or buckle inside the box. Run the Walnut Stain Crayon around the edges of the sign.
I attached the finish sign inside the box with foam pads to bring it slightly forward before applying Mica Flakes around the edges, adhering them with Glossy Accents.
At this stage, I also attached two of the red stars from the Baseboard Pack and inside the grotto, I also placed some wood slices, which will become a support for Santa's feet when I place him inside.
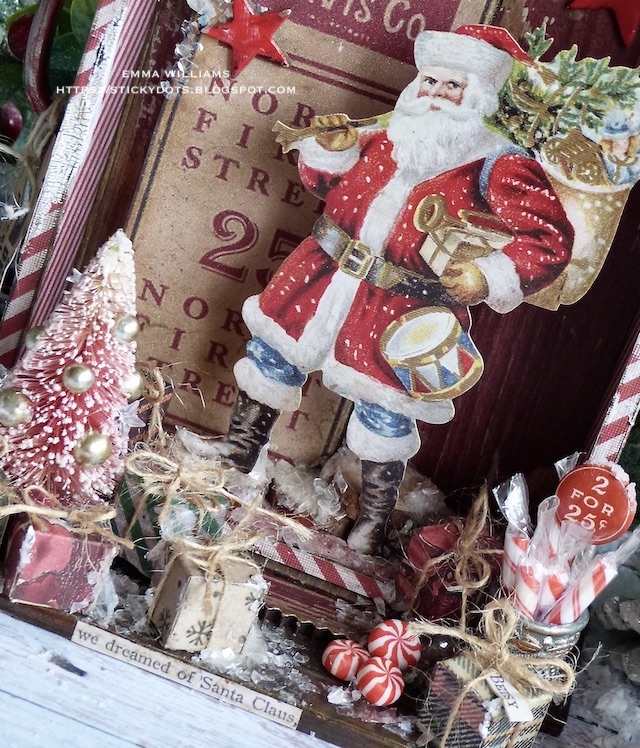
Next is the star of the show and this image is taken from Christmas Layers pack. I made, and attached an acetate bracket on the back of Santa, placing the bracket against the widest part of him, so that it will stabilise him inside the box and he won't bend.
Attach the opposite end of the bracket to the back of the box, and attach Santa to the right of the sign.
EMBELLISHMENTS
Tree
To create the white tips, of the tree, I applied gesso to the tips only using my finger and allowed it to dry. I then used Winterberry from the Holiday Mica Spray Stains set and spritzed it over the tree to colour it. Once dry, I rolled the tree in some Glossy Accents I squeezed out onto my craft sheet and then sprinkled Rock Candy Glitter over the top. Allow to dry before wrapping some of the paper offcuts around the wooden base of the tree and then attaching it in place on the left hand side.
To complete the tree, I coloured some Bauble Findings with a combination of Foundry Alloy Alcohol Ink and Mushroom Alcohol Ink and attached them to the tree.
Presents
I surround the tree with tiny presents. I bought these small wooden blocks which are readily available online and then covered them in offcuts of the Backdrops papers. To complete the presents I tied twine around them and on some of them I added small name tags which I took from the Clippings Sticker Book.
One to Jack and on the other side I added one to Betsy.
Candy Cane Basket
On the opposite side, I added a Candy Cane basket.
This is an idea-ology Thimble which I altered with a little Speckled Egg, Picket Fence and Tarnished Brass Distress Paint. I attached the thimble to the base of the shrine, placing it to the right and then wrapped some of the longer Christmas Confections in plastic, before placing them inside the thimble.
I then took one of the Mini Flair buttons, 2 for 25cents which I attached to a Memo Pin and stuck this inside the candy arrangement.
I arranged some more presents around the thimble and also placed one to tumble out of the shrine itself before I attached some little candy pieces in a cluster.
Finally, I sprinkled the base with Mica Flakes to give that dusting of icy goodness over the entire piece...
...before I added the finishing touch of the 'we dreamed of Santa Claus' sticker across the front of the base of the shrine.
So that completes Santa's Grotto and it's ready to display for Christmas time. I hope you've enjoyed reading all about this project and as always, if you make anything, or been inspired by anything that you've seen here on my blog ~ then please, let me know by tagging me on social media or leaving a comment here and I will be right over to take a look!
Don't forget that every week, one lucky random participant has the chance to win a $25 gift voucher from Simon Says Stamp and you can join in up to 5 times, which means you could have 5 chances to win. You have until next Monday at 8am Ohio time. 1pm UK time, 2 pm CET to join in and good luck....
Recipe for project: