Hello friends...
Can you believe how fast December is going right now?!? It's definitely flying by and before we know it, Christmas will be upon us...
But with just over 2 weeks to go, it's time for a brand new Simon Says Stamp Monday Challenge and this week's theme is all about USING DIE CUTS and of course, with so many different dies to use ~ i'm sure you'll feel inspired to join us and play along...
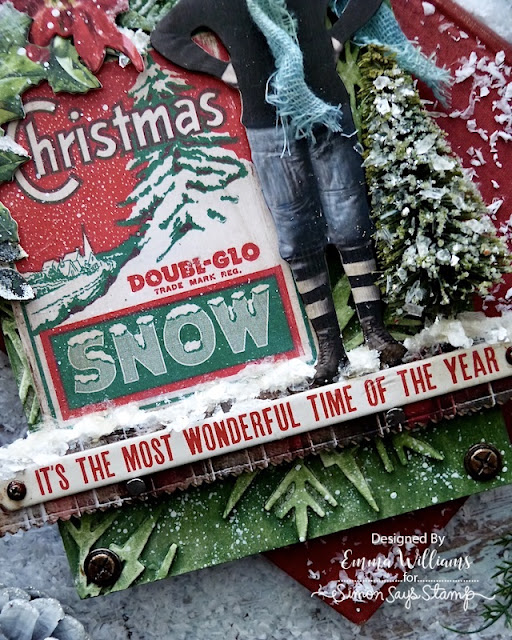
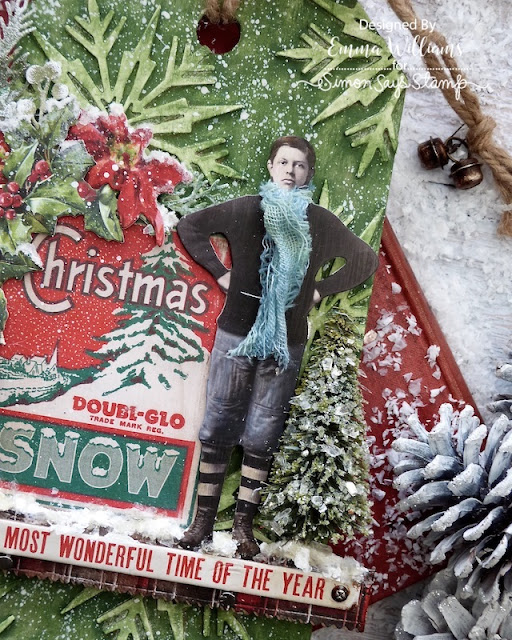
For my make, I chose to combine some of the Christmas 2024 dies from Tim and Sizzix with idea-ology and created a background that features that beautiful snowflake from the Winter Wishes Thinlits Die Set.
So, let's get started, and here's how I created this tag...
For this make I chose to use a Stampers Anonymous Mini Sized Etcetera Tag.
TAG BACKGROUND
To create the background, I started by die cutting my snowflake from Mixed Media Heavystock card. I cut three layers for each snowflake which I arranged to cover the background of the tag and adhered the layers using Matte Collage Medium.
Once the surface is completely dry, I then applied a coat of gesso to prime the tag for the paint and used Rustic Wilderness Distress Paint to cover the entire surface of the tag.
Whilst the paint is still wet, I used a baby wipe which I ran over the surface of the tag to blend the paint into all those recesses of the snowflake, this also helps to remove some of the paint and knock back the colour on the snowflakes to really showcase the die cuts and accentuate the background.
After heat drying the surface, I splattered white paint across the tag and set aside to dry.
LEDGE
For this I used the largest size Pinked Etcetera Trim. This is slightly wider than the tag itself, but I like the way it overhangs the edges.
I then used the Decorative Trims die to cut the tartan design Backdrops paper to fit the trim, which I adhered with some Collage Medium and also applied a layer of the medium over the top to seal the trim itself.
After placing foam pads on the back of the trim, I attached this across my tag and added the "It's The Most Wonderful Time of the Year Baseboard Quote over the top.
To complete this trim, I glued a couple of Screw Heads onto either end of the quote chip and altered these with a little Crackling Campfire, Antiqued Bronze and Black Soot Distress Paint to achieve a rusty finish to the metal.
I also attached two larger Screw Heads onto the bottom left and right hand corners, again altering them with the Distress Paint to add a rusty finish.
LAYERS
We can now start the fun part of decorating the tag and bringing the scene to life.
For this I used a combination of ephemera from both the Emporium Layers and Christmas Layers and Paper Dolls packs and began with the sign that sits on the left of the tag.
Once I'd sanded and inked the edges of the Christmas Snow layer, to add some extra vintage touches, I backed it onto a piece of mountboard to give it more stability. I then attached it to my tag with foam pads for dimension.
On the top left hand corner of the layer, I added the beautiful holly and poinsettia pieces that come from the Christmas Layers and Paper Dolls pack and arranged these with some die cut greenery that I cut using the Vault Festive Wreath Thinlits Dies. The Heavystock card is coloured with a combination of Peeled Paint, Speckled Egg and Rustic Wilderness Distress Spray Stain.
I then added some frosty magic to the die cut pieces by dabbing them with an Embossing Dabber and then sparkling some White Embossing Powder over the top, heat setting the powder. I then smeared a light coating of Collage Medium over the die cuts before dipping each piece into some Rock Candy Glitter.
I then arranged these pieces with the holly and poinsettia layers.
Don't forget that every week, one lucky random participant has the chance to win a $25 gift voucher from Simon Says Stamp and you can join in up to 5 times, which means you could have 5 chances to win. You have until next Monday at 8am Ohio time. 1pm UK time, 2 pm CET to join in and good luck....
Recipe for project:


WoW! I saw your tag on the challenge and had to bop over and see how you made it. It's an amazing and extraordinary make. Love it.
ReplyDeleteWhat an amazing tag! I love how you did the background of the tag. The snow dusted greenery and glittered tree make the perfect winter scene for this bundled up beauty.
ReplyDelete