
Hello friends and welcome to Day 1 of the Simon Says Stamp All The Joy Blog Hop.

I'm so excited to be joining so many of my talented friends and designers on this hop and if you've arrived here from my extremely talented friend, Bibi Cameron ~ then hello, but if not, and you want to catch up with everyone who is participating in this hop, then don't worry because you can head back to the beginning, HERE.
You can check out all the fabulous new products in this release, HERE including the Christmas Greetings Sentiment Strips and the gorgeous Branching Corner Holly and All The Joy Dies that I used to make my Christmas card, which I hope will inspire you with a few ideas.

So let's begin this stop on the hop and here's how I created my project....


To begin with I made my 16.5 x 13.5 card blank from black card.
BACKGROUND PANELS
I then cut a panel of Tim Holtz Black Heavystock card, 14.5 x 11.5cm, lightly misted it with water and then spritzed it with the following Distress Sprays and Mica Sprays:
Distress Spray Stains: Speckled Egg, Antique Linen, Pumice Stone
Distress Oxide Sprays: Speckled Egg
Mica Spray: Frozen Fog
After another spritz of water to blend the colours, I heat dried the panel and machine stitched a border around the outside, leaving some loose threads hanging.
After matting the panel onto silver metallic kraft card, I mounted it onto the centre of my black card blank.
TAG
Now to create the tag that is mounted onto the card blank and for this I used the largest size of the Sizzix Framed Tags die by Tim Holtz to die cut further piece of black heavystock card.
I then used exactly the same sprays as I used on the backing panel and spritzed these over the tag to colour it.
Once my tag was dry, I used a palette knife to apply Snowfall Grit paste through the Stampers Anonymous/Tim Holtz Twinkle Mini Layering Stencil from Set 57 and after removing the stencil, set the panel to one side to dry before adding a machine stitched border around the outside.

I matted the finished tag onto black card, followed by silver metallic kraft card, each time leaving the border.
After punching a hole at the top of the tag using a Crop A Tile, I fixed an eyelet into position and then mounted the tag onto the front of my card blank, using foam pads and slightly overlapping the top edge.
We now have the base ready to decorate.
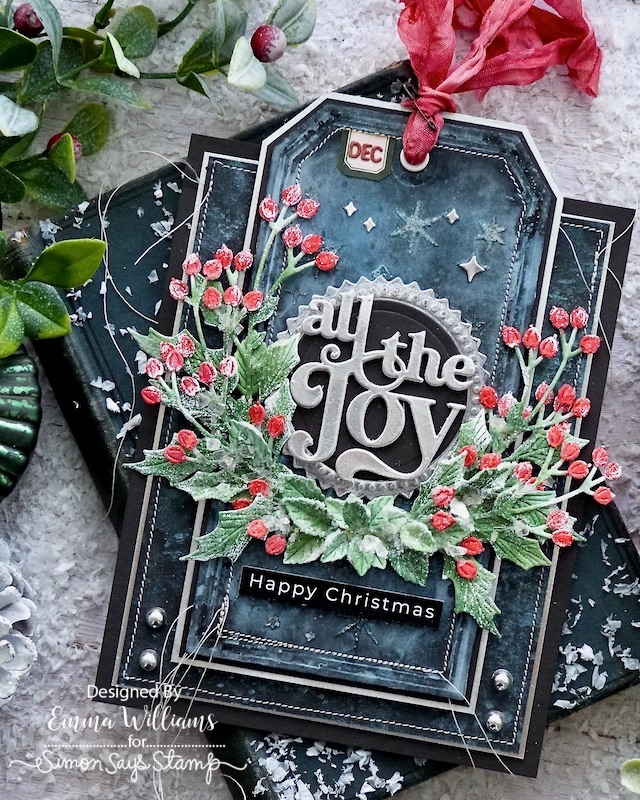
SENTIMENT
To begin with I used the Seal Dies and Switchlits embossing Folder to cut silver metallic kraft card. I then cut a smaller circle from black card using the Circles Nesting Die Set and adhered this to the centre of the seal.

Cut the ALL THE JOY sentiment three times from white card, and a fourth time from silver metallic kraft card before layering each die cut over the top of the previous one, finishing with the silver layer on top. Attach the die cut sentiment to the centre of the circle and then using foam pads, adhere the seal into position on your tag.

BRANCHING CORNER
I cut a selection of the foliage and berries from Mixed Media Heavystock card and then inked the greenery with a combination of the three colours from Ink Trio Set 14 ~ ~ Aspen, Sage, Pine
The berries are inked with Festive Berries Distress Ink.
With all my pieces inked, I then added the icy frostiness to each piece and for this I used a combination of an Embossing Dabber and white embossing powder.

Dab the tips of each piece with the dabber and then sprinkle with the embossing powder, tapping away any excess ~ you only want a light sprinkle, not a full on snowfall!! Heat emboss the powder until molten and then smear Collage Medium over the leaves, before sprinkling Rock Candy Distress Glitter and Mica Flakes over the top.

Arrange and attach all the foliage to create a swag around the bottom of the sentiment seal.

Use the smaller leaves and berries to fluff out the wreath, tucking them in amongst the foliage.

Cut the Happy Christmas Reverse Sentiment to size and attach with foam pads beneath the wreath.

FINISHING DETAILS
All that's left to do is add those all important final details, starting with two metallic droplets that I placed in the bottom left and right hand corners, on either side of the tag.

I then threaded some ribbon through the eyelet at the top of the tag. I used Crinkle Ribbon that I had in my stash, you can use seam binding ribbon as well. I then coloured the ribbon with LumberJack Plaid and Antique Linen Distress Spray Stains, before scrunching it into a ball to create the crinkle. Once dry, unravel the ribbon and pop through the top of the tag before I added a Mini Pin through the knot to secure it.

Around the top of the seal, I added a few die cut sparkles which again were left over from a previous project and cut from silver metallic card using a die in the Forest Shadows set but if you have any silver stars or crystal gems, in your collection, then these will work too!

Finally, I added the little Dec label at the top of tag. This is from the Christmas Ephemera Pack and I cut it into half before attaching it to my tag and then adding the letters, "DEC" that are die cut using letters from the Specimen die set, pieced together but if you haven't got this set ~ don't worry, just write it in red ink to give that personal touch.

So that's my card complete and I hope you love what I've made and will be inspired by the ideas!

It's now time to for the next stop on this hop...
HOP ORDER:
Simon Says Stamp Blog <<YOU ARE HERE!
Emma Williams <<you are here


MY VERY FAVE SO FAR ON THE HOP
ReplyDeleteThese are so beautiful. Your application of the embossing powder "snow" as snow on the leaves and berries is amazing.
ReplyDeleteThis is the most beautiful design I have ever seen! Thank you for sharing!
ReplyDeleteThese tags are absolutely gorgeous! I love them!
ReplyDeleteStunning... love all the detail 😍
ReplyDeleteYour projects never fail to utterly amaze me! This is the most beautiful card! Love how you used the tag!! Thank you for sharing!
ReplyDeleteWhat s beautiful card. Love the techniques you used.
ReplyDeleteWOW! Your card is stunning and definitely eye catching! I can't say enough about how amazing your design and techniques are! Love everything about your card!
ReplyDeleteBeautiful! 1st time on your blog
ReplyDeleteThis is awesome! I love this! It is so beautiful! Thanks for sharing!
ReplyDeleteWonderfully beautiful card. Love all of the detail!
ReplyDeleteI love how you frosted the leaves. Can't wait to try this.
ReplyDeleteLisa Johnson
Use of color: Wow!, Stitching: Wow!, Florals: Wow!, Embellishments: Wow! Finished project: WOW!!!!!
ReplyDeleteSo different. ❤️
ReplyDeleteOMG this card is stunning - such an amazing looking piece of art
ReplyDeleteJust magical! Thanks for the recipe.
ReplyDeleteAbsolutely beautiful!
ReplyDeleteWowzer!! I have no words for this piece of art!! Thank you very much.
ReplyDeleteBeautiful layering and design! I love the colors and textures!
ReplyDeleteOh my goodness how stunning! I love the dark colors and the snow on the branches and berries
ReplyDeleteThis is beautiful. When I see that dusting of sparkle it reminds me of Christmas and for some reason I feel like a kid that would lick the card because it looks so tasty and pretty. bunnyscards1.blogspot.com.au//">[Bunny]
ReplyDeleteYour card is stunning. Very beautiful with incredible details. I love the various sprays and embossing powder you used. Lovely! Happy holidays!
ReplyDeleteOne word.....A-freakin-mazing!!!
ReplyDeleteSo uniquely beautiful - love the design & color choices.
ReplyDeleteGorgeous creation; love the details and layers.
ReplyDeleteI'm in awe! So beautiful.
ReplyDeleteThis is absolutely GORGEOUS!!! I can't wait to try your techniques myself!!
ReplyDeleteAbsolutely love this project. Love how it takes on that denim look and the tag is so cool - that crinkle ribbon is great!
ReplyDeleteWowsers, love all the work on your tag, Emma.
ReplyDeleteI love this, Emma!!!! The colors are amazing!
ReplyDeleteAbsolutely gorgeous!
ReplyDeleteSimply stunning! I love all the beautiful little details
ReplyDeleteKim M Jacobs
bast830@gmail.com
OMG! Your stitching is incredible! LOVE the holly!
ReplyDeleteBeautiful. I love the stitching. I wish I could figure out a way to do it.
ReplyDeleteSuch beautiful designs. Love the colors.
ReplyDeleteLove how you incorporated this into a tag!
ReplyDeleteAbsolutely gorgeous as always. The colors, the sparkle, the details are all fabulous!
ReplyDeleteUnique design! Love it!
ReplyDeleteA denim look! I LOVE THIS!!!!
ReplyDeleteGreat tag. I love the detail and texture.
ReplyDeleteFantastic!
ReplyDeleteBeautiful project! So many fantastic elements!
ReplyDeleteThis is AMAZING! Love the textures and details and how they all come together! Thanks for sharing!! This is FANTASTIC!
ReplyDeleteWowsers!! I love all of the amazing details to this project!
ReplyDeleteStunning - As a newbie all I can say is WOW:)
ReplyDeleteI love how it looks like denim. Beautiful!
ReplyDeleteGorgeous! Love the textures and the blue background.
ReplyDeleteWOW! That is so pretty and unique. I would never think of that.
ReplyDeleteSo beautiful! Love this!
ReplyDeleteSo stunning! I love the dewy snowy look you've got on the leaves! Its gorgeous 😍 great job! ❤️❤️❤️
ReplyDeleteBeautiful card, looks very realistic.
ReplyDeleteThat is just beautiful!!
ReplyDeleteBeautiful tags, with lovely details!
ReplyDeleteAbsolutely gorgeous!! Love the details!
ReplyDeleteSo beautiful!
ReplyDeleteI love your card/tag. It’s stunning. The leaves look so real.
ReplyDeleteSo creative and unique. Love it.
ReplyDeleteWow!!! This is Absolutely Gorgeous!!!! I love the colors and the dimension!!!!
ReplyDeleteThere are so many details to love! My fav is the "icy frostiness" but also absolutely love the little pin in your ribbon. All so very pretty!
ReplyDeleteGorgeous!
ReplyDeleteStunning!! Love it!
ReplyDeleteSuch a gorgeous card! Such a labor of love!
ReplyDeleteWow, the details in this are amazing. You said you machine stitched the card... was there a special machine you used? Or was it just a sewing machine? Or something completely different? Thank you for answering this. I honestly can't stand sewing but I don't mind so much if it's on paper. Silly, I know. You have truly inspired me. I love this so much. Thank you! You're are so talented. Love n hugs! Linda
ReplyDeleteThank you so much for your lovely comment Linda, it is truly appreciated and I’m so happy you loved this card! ♥️ I very rarely sew on material, but paper is my thing and I always use a regular sewing machine, mine is a Brother LS14S, nothing special but does exactly what I need and I LOVE it! Hope you’ll try it out and once again, thank you! Hugs… x
DeleteSo creative! I would never have come up with a design like this in a million years!
ReplyDeleteGorgeous! I love the layers and frosty leaves.
ReplyDeletePretty tag. Love the frosty greens.
ReplyDeleteGorgeous!
ReplyDeleteThanks for sharing your creative process.
This card is a master class! Your work is phenomenal!! I love all the details from the icy touches to the stitching! The dark background makes this very dramatic!
ReplyDeleteLori S in PA
Absolutely stunning! Love that background color with the design.
ReplyDeleteWow, wow, wow! What an amazing and gorgeous card.
ReplyDeleteWow Emma, you know how to bring the magic hun! That layered dimension is delish and all the inky mica layers so divine. I LOVE the frosting you gave the foliage, oh my goodness, I cannot get my head around that, I read how you did but, keh?! LOL. You're just magic! Hugs, Wends xoxo
ReplyDeleteWow... this card is stunning. I can't believe it's made put of paper. Thank you so much for your inspiration, Emma 💕
ReplyDeleteVery striking!
ReplyDeleteI love the use of the embossing powder on the berries and leaves then the addition of the mica flakes and glitter is absolutely breath taking!
ReplyDeleteThis is so creative! The colors are gorgeous!
ReplyDeleteSo creative, I love how the foliage looks like it has frost on it.
ReplyDeleteThis card is amazing! Such detail and I love the background!
ReplyDeleteBeautiful card
ReplyDeleteLove the background. Can’t wait to experiment
ReplyDeleteStunning card
ReplyDeleteI love those gorgeous deep colours of the blue - it shows off all the other elements so well. Another fabulous creation.
ReplyDeleteSuch a fun unique card design. This is beautiful!
ReplyDeleteEmma, you never disappoint! This is a beautiful make! This is always one of the first blogs I visit when looking for creative inspiration!
ReplyDeleteYour card is stunning. I love the colors and all the details. Awesome!
ReplyDeleteWow, I think this is so amazing. So much detail and so many elements to it. A serious WOW for the creativity!!
ReplyDeletedonnacheatle@gmail.com
So much detail, but so beautiful! Great job!
ReplyDeleteThis is so beautiful. The level of detail is perfect! Love it.
ReplyDeleteSorry, i did not mean to do anonymous.
DeleteYour vintage style looks beautiful.
ReplyDeleteWow! Love, love, love.
ReplyDeleteGorgeous and totally amazing! Love the attention to detail!
ReplyDeleteWow, I’m not sure what I like most, there’s just too much to pick from!
ReplyDeleteLove, love, love it! So pretty! I love the black and the skiff of snow!
ReplyDeleteI have no words for this absolutely stunning card! I’m in awh of it! 😍😍😍😍love it!
ReplyDeleteWow!!!! This is absolutely stunning! I love all the details and the dark background as well as the wonderful effect on the edges of the garland pieces!! I am certainly going to try some of your ideas. I love it all!!! Thanks so much for sharing! .:)
ReplyDeleteWow - how stunning. Love your color choice. Gorgeous!
ReplyDeleteLove the colouring!
ReplyDeleteThis card & tag is amazing! I know that a lot of work went into this-so many steps to make each part perfect. I love the colors, the shine, the stitching. Beautiful.
ReplyDeleteI am in love with the denim look of this tag. Gorgeous work.
ReplyDeleteI love all the texture and dimension on this tag! The rock candy on the leaves looks beautiful!
ReplyDeleteThis is AMAZING! Love that background and the leaves and berries are beautiful with their icy finish!
ReplyDeleteMarisela Delgado said: So pretty! mariandmonsterd@yahoo.com
ReplyDeleteI can't stop looking at this card! A little goth, a bit like blue jeans and soft texture, a little romance and mystery. I love the way you present your instructions.
ReplyDeleteWhat an exquisite card! There are so many wonderful, thoughtful details, and they come together beautifully for just the most amazing work of art! You never disappoint; I'm pretty sure this is my favorite of your makes, although so hard to top the others!
ReplyDeleteAll the layers combine so well.
ReplyDeleteSo much dimension! I always forget to use black cardstock. I love how it makes the colors pop! Thanks for sharing!
ReplyDeleteThis is a show stopper! Between the black, red, and green colors, then all the fine details your card/tag is such a beauty.
ReplyDeleteGorgeous with the dark background. Hugz ionabunny
ReplyDeleteGorgeous--so many great details.
ReplyDeleteWOW… just wow!! I have like experience with mixed media, but your card project really rocks it. It’s amazing!
ReplyDeleteI love the colors of your card especially the background
ReplyDeleteBeautiful! A real work of art!
ReplyDeleteThis is so stunning! Just WOW!
ReplyDelete