Hello everyone...
Hope you've all had a wonderful weekend and ready to begin the new week with a brand new Simon Says Stamp Monday Challenge. Today is Columbus Day which we are celebrating with our theme ~ EXPLORE and hope you'll come and join in with our challenge and play along.
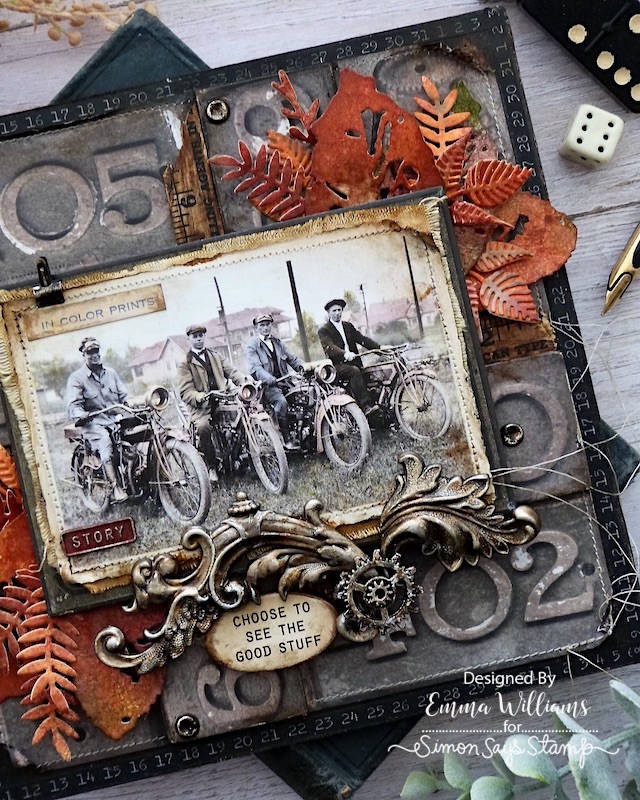
For my make, I used one of my favourite photos from Tim Holtz's idea-ology Snapshots Photos and I thought this was perfect for our theme to create this project, set against an autumnal backdrop and is all about the 'adventure of a lifetime' for these four friends, who choose to see the good stuff!
So let's get started and here's how I created this piece....


For this project, I used the smaller sized square Etcetera Panel and Mosaic Tiles.
PREPPING THE ETCETERA PANEL BASE
To begin with I painted the edges of the panel with Black Soot Distress Paint. You don't need to waste paint and cover the entire panel, as this will be covered with paper, I always just paint the areas that will show on the finished piece.
Once dry, I applied Design Tape around the four edges of the panel.
I then applied another design around the four sides of the panel to form a border.
With the tape in position, I chose a piece of Backdrop paper from the Halloween Backdrops 2023 pack and thought this one worked perfectly with my theme.
To begin with I cut some of the number plaques to fit four of the rectangular mosaic tiles, and I adhered the paper onto the tile with Matte Collage Medium. Sand the edges to create a neat finish and seal with a coat of the medium over the top. Run the Walnut stain Distress Crayon around the edges to colour them.
With the remaining paper, I cut this so that it would fit the square panel ~ I did have to slightly patch areas but once you have the layers over the top, this will not be seen.
I machine stitched a border around the outside of my paper before I attached it to the centre of my panel, adding rips and tears around the edge and curling the corners back to create some texture. I also added a Remnant Rub, 'Fare' in the corner.
For the next layer of this panel, I attached the covered Mosaic Tiles, and placed these to form a platform and a support for my photo arrangement and you can see below the rough layout of the tile formation before I attached everything into place.

Each of the tiles are placed around the outside of the panel, on each of the four sides.
I then added some broken ruler pieces, inking them with Walnut Stain Distress Ink and then placing them alongside each of the Mosaic Tiles.
After applying Walnut Stain Distress Crayon around the edges, my base is ready....
AUTUMN LEAVES AND FOLIAGEThe leaves and foliage are all cut from Mixed Media Heavystock card that I coloured with a combination of Distress Spray Stains and Mica Sprays.
COLOURS USED:
Distress Spray Stains ~ Spiced Marmalade, Crackling Campfire, Peeled Paint and Vintage Photo
Mica Spray: Mulled Cider and Fallen Acorn
Once I was happy with the blend, I dried my card and then used the Tim Holtz Funky Florals 3 and Leaf Fragments Dies from Sizzix to cut all my pieces.
SNAPSHOT PHOTO
The whole project is centred around this photo and as I mentioned, I just love this image ~ there's something about it that is so cool and I just knew I had to use it for this challenge theme and to make it look slightly more vintage, I used the Deckle Edged Trimmer to cut around the edge.
I then colour tinted the photo using Distress Crayons and a waterbrush, before I machine stitched it to a piece of cotton calico cloth, that I dyed with a blend of Brushed Corduroy and Frayed Burlap Distress Spray Stains.
In the top left hand corner of the photo, I adhered the "In Colour Print" strip which is from the Numbers Snippets pack, and to give that vintage look, I just added some ink around the edge before I added a Tiny Clip, which I painted with Black Soot Distress Paint and then applied a smidge of Pewter Foundry Wax over the top.
I layered the completed photo onto a Baseboard Frame, which will add support and stability to the image, and then attached my frame to the panel, placing it over the top of the leaves and foliage arrangement, which I placed in the top right and bottom left hand corners.
As the final touch to the photo, I placed a Word Tag, that I painted with Candied Apple Distress Paint, in the bottom left hand corner. The tag does have a loop but I managed to actually snap this off by mistake ~ not sure how, but I obviously don't know my own strength, lol! To accentuate the wording, 'story', I applied some gilding wax from my stash, over the top.
FLOURISH ADORNMENTS AND SPROCKET GEARS
We're now ready to add those beautiful Flourish Adornments and the sprocket gears which will complete the piece.
Once I'd selected the pieces I wanted to use, I applied Gilding Wax to add some colour. I used Foundry and Sterling on each of these pieces, applying one layer of wax at a time and then adding the second layer over the top, but not giving the metal a complete coverage. This will allow the layer of wax underneath to show through and create the variation of colour to the metal.
I heat set the wax on all the pieces I used, and then arranged and attached them onto my panel with Matte Collage Medium, placing the flourishes across the bottom of the photo, and layering the sprocket gears over the top, where the two flourishes meet.
I finished the piece by adding the quote ~ "Choose To See The Good Stuff'. This is from the Quote Chip Labels set and I sanded the edges of the chip, before inking with Walnut Stain Distress Crayon. I then attached it to my panel with foam pads, placing it between the flourishes.
To complete the panel, I added some Long Fasteners to each of the Mosaic Tiles. I cut the legs of the back of each fastener and then hammered them before adding some Foundry Wax and attaching them with Matte Collage Medium.
So, that's my project complete and I hope you love and have enjoyed the process and all the techniques that I've used to make this project.

As always, if you make anything, or if you've been inspired by anything that you've seen here on my blog ~ then please, let me know by tagging me on social media or leaving a comment here and I will be right over to take a look!
Don't forget that every week, one lucky random participant has the chance to win a $25 gift voucher from Simon Says Stamp and you can join in up to 5 times, which means you could have 5 chances to win. You have until next Monday at 8am Ohio time. 1pm UK time, 2 pm CET to join in and good luck....
Thank you so much for taking the time to stop by today ~ stay safe and keep well.
Love Emma xxx
Recipe for project:
Distress Spray Stains: Brushed Corduroy, Frayed Burlap,
Spiced Marmalade, Crackling Campfire, Peeled Paint and Vintage Photo Hot Glue Gun
Cotton Calico and Gilding Wax from my own stash
****These are not affiliate links****


That paper had me going there for a few minutes. It looks very dimensional, like you had cut the numbers and layered them. I love how you cut Brad's legs off to glue them down (hehehe).
ReplyDelete