Hello friends...
Firstly, I just wanted to say thank you to all all those who've messaged me to say they were missing my Monday posts ~ it's good to be back and so sorry I've been MIA but my Mum hasn't been too well and life just took over for a while.
Anyway, today is such a fun project to return to and we hope that you will join us and play along with the latest Simon Says Stamp Monday Challenge which this week is all about ARCHITECTURE AND BUILDINGS.
In the past, I've often mentioned that my Grandad was a master builder and architect ~ many of his designs and builds, can actually be seen in Birmingham, UK and as a family we are so proud of him and his memory which continues to be a huge inspiration to me within my makes and designs. It was because of him, I actually always wanted to grow up to be a architect myself but somewhere along the way, music and art took over and that became a bigger part of my life but with all this in mind, I chose to dedicate this week's project to the dreams and aspirations of a young boy, who would become one of the finest in the world and be the most wonderful, inspirational Grandad a little girl could have grown up with!
So let's get started, it's time to walk you through my project, which I hope you love...

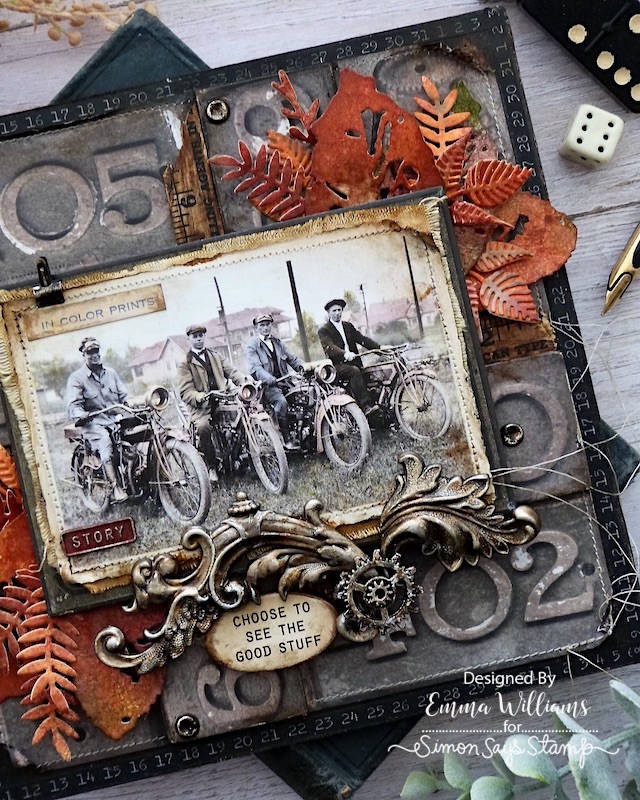
To begin with I used the awesome new Etcetera Panels and Mosaic Tiles from Tim Holtz and Stampers Anonymous. These are something that I will be using a lot of in future makes, they are so good ~ substantial, thick boards that are so easy to work with and take so many different mediums!
PANEL AND TILES
For this make, I chose to use the larger sized rectangular panel, and three of the Mosaic Tiles, two rectangle, one square and also the waste piece from the Mosaic Tiles themselves.
Putting the tiles to one side, I painted around the sides and the edges of the panel with Black Soot Distress Paint and at this stage, I also painted the waste frame. You don't need to paint the entire panel as this won't be seen, just paint the areas that will show.
I then used a Design Tape trims from my stash to create a border around the edges of the panel and also attached tape to any areas that will show once I've attached the tiles and frame. This is one of Tim's from an older set that you might have in your stash but if not, any design tape will do.
With my panel complete, I moved onto the tiles...
I chose to use a piece of paper from Backdrops Vol 1, which shows a blueprint design for a Gothic Arcade and I cut the paper to fit inside my frame and also covered the tiles that will be placed down the left hand side.
Once I'd adhered the paper to the tiles, I then adhered them into position onto the panel with Matte Collage Medium, sealing the surface of each tile with a coat of the medium and once they were secure, I applied some Translucent Crackle Paste to the edges, which I then allowed to dry.

When the crackles appear, I added vintage colour to the tiles with the Walnut Stain Distress Crayon which I ran around the edge of the paper, and blending the pigment over the surface with a semi dry baby wipe. In the crackled areas, I just added a little more crayon and again blended it so it would sink into those cracks.
FRAME

Moving onto the frame and I to create the texture I added some Black Texture Paste to the surface and allowed for this to dry before applying a combo of Sterling and Statue Foundry Wax over the top of the beautiful gnarly, texture that the paste had given to the surface. Heat set the wax and then adhere the frame to the right hand side of the panel.

Taking the larger piece of the Backdrops paper, I ripped and tore around the edge before machine stitching a border and then attaching it inside the frame itself, allowing all those tears and curled edges to show. I applied a coat of Matte Collage Medium over the top to seal the paper.
Once again, I added a vintage feel with Walnut Stain Distress Crayon which I applied directly to the paper itself, adding it around the edges of the paper and over the surface.

I added some Hardware Heads around the frame, which I altered with Black Soot Distress Paint and Foundry Wax.

Flick Black Soot Distress Paint across the panel and set to one side to dry.
We're now ready to start embellishing the piece with all those gorgeous metal pieces and details...
MOSAIC TILE DETAILS
On each tile, I added some details from top to bottom...

TOP: I used the number 2 which I painted with Candied Apple Distress Paint and attached this together with a star adornment, altered with a Sterling and Statue Foundry Wax. These are placed above the "Finest In The World" remnant rub from the Labeled set.

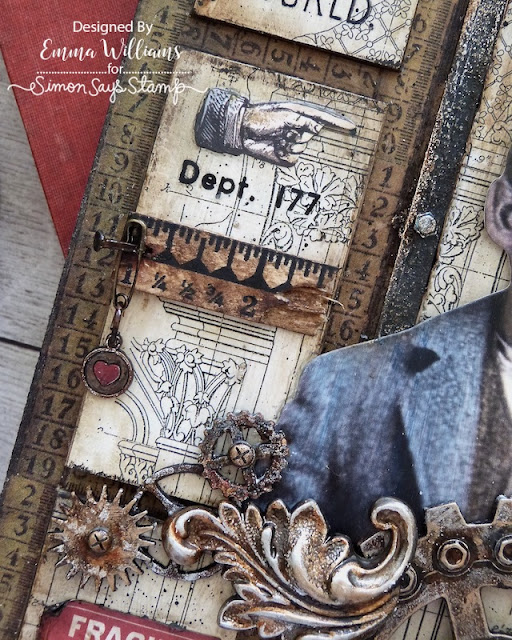
MIDDLE: This tile features a pointy finger from the Snippets Ephemera set, and coloured with Distress Crayons and I also added a Labeled Remnant Rub underneath.
Across the centre of the tile, I attached a broken ruler piece, coloured with Walnut Stain Distress Ink. I then hammered a Nail Tack into the wood and placed a mini pin and tiny word tag. I altered the metal on the tag with Foundry Wax and then painted the heart with a little Candied Apple Distress Paint.
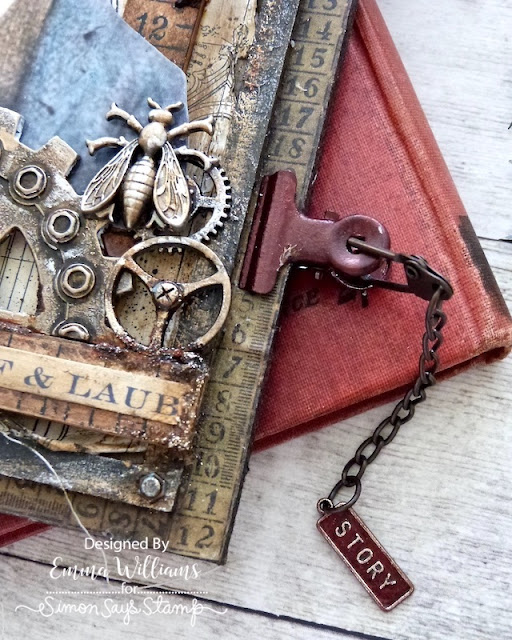
BOTTOM: On the final tile, I added a Fragile Label taken from the Palette Ephemera pack.
METAL EMBELLISHMENTS
I used an assortment of idea-ology pieces including a Industrial Gear, some Sprocket Gears, an Entomology Adornments, Hardware Heads and a Flourish and each piece is altered with Foundry Wax and Mushroom Alcohol Ink.
On each metal pieces, I applied a layer of Statue Foundry Wax, heat set the wax and then apply a lighter coverage of the Sterling wax, over the top, just allowing my finger to kiss raised areas of the metal and not give a full coverage. Heat set this layer and then once coo, dribble Mushroom alcohol Ink over the metal.
Finally, I added some Burnt Sienna Acrylic Paint to just accentuate all the detail and add some rusty pockets of colour.

PAPER DOLL PORTRAIT
I colour tinted the paper doll with Distress Crayons and a water brush.
COLOURS USED: Faded Jeans, Brushed Corduroy, Gathered Twigs, Tea Dye, Aged Mahogany and Frayed Burlap

ARRANGING THE EMBELLISHMENTS
Now to start building those layers and I began by breaking some more of the ruler pieces in half and then swiping the surface with Walnut Stain Distress Ink to add a darker colour tone. I then attached one piece across the frame and the second piece vertically inside the frame.
I placed the paper doll portrait over the top, using foam pads to add height and then attached all my metal embellishments, using Matte Collage Medium and arranging them to cascade and go across the width of the panel.

Finally, I attached a Palette Ephemera piece across the ruler, "Smith, Paff & Laub...

....and then hammered a tack into the vertical ruler piece.

As a finishing detail, I added a Number Snippets to the top right hand corner...

...and also added a Labeled Remnant Rub just to the right of the boys head, placing it directly onto the paper.

To complete the panel and tell the story, I attached a Hinge Clip to the side of the panel, which again was painted red with Candied Apple Distress Paint and I hung a Swivel Clasp and painted red Word Tag from the clip. I then applied a Foundry Wax over the top to accentuate the wording on the tag.
So, that's my project finished and I hope you love it and will be inspired by some of the ideas and techniques.

As always, if you make anything, or if you've been inspired by anything that you've seen here on my blog ~ then please, let me know by tagging me on social media or leaving a comment here and I will be right over to take a look!
Don't forget that every week, one lucky random participant has the chance to win a $25 gift voucher from Simon Says Stamp and you can join in up to 5 times, which means you could have 5 chances to win. You have until next Monday at 8am Ohio time. 1pm UK time, 2 pm CET to join in and good luck....
Thank you so much for taking the time to stop by today ~ stay safe and keep well.
Love Emma xxx
Recipe for project:
Tim Holtz Idea-ology: Backdrops Vol 1, Labeled Remnant Rubs, Paper doll Portrait, Word Tag, Palette Ephemera, Hinge Clip, Star Adornments, Snippets Ephemera, Ruler Pieces, Industrial Gears, Sprocket Gears, Entomology Adornments, Flourish Adornment, Hardware Heads, Odds and ends, Mini Pin, Nail Tacks, Numbers Snippets
****These are not affiliate links****