
Hello friends....
Happy Monday and welcome to a brand Simon Says Stamp Monday Challenge! This week, our theme is all about being Inspired By Music and we hope that you can join us and play along with our fun challenge.
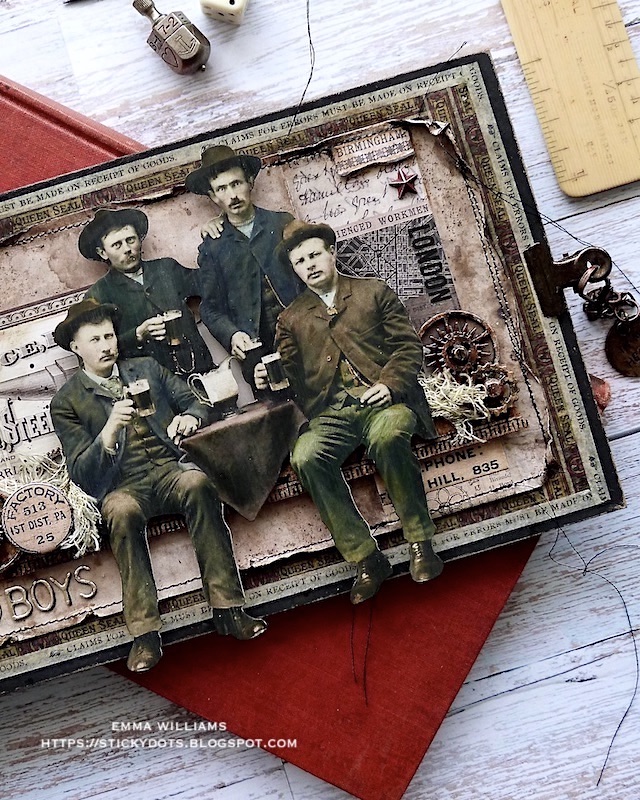
Now I'm a huge music fan, always have been, always will be ~ if you ask my parents, they'll tell you at the age of 6 months, I would shuffle along the floor every time the song, Resurrection Shuffle was played and since then, my love for music and especially vinyl has never waivered. Music is played every single day in the house and I will admit I have an eclectic taste, but there is one band above all others that is constantly on the playlist and when it came to inspiration for my project, there was never a doubt of what would inspire me ~ it had to be my favourite band, Duran Duran and I created a project for one of their most famous songs, The Wild Boys. There are plenty of references to the band and in particular, this single which was released in 1984 and these include their home towns of Birmingham and London, together with the number 2, which was the final chart position in the UK and US singles chart and there's even a star to represent the star on the Hollywood Walk of Fame.


For this project I used a Small Etcetera Tag as my base and I used it horizontally.

TAG
To begin with I painted the surface of my tag with a couple of coats of Black Soot Distress Paint and once it was thoroughly dry, I sanded back the edges using Tim's Sanding Disks, attached to a blending tool.
I then wanted to create a frame and for this I used a combination of Design Tape Trims and Humidor Design Tape, which I applied separately to create a double border around the edge of the tag, leaving approx a 0.5cm of the painted border showing.

I then cut a tag shaped piece of paper from Backdrops Vol 4. This panel will need to fit inside the design tape border, so it measures approx. 11 x 22cm. I machine stitched a border around the outside before ripping and tearing along the edge to create a vintage feel to the paper.


To complete the background, I attached a line of Collage Strips which are cut to fit vertically down the right hand side of the panel. I adhered them with Collage Medium before stitching across the top and bottom.

On one section of the collage strip, I applied a "London" Remnant Rub from the Labeled set and I also added 'Birmingham' to the top of the strip. I searched high and low for that word, I knew I'd seen it somewhere and finally found it on one of the Ephemera Pieces from the Memoir set, which I then cut down so I just had the name of the city.

I adhered the paper to my tag, then using a paint brush dipped in water, I applied a diluted solution of Ground Espresso and Black Soot Distress Paint to the torn edges to add even more of a vintage feel.
BACKGROUND LAYERS
The tag surface is complete, so now to start building those layers and we'll begin with the Wild Boys.
I'm using one of the group Paper Dolls as my focal point for the story and I thought this one was perfect. To prep the image for colour tinting, I applied clear gesso over the surface and once dry, I coloured it with Distress Crayons and a water brush.

Setting the boys to one side, I added some layers to my background using an ephemera piece from the Urban Layers set which I adhered to the tag with collage medium, adding a layer of the medium over the entire surface of the paper panel. To add some "oldy worldy" to the ephemera piece, I sanded it around the edge and then applied Walnut Stain Distress Crayon, scribbling the colour around the edge and then blending it with my fingertip.
I then added the 'boys', placing foam pads on the back of the image and placing them so they are sitting on a Ruler Piece that I inked with Walnut Stain Distress Ink.

To ground the image, I added some small pieces of Mummy Cloth, dyed with Frayed Burlap Distress Stain and just tucked these behind the photo, along the ruler seat.
METAL ADORNMENTS

I used a selection of metal adornments including flourishes, sprocket gears and mini sprocket gears, tougher with a few Hardware Heads and painted all these pieces to create more of a bronze, rusty appearance to the metal.

To do this, I used Foundry Wax and Distress Paints in the following colours;
Foundry Wax ~ Statue and Sterling on the Flourish Adornment
Distress Paints ~ Black Soot, Ground Espresso and Crackling Campfire on the gears and hardware heads.
I applied the waxes one at a time to the flourish adornment, and then heat set between each application before rubbing Black Soot Distress Paint over the surface. Working quickly I removed the paint from the raised areas, allowing it to remain and accentuate the detailed parts of the metal.
I then painted the gears and hardware heads with the paints, drying between each application and just building up that rusty appearance.
Once all my pieces were ready, I arranged them to cascade around the photo, placing them on either side.


At this stage, I also added a 'factory' Mini Flair Embellishment.

The final metal embellishments are the star and the number 2 which again are painted with Distress Paints;

Number 2 ~ Salvaged Patina, Crackling Campfire, Black Soot with a touch of Statue Foundry Wax over the raised areas
Star ~ Candied Apple
I attached these to my project with collage medium, the star in the top right hand corner...

...and the number 2 in the bottom left.

We're nearly there and all that's left is the finishing touches...
WILD BOYS LETTERING
Each of the individual letters were cut using the Sizzix Label Alphanumeric Die Set by Tim Holtz, and I cut hem once from gold metallic kraft stash, and a second time from black card stock. I layered the gold over the top of the black, to create a slight drop shadow and to form a dimensional letter which I then attached to the tag, adding a hashtag die cut.

DETAILS, DETAILS, DETAILS
I added some Large Fasteners down the left hand side, alternating them with small die cut small crosses that I had leftover from a previous project.

The final touch was to attach a Hinge Clip, altered with the same paints as I used on the Sprocket gears. I clipped this to the right hand side of the tag, and attached a Hook Clasp complete with a Thought Token attached to the end. The thought token says "In My Heart' because this band has given me so many happy memories that I will treasure forever and are in my heart.

So that's my project complete and I hope you love what I've made...it's been fun to tell this particular story through my tag and art.
As always, if you make anything, or if you've been inspired by anything that you've seen here on my blog ~ then please, let me know by tagging me on social media or leaving a comment here and I will be right over to take a look!
Don't forget that every week, one lucky random participant has the chance to win a $25 gift voucher from Simon Says Stamp and you can join in up to 5 times, which means you could have 5 chances to win. You have until next Monday at 8am Ohio time. 1pm UK time, 2 pm CET to join in and good luck....


Recipe for project:


I so want to make this! I love it! Going to incorporate a
ReplyDeletePicture of my three boys! Love it! 💝 you always inspire Me! I always want to buy everything Tim when I see Your makes!!!!