Hello everyone...
Hope you all had a lovely weekend and now, you're ready for the week ahead. As always on a Monday, we have a brand new Simon Says Stamp Monday Challenge and this week, our theme is all about Art Journaling and we would love for you to join us and play along.
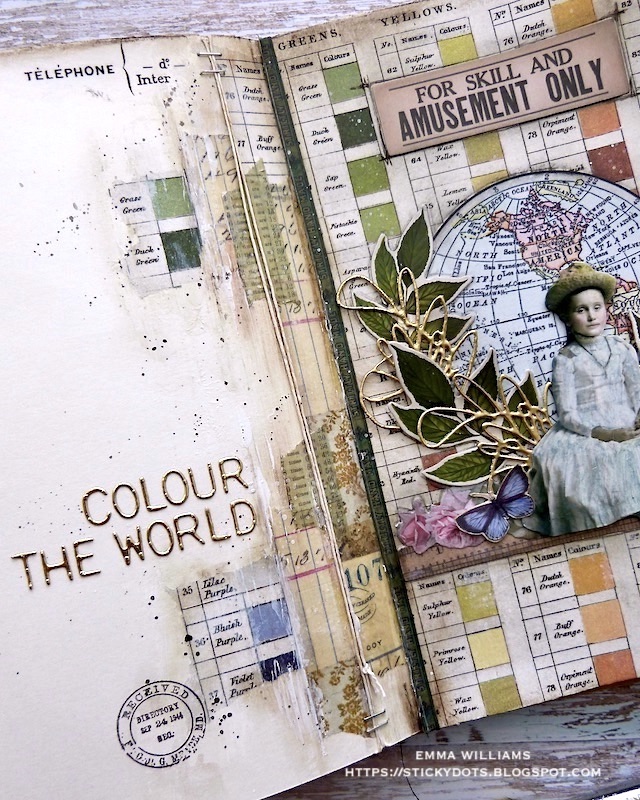
For my project, I chose to create a double paged layout with the theme of "Colour The World", with the British spelling of the word 'colour" and amongst many Tim Holtz products, I wanted to use one of my favourite pieces from the 2023 idea-ology release, the gorgeous Palette Collage paper which you can see on the background.
So, here we go, let's start journaling....
For this particular make, I used my
Dylusions Journal, and the pages insides measure 8" x 5'.
TO BEGIN...
I started by covering the page on the right hand side using the Palette Collage paper.
The depth of the paper won't cover the page completely, so I used two panels that I pieced together to cover the entire page and adhered them into the book with Matte Collage Medium, applying a coat over the top to seal the paper and adding some machine stitching around the edges of the page. I then ran the Walnut Stain Distress Crayon around the edges, blending it with my fingertip and dragging the colour towards the centre of the page.
Even though my intention was to leave white space on the left hand side, I also wanted for the pages to come together as one. So bring the two pages of my layout together and create continuity, I added strips of Design Tape, placing the first strip of Tape Trim down the join of the journal.
I then added torn strips of Salvaged Design Tape on the opposite page on the left, together with some torn pieces of the Palette and Photographic Collage Papers and applied a coat of Collage Medium over the top.
Using a palette knife, I added lines of white gesso over the surface of the taped area, followed by scribbling some Walnut Stain Distress Crayon over the top which helps to blend away the harsh edges of the collage paper and tape.
Finally, I wrapped some twine around the page, top to bottom and securing it with tiny staples.
To add more layers and interest to this page, I stamped the postmark from the Field Notes Stamp Set in Black Soot Archival Ink and then added some flicks of Black Soot Distress Paint across the surface.
Finally, I added my quote, which will tell the story ~ Colour The World and I used the Label Alphanumeric Thinlits Dies to cut each letter from gold metallic kraft card backed with double sided adhesive and placed to the left of the taped section.
BACK TO THE MAIN PAGE
I'm now ready to add those layers to the main page and began with the globe, taken from the Memoirs Ephemera pack, and adhering it into position.
I then added a Ruler Ephemera piece, together with the rose banner again taken from the Memoirs Ephemera pack, and adhered these just beneath the globe.
Taking a soft graphite pencil, and once the medium was dry, I ran this around the outsides of each of the pieces to define the edges.
PAPER DOLL
I chose a paper doll from the pack, (and don't forget you don't have to use this one because in these packs, there are plenty to choose from that will speak to you), and I colour tinted the paper doll with Distress Crayons and a water brush.
Colours used:
Tea Dye and Aged Mahogany for the skin tones
Stormy Sky and Tumbled Glass for the dress
Peeled Paint for the hat
Picked Raspberry for the shoes
LEAVES AND GOLD MEDIA MARKS
Using the Sizzix Media Marks Thinlits Die Set, I began by die cutting a few of the squiggly shape from Mixed Media Heavystock card.
I then wanted to create an enamelled effect to each die cut and for this I applied an Embossing Dabber over the surface and then sprinkled Gold Embossing Powder over the top. Tap away the excess and heat emboss before repeating the process again to create the molten look to each piece.
The leaves that I used are from the Organic Layers pack. These come with a white outline, which you can trim away if you choose but for this particular make, I wanted to keep that white outline because I wouldn't be adding dimension or shape to the images, they would just be flat on the journal page.
I attached the leaves around the globe, tucking some of the Media Mark squiggles into the arrangement, which I cut into smaller sections.
After sitting the little girl in the centre of the arrangement, I once again added shading around each of the Organic Layers pieces.
To complete the arrangement, I added a tiny butterfly from the Snippets Ephemera pack and placed him to the left of the little girl.
COMPLETING THE JOURNAL LAYOUT...
Finally, I added my final ephemera piece, "For Skill and Amusement Only", again from the Memoirs pack and adhered this into position at the top of the page before I ran a black fine line pen to add doodles around the outside of the piece.

So that's my art journal layout complete and I hope you love what I've made and will be inspired to colour your world with these ideas!

As always, if you make anything, or if you've been inspired by anything that you've seen here on my blog ~ then please, let me know by tagging me on social media or leaving a comment here and I will be right over to take a look!
Don't forget that every week, one lucky random participant has the chance to win a $25 gift voucher from Simon Says Stamp and you can join in up to 5 times, which means you could have 5 chances to win. You have until next Monday at 8am Ohio time. 1pm UK time, 2 pm CET to join in and good luck....
Thank you so much for taking the time to stop by today ~ stay safe and keep well.
Love Emma xxx
Recipe for project:
Black Pen and Black Pencil from my stash


An absolute stunner!
ReplyDeleteWow, this is great. Love the collage paper.
ReplyDeletegr. Yvonne
Awesome
ReplyDelete