
Hello everyone...
Hope you all had a happy weekend and you're ready for the week ahead! As always on a Monday, we have a brand new Simon Says Stamp Monday Challenge and this week we challenge you to create a project that is all about the SUN, MOON and STARS. There are so many interpretations and products that can be used for this fun theme and we hope that you'll join us and play along...
I love anything to do with the moon and stars, and was inspired by the theme to create a special make for my Dad and hero ready to give to him on Father's Day. Of course, this make doesn't have to be about Father's Day, the ideas can be used for birthdays, anniversaries or just to let that special man in your life know how much he's appreciated.
So, back to my project and with the Father's Day theme in mind, I bought back a favourite die of mine from a few years ago ~ The Count. As some of you may remember from a few of my previous projects, the Count isn't just for Halloween ~ oh no, not in Emma's world ~ The Count is for all year round and this time, he is making an appearance as a dapper gent, who is loved to the moon and back!


MOONLIT BACKGROUND
To begin with I made my background and for this I cut a panel of Distress watercolour card the same size as the tag itself and placed the middle sized Moon Mask onto the left hand side of the panel. I then started inking my background and starting at the top to create the ombre effect, I used a blending tool to blend Stormy Sky Distress Ink over my card panel. With the mask still in place, I then blended Uncharted Mariner over the top, followed by Villainous Potion and Black Soot, each time applying the ink so it was a lighter coverage as it moved down the card panel.

Once I was happy with the blend, I removed the mask, spritzed the card with a light misting of water and then flicked a few droplets of water across the surface, before heat drying the panel.

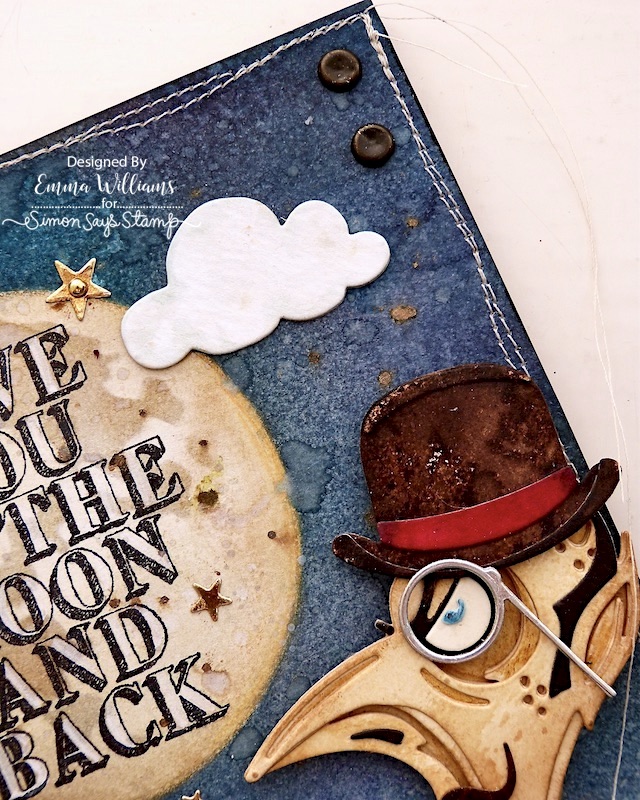
I then inked the moon ~ firstly, I inked the entire moon using Antique Linen and then I placed the detail moon mask over the top and inked through the mask with Hickory Smoke and Lost Shadow Distress Inks.
Once I was happy, I inked up the "Love You To The Moon And Back" from the Life Quotes Stamp Set with Black Soot Archival Ink and stamped the message directly inside the outline of the moon. For this I used my Stamp Platform, as I wanted to colour the wording using Picket Fence Distress Paint and because the line art is quite fine and you could go over the outline of the words, I always paint, then re-ink and stamp over the top once again to create a crisp image and that's why I used the platform as it means I can go back in and res-stamp without having to try and line the image up and 99.9% of the time not get it perfect.

With my background ready, I attached a border of the darker inked card along the bottom of the panel, and then machine stitched a squiggly border around the outside, added a few flicked of ink across the surface and then adhered the background to my Etcetera tag with Matte Collage Medium.
CLOUDS
The clouds are cut from Distress Watercolour Card using the Christmas Cutouts Die Set and I just added a very light wash of Speckled Egg Distress Ink over the top before attaching them to my background.

THE COUNT

Now for the star of the show and for this I cut all my pieces using The Count Colorize Die Set and combined him with three other die sets, Tailored, Gentleman and The Gent which all helped to create the add ons.

Ink colours and cardstock used:
FACE: Distress Watercolour Card, inked with Antique Linen Distress Ink and edged with Frayed Burlap
WAISTCOAT and HATBAND: Distress Watercolour Card, inked with Lumberjack Plaid Distress Ink
SUIT from The Count, HAT from Tailored and MOUSTACHE from The Gent: Distress Watercolour Card inked with Ground Espresso, Brushed Corduroy, Walnut Stain, Black Soot and Gathered Twigs
WALKING STICK from Gentleman and GENERAL FEATURES: Black Kraft Card
EYE and SHIRT: White Heavystock Card
MONOCLE from The Gent: Silver Kraft Stash
Once I had all my card layers die cut and coloured, I started layering each piece and building the character to create The Dapper Count and when he was all dressed up and ready, I added his hat and walking stick, complete with gold embossed handle. This is achieved by applying a small amount of Gilded Foundry Wax to the handle and then heat set. I then threaded the stick through his arm.

I then added the monocle and moustache to complete the image.

My Dapper Count is ready and I attached him to my background using foam pads to add some height and dimension, which you can see in the photo below...

I always like to ground my figures, so I have stood him on a ledge that I created using one of the straight edged Etcetera Trims from the Facades set. I applied a layer of Crackle Paste over the surface before attaching the ledge along the bottom of my tag. If you don't have the Facades, then you can use mountboard to create a similar effect.

With the Count in place, I added some moss along the ledge.
SIGNPOST AND GREENERY
Now for the signpost and this is from the Road Trip Colorize die set, cut from Mixed Media Heavystock card and then inked with various brown shades of Distress Ink.
After I'd assembled the sign post, I added the numbers which again are die cut and I used the Specimen Die Set but you can use a stamp, or for a personal touch ~ just right it in your own handwriting.

I attached the signpost on the left hand side and placed some moss spilling over the top before die cutting some greenery using one of my well loved and well used foliage dies, taken from the Funky Florals 3 die set and coloured with Evergreen Bough and Rustic Wilderness Distress Inks. I arranged the greenery and attached it along the ledge.

To complete this section, I added some Floral Adornments. I altered the metal with Foundry Wax, which I applied directly over the surface and then heat set.

STARS
I cut the cascade of stars from Metallic Gold cardstock using the Falling Stars die and then just layered them to create dimensional stars, which I attached directly to the background. In the centres of some stars, I placed gold Metallic droplets.

The final star though is a red star and this again was die cut using the Falling Stars die but I cut this special one from red cardstock and then attached it to the sign post, placing it just to the right of the No.1.

We're nearly there and all that's left is the details...
DETAILS
I added two Large Fasteners to the top right corner, both of which are hammered with the Texture Hammer to create those tiny dents and then I cut the wings off the back before attaching them to my tag.
Finally, I coloured a Hinge Clip with Candied Apple Distress Paint which I clipped onto the side of the tag, together with a swivel clasp attached. I then attached a Heart Adornment, also painted with a little Candied Apple paint to accentuate the heart in the centre and attached this to the clasp.

So that's my make finished and ready to be given on Father's Day and I hope you've loved the ideas and techniques I've used and if you don't have all the dies for this make, then just use what you can....it's just a fun theme to bring together to make your own!

Now all that's left for me to do, is to make sure my Dad doesn't see it before the big day...so, I'm going to find a hiding place.
As always, if you make anything, or if you've been inspired by anything that you've seen here on my blog ~ then please, let me know by tagging me on social media or leaving a comment here and I will be right over to take a look!
Don't forget that every week, one lucky random participant has the chance to win a $25 gift voucher from Simon Says Stamp and you can join in up to 5 times, which means you could have 5 chances to win. You have until next Monday at 8am Ohio time. 1pm UK time, 2 pm CET to join in and good luck....


Recipe for project:


I LOVE the Count! He can be so much more than Halloween. Love your tag and Dad will love it too!
ReplyDelete