
Hello friends and welcome to Day 2 of the Simon Says Stamp DieCember Blog Hop.

I'm so excited to be joining so many of my talented friends and designers on this hop and if you've arrived here from, Mindy's blog ~ then hello, but if not, and you want to catch up with everyone who is participating in this hop, then don't worry because you can head back to the beginning by clicking ---> HERE.
There are so many gorgeous new products in this release and I can guarantee you’ll be spoilt for choice because every single one of them will have you heading to your craft room to create some festive Christmas magic and sparkle. You can see all the products in this amazing release, HERE!
Now, back to my make and I created a winter greetings card using the gorgeous Snowflake Medallion, and combined it with an older die, Snowy Greetings.

So let's get started and here's how I created my card...

To begin with I created a card blank measuring, 11.5 x 18cm using Simon Says Stamp Off White Cardstock.

LAYERS
To create the base layers for my card, I cut a panel of Tim Holtz Distress Mixed Media Heavystock card, 11 x 17.5cm and I spritzed the card with Speckled Egg and Tumbled Glass Distress Spray Stain. After heat drying the card panel, I inked the edges with Frayed Burlap Distress Ink and matted it onto my card front.
I then cut a panel of Pawsitively Velvet cardstock, 9.5 x 16cm and using chalk white cotton thread, I machine stitched a border around the outside.

I matted this panel onto off white card, and then mounted the layered card panels onto the front of my card blank.

SNOWFLAKE BACKGROUND
To create the background for my card, I used a panel of Distress Watercolour card, 8 x 15cm. I spritzed the card with a light misting of water and then spritzed Speckled Egg and Tumbled Glass Spray Stains over the panel. After heat drying the panel thoroughly, I smooshed some Frayed Burlap Ink onto my craft mat, spritzed with a little water and dipped the edges of my card panel into the tiny droplets. After drying the panel once more, I inked the edges with Frayed Burlap ink.
Now to create the raised snowflakes that you can see on the background and for this I used the Snowflake Medallion Die and cut two of the images from Distress Watercolour card that I inked using the same colours and the same technique as I used on the background. TOP TIP: Add adhesive sheets to the back of your card panel so it's easier to adhere the fine detail snowflake.
Place one die cut snowflake at the top of the inky blue card panel and adhere it into place.
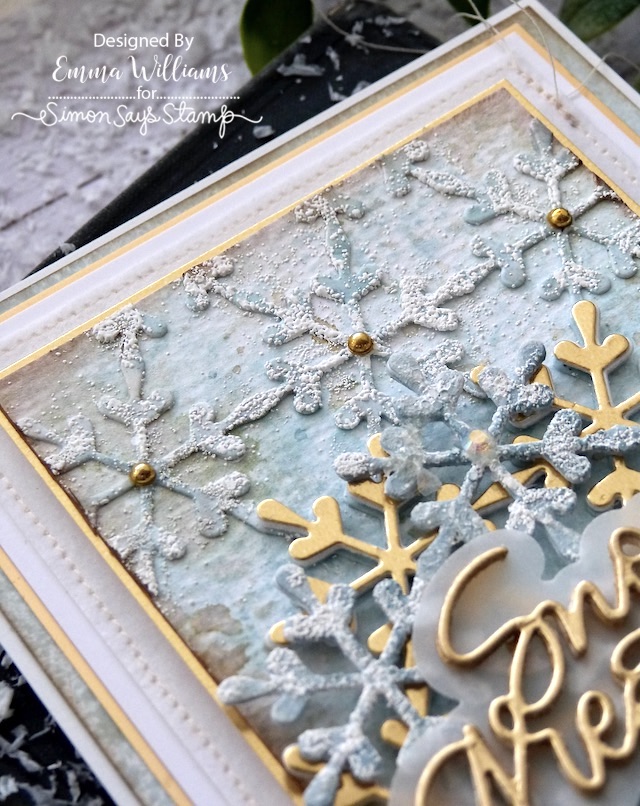
Attach the second snowflake along the bottom edge of the panel, aligning it with the previous die cut and stick into place.

Using an Embossing Dabber, gently brush the dabber across the raised snowflake surface of the panel ~ you don't need to add a solid block of the ink, just allow it to kiss the snowflakes where it touches. Sprinkle Cosmic Shimmer Snow Storm over the panel and tap away the excess. Heat emboss and melt the powder.
I matted the finished panel onto a piece of gold metallic cardstock and using foam pads, mounted this onto the card front.

SNOWFLAKE MEDALLION
To create the snowflake, I cut three layers from Mixed Media Heavystock card, before cutting a fourth layer from Watercolour card, again inked in the same colours as the background.
Attach and layer each of the snowflake die cuts, finishing with the coloured die cut on the top to create a substantial snowflake, the thickness of mountboard.

As with the background panel, lightly brush the dabber over the snowflake die cut and once again, sprinkle the embossing powder over the top and gently heat emboss the snowflake.
Layer the finished snowflake over the top of a second snowflake medallion, this time cut from gold metallic card, and attach the blue snowflake at an angle to the gold one to form a complete circle.

I attached the snowflake to my background, placing it in the centre using foam pads, strategically placed so they don't show through.

SNOWY GREETINGS
In the centre of the snowflake, I added a sentiment ~ Snowy Greetings. This die is in two separate pieces, the solid backing and the beautiful greeting, which I cut three times ~ twice from mixed media cardstock and a third time from gold metallic card.

I layered each of the die cuts to form the sentiment before attaching it to a die cut vellum background.
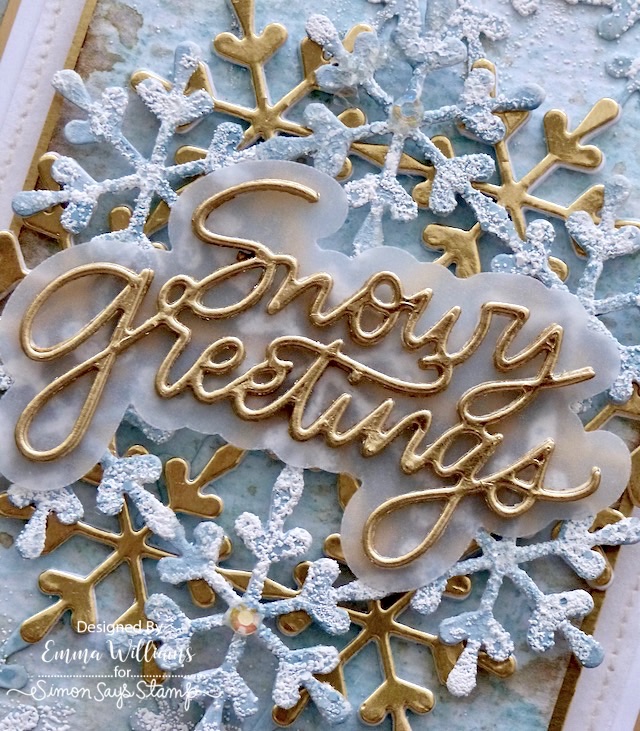
I attached the greeting to the centre of the snowflake using Matte Collage Medium, that I applied behind the lettering so it wouldn't show through the vellum.

Finally to complete my card, I added metallic droplets to the centres of the snowflakes on the background and crystals to the arms of the large snowflake in the centre.
That's my card for this hope finished and I hope you love what I've created....

Simon Says Stamp is giving away a $25 coupon to every stop on the blog hop! This means you can leave a comment here and on every stop along the way to increase your chances. Winners will be posted on the Simon Says Stamp blog on Wednesday, 7th December and all winners will need to contact/email Simon Says Stamp to claim their prize.
BLOG HOP ORDER
Emma Williams <<YOU ARE HERE


So much detail. Beautiful.
ReplyDeleteWonderful layers & colors.
ReplyDeleteMelissa
"Sunshine HoneyBee"
Love the layers of snowflakes; such a beautiful card!!
ReplyDeleteYour card is so pretty!
ReplyDeleteOh my gosh, this is incredible. I LOVE the depth, the colors, the snowflakes. Really gorgeous
ReplyDeleteGlorious card! TFS!
ReplyDeleteAbsolutely stunning card! Just love it so much!
ReplyDeleteWow, this card is amazing! Thank you for sharing all the techniques that you used to create this beautiful card. Carrie Clark
ReplyDeleteThis is stunning! I would frame it and hang it on the wall if I'd made it! :-)
ReplyDeleteLove all the layers with gold!
ReplyDeleteWow! What a stunning card! It looks like it should be a home decor piece! The colors and texture are amazing! Love it!
ReplyDeleteWhat an elegant and gorgeous card!! I would frame this.
ReplyDeleteWhat gorgeous colours! Really beautiful card.
ReplyDeleteThis is Absolutely Stunning!!! I love all of the layers and texture!!!
ReplyDeleteThis is just stunning!!! Not to mention elegant as well.
ReplyDeleteThis is amazing with all the layers and the gold accents. Wow!
ReplyDeleteStunning! this is amazing, love all the layers, colours and design! wow!
ReplyDeleteWow! This is absolutely stunning, with all the layers of snowflake. The gold and blue is an amazing combination.
ReplyDeleteAbsolutely stunning! I love everything about this piece. Thanks so much for sharing your process in such an easy to follow manner.
ReplyDeleteThat is just stunning. What amazing texture.
ReplyDeleteElegant!
ReplyDeleteGorgeous!
ReplyDeleteI love the layers and texture and colors!
ReplyDeleteOMG this is beyond stunning - a piece of art for the wall!!!!
ReplyDeleteSo pretty. I like the frosty colors and texture.
ReplyDeleteWow! This is worth a 2nd, 3rd, and 4th look!
ReplyDeleteMerrill P.
So stunning! I love this card. What a treasure it would be to receive.
ReplyDeleteLove your creation! I don't know how I ever missed that "Snowy Greetings" die, but it's perfect.
ReplyDeleteSnow pretty! Love the dimension. This is a card worthy of framing!
ReplyDeleteSuch a stunning card !
ReplyDeleteSuch a pretty card with the hold and silver color palette. Really enjoy seeing all the ideas for the snowflake dies. Thank you for sharing.
ReplyDeleteBeautiful Cards!
ReplyDeleteDefinitely my favorite card of the blog hop. Just gorgeous. Love the mixed media look.
ReplyDeleteYour creations are always real works of art!
ReplyDeleteAbsolutely stunning card!
ReplyDeleteBeautiful colors and textures! Gorgeous project!
ReplyDeleteTotally beautiful!!! A work of art!!!
ReplyDeleteMarisela Delgado said: So beautiful! mariandmonsterd@yahoo.com
ReplyDeleteSo very elegant, lovely snowflake background!
ReplyDeleteLove everything about your spectacular card!
ReplyDeleteThis is beautiful!
ReplyDeleteThis is just gorgeous.
ReplyDeleteThis is gorgeous.
ReplyDeleteI love your design.
ReplyDeleteWhat a stunning card.
ReplyDeleteWow! Amazing cards!
ReplyDeleteAbsolutly stunning! The snowflake medallion was the first in this release that caught my eye.
ReplyDeleteSo beautiful!
ReplyDeleteOh my, this is stunning!
ReplyDeleteVery pretty! Love the color choices.
ReplyDeleteThis is absolutely beautiful, great colour & texture choices!
ReplyDeleteYour card really looks icy cold. The gold gives your card a warm touch.
ReplyDeleteGorgeous eye candy on this design, the cool blues paired with the gold is so striking.
ReplyDeleteThis was a very striking an d beautiful card. The details are amazing. The sentiment is so spot on for this card. Thanks for sharing.
ReplyDeleteFabulous card! Beautiful layers and textures.
ReplyDeleteSo lovely!!! The colours are stunning!
ReplyDeleteGorgeous! Love the snowflakes!
ReplyDeleteThis is a keepsake card worth saving, and bringing out every year! I would probably frame it. Just so precious.
ReplyDeleteBeautiful card. The snowflakes
ReplyDeletereally reflect the cold winter theme.
thanks for sharing.
Brrr, looks cold like outside my window in Alaska!
ReplyDeleteIt's a beautiful card. Thank you for such a detailed description of the process. Greetings.
ReplyDeleteHi, Emma - What a knockout card! The texture and the colors are spot-on. I rarely see Frayed Burlap used and I'm blown away by this gorgeous hue. Great work!! Thanks for inspiring us!
ReplyDeleteLori S in PA
Man, if someone gave me this card I would put it away with the decorations and bring it out year after year! It is gorgeous!
ReplyDeleteBeautiful card! Love all the layers and colors.
ReplyDeleteSuch a beautiful card, love that snow flake die
ReplyDeleteLove the snowflake die and this background is beautiful
ReplyDelete