
Hello friends...
It's that time of the week again, and over on the Simon Says Stamp Monday Challenge Blog we are launching a brand new weekly challenge ~ TAG IT! If you'd love to join us, then we'd love for you to play along and can't wait to see what you create.
For my project, I chose to make a few different styles of quick and easy gift tags that I will be using on all my gifts. But that’s not all because I thought it would be fun to also decorate a box that I can use to store the tags in, until I'm ready to use them.


TAGS

I began by cutting my tags using Tim's Framed Tag and Vintage Label dies from Sizzix and cut two of the smallest size tag shapes and one circular shape from the Vintage Label set. These dies are such a genius idea, as they emboss and deboss a gorgeous border that can also be inked before cutting.
I always ink my dies using Archival Inks and a brayer. I rolled the brayer over the Rustic Wilderness ink pad to pick the ink up and then applied it over the top of the cutting side of the tag. Place a piece of Mixed Media Heavystock card over the top and run through the die cutting machine. After removing the die, I inked the tag using a combination of Antique Linen and Frayed Burlap Distress Sprays and then inked the edges with Vintage Photo Distress Ink. I then added the reinforcer pieces, cut from kraft card to the tags, and punched a hole in the top of the round tag. Adding an eyelet in the hole to reinforce that one.
I mounted each of the framed tags onto a second layer of card which I edged with Christmas Design Tape. Tartan on the book tag, the holly design on the wreath. The circular tag was mounted onto green kraft card.
BOOK TAG 1

For tag 1, I made a gift tag for a book lover, (better known as my Dad) and I started by making a tiny book. The book is from the Memoir Ephemera Pack and to make my book, I placed the cover in front of me and scored two lines to create a spine.
I then folded along the lines to form the book cover. For the pages, I cut old book paper to the size of the book itself. I then placed each piece inside the cover, adhering them one by one as I built up the pages. When the book is full, I scuffed the edges of the pages with my scissors before inking them with Vintage Photo Distress Ink.
I then added the 'Christmas Story" from the Christmas Sticker book onto the spine and aged it with a little Distress Ink.

The book is now ready and I can assemble my tag, starting with the sentiment. I stamped this in Fired Brick Archival Ink using a stamp from the Darling Christmas stamp set and then attached the tiny book above the sentiment.
I wanted a pop of red on this tag and for this I used the tiny bow that is in the Yuletide Colorize Die Set. I cut each layer of the bow from Mixed Media Heavystock card that I coloured with Lumberjack Plaid Distress Spray Stain.
Once the bow was assembled, I attached it to the book, and smeared a little Glossy Accents onto the edges, before sprinkling Mica Flakes over the top for a frosty feel.

I flicked some Picket Fence Distress Paint across the tag using Tim's Splatter Brush before adding a final trim of Design Tape that will match the outer layer. I completed the tag with velvet ribbon.
WREATH TAG 2

For the second tag, I stamped the "Have Yourself A Merry Little Christmas" sentiment from the Darling Christmas set in Fired Brick.
I then took the idea-ology wreath adornments and painted the metal with Peeled Paint and Lumberjack Plaid Distress Paints. Once the paint was dry, I attached the wreath to my tag with Collage Medium and placed a no. 25 remnant rub in the centre.
I added a light frosting of Rock Candy Distress Glitter over the top of the wreath.
Add a trim of tape along the bottom and some more velvet ribbon through the hole before lightly flicking some Picket Fence Paint across the entire tag for a sprinkle of snow.
VINTAGE LABEL ROUND POINSETTIA TAG 3

For this tag, I cut a circle of paper from the Christmas Backdrops set and adhered it to the centre of my tag. I flicked some Picket Fence Distress Paint across the surface and then added a "Merry Christmas' sticker to this one.
I then threaded some candy cane twine through the hole.
BOX
Now we have the three tags ready to put into their little storage box and this is how I made it.
I used the smallest sized Square Vignette Box and began by adding Lumberjack Distress Paint to two sides, these will become the left and right hand sides of the box.
Once the paint was dry, I used sandpaper to sand back some of the paint to reveal the wood. I then added a smear of Crackle Paste over the surface.
Allow for the paste to dry, and the crackles to appear and once that's happened, I applied Walnut Stain Distress Crayon over the top, blended the colour into the cracks.
On the remaining two sides, the front and back of the box, I covered these with paper from the Christmas Backdrops and also using co-ordinating papers from the set, I lined the box.

I then finished the base of the box by applying Design Tape along the top edges of the box and down each of the sides.


I completed the box with a Christmas Word Plaque that I added to the front. I painted the metal with Lumberjack Plaid and then rubbed away the paint to reveal the lettering, leaving the remainder of the red paint on the plaque still visible. I attached the plaque with Matte collage medium and added a hardware head to either side.

BOX LID
These boxes don't come with lids, but I wanted one for this particular make. This is really easy to do and all you need is some thick mountboard cut to the same size as the box. I cut three pieces of board and layered them to form the thick and substantial lid, ready for decorating!
I added strips of design tape around each edge of the mountboard lid to create a nice edge and then cut a slightly smaller panel of the paper from the pack and adhered this to the bottom side of the lid and the top side, placing it to show a border of the tape.

To form the next layer of the lid and create the bevelled look, I cut another layer of the mountboard, slightly smaller in size than the lid itself and just as I have on the larger piece, I adhered design tape around the edges and then adhered a panel of the Christmas Backdrops paper in the centre.

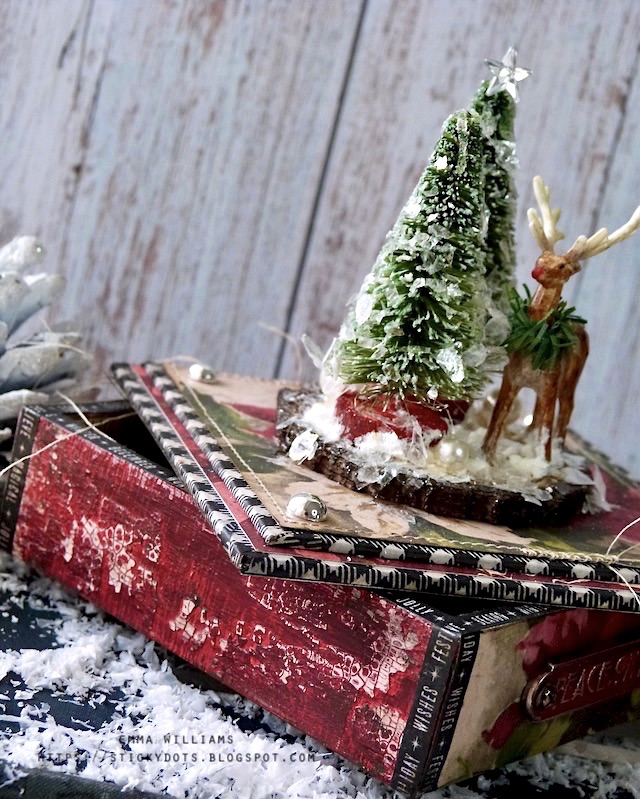
CHRISTMAS SCENE

For the Christmas scene that will sit on the top of the box, I used two Woodland Trees and one of the Salvaged Deers which I arranged and placed onto a Wood Slice, that I made using the Tree Rings Bigz Die and Texture Fade set.
I used the Bigz die to cut three pieces from Mountboard and layered them to form the tree ring base, which I painted with a combination of Gathered Twigs and Antique Linen Distress Paints. I actually didn't use the texture fade for this piece, you can if you like but I will be covering the base of the wood slice and it won't be seen on the finished piece.
SALVAGED DEER
I painted the deer using Distress Paints:
Gathered Twigs and Ground Espresso for the body
Frayed Burlap for the antlers
Lumberjack Plaid for the nose
Black Soot for the eye
Once the paint was dry, to age the paintwork I rubbed the surface with Walnut Stain Distress Crayon, blending out any harsh lines with my finger.
To finish my little deer, I added a tiny wreath around his neck. This is a small piece of Tim's Pine Twine, that I wrapped around the neck of the deer and secured in place with a dab of glue.

WOODLAND TREES
I spritzed each tree with Rustic Wilderness Distress Spray Stain and once the stain was dry, I rolled the tree in Glossy Accents that I applied to my glass mat. I then sprinkled the trees with Rock Candy Glitter and Mica Flakes.
I painted the wooden base of each tree with Lumberjack Plaid Distress Paint.
Now to assemble the scene and once I'd attached the trees and the deer to the base, I added some Opaque Grit Paste to the base.

I added some Glossy Accents over the top of the paste, before sprinkling the entire piece with Mica Flakes and adding a few baubles in amongst the snow. Once dry, I attached the piece to the top of my box.
I completed the top of the lid with some Metallic Droplets in each corner.

TAG FOR BOX
To finish the box, one last tag and this is super quick and easy. I cut a small circle of mountboard, which I painted with Lumberjack Plaid Distress Paint. Once dry, I adhered a seal from the Christmas Sticker Book onto the centre of the circle and punched a hole through the top. I finished with some Candy Cane twine.

So that's my project for this week finished and I hope you love what I've created...

As always, if you make anything, or if you've been inspired by anything that you've seen here on my blog ~ then please, let me know by tagging me on social media or leaving a comment here and I will be right over to take a look and if sometimes I miss it ~ just keep nudging me!
Don't forget that every week, one lucky random participant has the chance to win a $25 gift voucher from Simon Says Stamp and you can join in up to 5 times, which means you could have 5 chances to win. You have until next Monday at 8am Ohio time. 1pm UK time, 2 pm CET to join in and good luck....


Recipe for project:


The tags and box are gorgeous!! Thank you so much for sharing how you made them 😊
ReplyDeleteLocal UK Swing & Hang Tags Supplier Available in any size, for all our personalized clothing & Shirt Tags and swing tags that are complemented. Call us 07360238910.
ReplyDeleteRead More: The Complete Guide to Kraft Swing Tags in the UK (2025 Edition)
Guide to Water Bottle Hang Tags: Custom Wine Bottle Hang Tags in the UK and London
Discover premium reed diffuser box packaging at Sky Custom Box. Custom designs and wholesale options to elevate your brand. Quality packaging solutions available.
ReplyDeleteHow Custom Boxes Improve Product Visibility and Sales?
Best Platforms for Selling Stickers Online
Scaling Your Custom Sticker Side Hustle: From Startup to Standout
Small Business Branding with Affordable Stickers