
Hello friends and happy Monday!
Hope you all had a wonderful weekend and as we head into the final week of October, it's time for a brand new Simon Says Stamp Monday Challenge and this week our theme is called THINKING OF YOU!
With Remembrance Day and Armistice Day just around the corner, as always at this time of the year, I felt inspired to create a card that would be a tribute to all those who have served our countries and used Tim Holtz products from Sizzix and Stampers Anonymous to make it!

So let's get started and here's how I created my tribute card...


To begin with I made a card blank from white card measuring 13.5 x 21cm with the fold at the top. I wanted a decorative border around the outside of my card layers that I will be mounting onto the card blank, so for this I used Design Tape and just stuck it around all four edges of the card to create a border.
Now for the first layer, and the chalkboard effect that I created for the background....
I cut a piece of black card, 11.5 x 19cm ( I always use smooth card for this technique) and using the Stampers Anonymous Floral Outline stamp set, I took one of the three designs that features the poppy in the design and after inking up the stamp with clear Versamark embossing ink, I started stamping the floral image over the entire background to create my background design.

I then sprinkled the stamped images with Frosted Crystal Embossing Medium and after tapping away the excess, I heat embossed the images.
TOP TIP: Do not overheat the powder, once it has melted and you can see that the texture has become crystallised, I always move onto the next section of embossing!
This medium leaves a gorgeous crystal gritty textured finish and as Tim demonstrated in his recent YouTube Live, this is perfect for this chalkboard technique, which is so easy but so effective and all you need to do to make the images pop is rub a piece of chalk over the textured embossing and then rub it with your finger to make sure it really gets into all those raised areas.
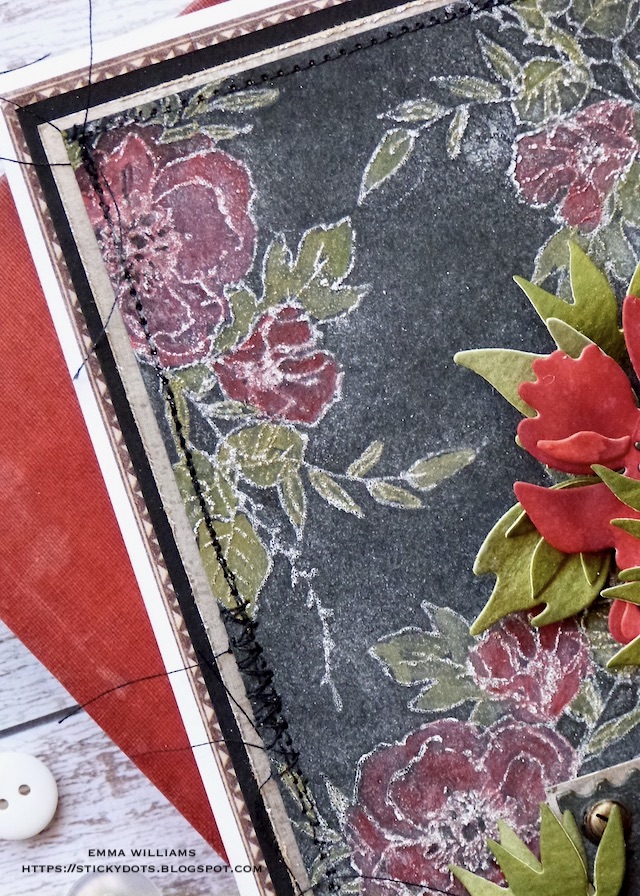
Once I was happy, I then started colouring my flowers and for this I used Distress Paints and a waterbrush.
COLOURS: Barn Door, Candied Apple, Peeled Paint, Forest Moss.
When you watercolour each of the flowers using the combination of red paints, and the leaves coloured with the green paints, you will find that you lose some of the chalk outline, so once the artwork was dry, I just gently rubbed a light touch of Matte White Wax Paste over the top to accentuate the outlines again.

With the background finished, I machine stitched a border around the outside and then matted the panel onto silver kraft stock card, followed by another layer of black card.
At this stage, I dyed some Mummy Cloth with Black Soot Distress Spray Stain and once it was dry I wrapped the cloth around my card layers, and secured it with a knot on the right hand side.

I then mounted the layers onto my card blank with foam pads, placing it with the design tape border showing around the outside of the layers.

Moving onto the next stage ~ the sentiment plaque.

For this I cut a panel of black card using an older Tim Holtz die set, Stacked Postage Stamp Thinlits Die set which I have in my stash. I then cut my lettering, 'We Will Remember Them' cutting each letter from silver metallic kraft stock using the Alphanumeric Label die set. I always adhere a piece of adhesive sheet to the back of my card as this really does make sticking the smaller die cuts, including these letters so much easier.
After attaching the letters to the black postage stamp die cut, I matted it onto more of the silver metallic card. I didn't want the silver to be too shiny, so to knock it back I ran the Black Soot Distress Crayon over the top, before I adhered the plaque to the front of my card blank with foam pads.
To finish the plaque, I added a Hardware Head to each opposite corner of the plaque.

Now the poppies...

I used the Sizzix Brushstroke Flowers 1 Thinlits Die Set by Tim Holtz, and cut the main layered sections for three flowers from Mixed Media Heavystock card that I had coloured with Candied Apple, Aged Mahogany and Barn Door Distress Spray Stains. I inked the edges with a little more Aged Mahogany Distress Ink and then assembled each piece to create my poppies, adding a black centre die cut to each flower.
I then cut a selection of leaves using the same thinlits die set, and cut these from more of the Mixed Media Heavystock card coloured with Bundled Sage, Peeled Paint and Crushed Olive Distress Sprays.

The flowers are now ready to arrange on my card and I placed them to overlap the sentiment plaque and cascade down the card front, with the leaves nestled amongst them.


For the finishing touches, I added a mini pin, and story stick to the knot of the mummy cloth....

...before clipping a tiny clip, painted with Candied Apple Distress Paint, onto the right hand side of the plaque.

So that completes my tribute card which I hope you love and I hope you've been inspired by some of the tricks and techniques I've used.

As always, if you make anything, or been inspired by anything that you've seen here on my blog ~ then please, let me know by tagging me on social media or leaving a comment here and I will be right over to take a look!
Don't forget that every week, one lucky random participant has the chance to win a $25 gift voucher from Simon Says Stamp and you can join in up to 5 times, which means you could have 5 chances to win. You have until next Monday at 8am Ohio time. 1pm UK time, 2 pm CET to join in and good luck....


Recipe for project:


This is gorgeous Emma! Love the chalkboard technique. This is definitely worth framing xxx
ReplyDeleteLove the card! Beautiful colors. When you say you used distress sprays, did you actually spray the petals or spray on a surface and then paint the petals?
ReplyDeleteThank you for your lovely comment and with regards to the petals, I always spray the card with the colour, prior to die cutting, then ink the edges! Then, once the die cuts are assembled, if I feel it needs shading added, I’ll add that at this stage! Hope that helps…
Delete