Hello everyone...
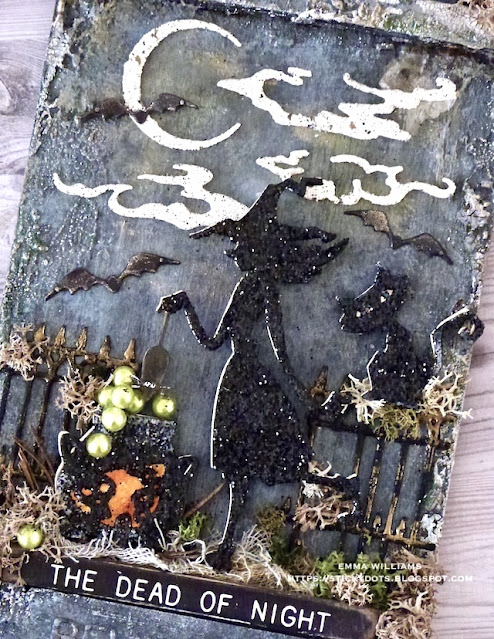
Can you believe Halloween is nearly here?!? This month has flown by so quickly, though to be honest, this year has flown ~ where did 2021 go!?! So seeing as it is nearly Halloween at the end of the week, I have one more spooky make to share with you all before I break out the Michael Bublé Christmas album and begin to share all my Christmas makes and that make is one that I created for the Tim Holtz/Sizzix Halloween YouTube Live launch and features the fabulous Toil and Trouble dies, (which I love), combined with the gates from the Vault series die set, and the clouds and moon from Ghost Town 2 die set which all came together to create my little scene featuring the witch, the mouse and the pussy cat who are a little bewitched, bothered and bewildered by what is going on!!!
If you would like to catch up with the replay of the live, then head on over to Tim's blog or his YouTube Channel and see all the amazing makes for this release from all my talented friends and makers!
To begin with I cut all my pieces from plain black card ~ the witch, bats, cauldron, mouse and cat from Toil and Trouble and the gates from the Halloween Vault 2021 dies. I also cut the clouds and moon from Mixed Media Heavystock using the dies from Ghost Town 2. With the exception of the gates, I cut each of the images three or four times, dependent on which piece so that this will create really substantial die cuts that resemble the thickness of chipboard.
GATES
We'll start with the gates first which I will be attaching on either side of the tombstone behind the witch, and I used Tim's Embossing Dabber over the surface before sprinkling them with black embossing powder. Tap away the excess powder and then heat emboss until molten. I repeated this a couple more times to create the enamelled look before I then applied the dabber to just the top spikes of the gates. I then sprinkled gold embossing powder over the top, tapped away the excess and heat embossed the powder.
I then attached my gates to my tombstone using Matte Collage Medium and placed them along the bottom section of the tombstone.
CLOUDS, MOON and BATS
For the moon and clouds, I took my die cuts ~ for these I cut each of them three times and then layered them over one another to make each separate piece. I used exactly the same technique of embossing as I used on the gates but this time I embossed them with Bone Mixed Media Embossing Powder. Once each piece was embossed, I adhered them onto the tag with collage medium.
Just around the moon, I added a glow using Fossilized Amber Distress Crayon. I just applied the crayon directly onto the surface where I was attaching the moon, blended it a little with my fingertip and then placed the moon over the top.
Around the moon, I attached the die cut bats, these were cut three times and layered over one another. I highlighted the bats with a touch of Antiqued Bronze Distress Crayon, blended with my fingertip.
WITCH, CAULDRON, CAT AND MOUSE
With all my die cuts cut four times and layered to create each piece, I glittered the witch, the cat and the cauldron by applying glossy accents over the surface of each die cut and sprinkling with Nightfall Glitter from the Halloween Sparkle Set.
To create a silvery shadow behind the dies, cut each image from silver metallic kraft stash and then placed the silver die cuts behind the glittery images, slightly offsetting the silver backing to create the shadow.
Set these aside to dry and whilst that is happening, I took a small piece of gold metallic kraft stash and applied the colours from the Alcohol Pearls Kit 1 over the surface before placing and attaching the card behind the glittered cauldron. This creates the fiery glow inside the cauldron.
With all my pieces ready, I attached them to the tombstone with foam pads to add dimension, placing the cat to sit on the gates...
...the witch in the centre and the cauldron in front of her. Around the base of the witch and the cauldron, I attached mummy cloth, dyed with Antique Linen and Frayed Burlap Distress Spray Stains, and moss. These little details will help to ground each die cut piece, so they aren't floating in mid air.
To create the bubbles coming out of the cauldron, I used the Bauble Adornments and coloured these with a combination of Limeade and Envy Pearls Alcohol Ink. I then attached each bauble to spill out of the cauldron, using Glossy Accents to secure them into place.
Taking the tiny mouse die cut which I haven't glittered, I added whites to the eyes of the mouse and then placed this in the witches hand, so that it's hovering with trepidation over the cauldron.
We're nearly there and all that's left is to add some small touches of moss, and a few little twigs around the tombstone and some hardware heads on the base and the top section of the tomb...
...before the finishing piece, which is the Quote Chip, "The Dead of Night", from the Halloween Baseboards pack. I sanded the edges of the chip and then attached it directly beneath the scene, and above the Bewitched wording.
I hope you've enjoyed the stroll through my makand have felt inspired to try some of the techniques I've used to create texture, sparkle and dimension, which can be used for any project, not just for Halloween!
Recipe for project:


No comments:
Post a Comment
Thank you for all your comments and messages, they are all appreciated and I hope you'll come back and visit again soon...
Emma ~xx