
Hello there...
Today, I'm back sharing my third idea-ology project that I created for the recent Tim Holtz idea-ology launch, and don't worry if you missed the launch or any of the projects, because you can catch up with everything HERE on Tim's blog!
For the first two pieces I've shared, I tapped into the industrial side of the products and focused on all those beautiful gears and metal pieces but for this piece, it was all about showcasing a soft, feminine look and I combined papers and flowers from Backdrops 2 and the Scraps Worn Wallpaper to create all those gorgeous layers and the message behind this piece was: Be Your Beautiful Self & Do Small Things With Great Love.
So, let's get started and here's how I created my etcetera tag...

Whilst the paint is drying, I cut a panel of the floral design paper from Backdrops Vol 2, cutting it so that it will cover the main body of the tag, but leave a gap at the top and a border around the remaining outside edges and then machine stitched a border around the outside. I then cut a smaller sized panel of the Worn Wallpaper and once again, added a layer of machine stitching around the outside edge, leaving some of the cotton threads to hang once I'd completed the stitching.
I added Design Tape around each of the edges of the tag and added some Matte Collage Medium to make sure the tape sticks and stays in place.
I then adhered my larger floral panel onto the tag, followed by the smaller Worn Wallpaper panel.
At the top of the tag, I applied a good layer of Crackle Paste and allowed this to dry and for the crackle to appear. Once that had happened, I then scribbled the Walnut Stain Distress Crayon over the surface and blended it into the crackles to accentuate them using a damp baby wipe.

I also added the crayon around the edge of the tag, blending out any harsh lines with the baby wipe.

My tag is now ready to decorate and I chose one of my favourite images from the new Solo Paper Dolls set. I just think this beautiful lady was perfect for this tag, she's the epitome of elegance and sophistication and worked so well against the floral backdrop.

I coloured her with Distress Crayons and a water brush and just built up the intensity and the shading.
Next, the trim that I added across the card which also grounds the paper doll and for this I used a Etcetera Trim, painted it with a layer of gesso and once it was dry, I applied some Crackle Paste over the top. I then allowed the paste to crackle and once again, I used the Walnut Stain Distress Crayon to add colour to the trim and accentuate the crackles.
I attached the trim across the tag and then adhered the border strip from the Scraps Worn Wallpaper pack and placed this onto the trim.

Beneath the trim, I added a strip of the gorgeous velvet trim and attached this across the width of the tag.
I then added a twist of the trim to the right hand side, adding a pink button to the centre of the ribbon twist.

The next embellishment was the frame and I used one of the Label Frames and after painting the metal with a combination of Distress Paints, Picket Fence and Evergreen Bough and then adding touches of rust using Ground Espresso, Black Soot, Rusty Hinge and Vintage Photo. I then placed a piece of Field Notes Ephemera behind the aperture.

I now have all the embellishments ready to layer and it's time to put this tag together and started by building up all those beautiful flower layers...

After selecting the flowers I wanted to use from the Scrap Worn Wallpaper pack, I inked the edges of each of them with and then started to layer them using foam pads to create different heights and various dimensions. I attached the flowers to slightly overlap the top edge of the panels of paper.
In amongst those flowers which cascade down and across the tag, I placed a gold Stencil Chip, the ampersand. I placed a piece of linen behind the chip and attached this directly onto the tag. I also added some a Metallic Quote sticker "Be Your Beautiful Self". I snipped this sticker into two sections and attached it to the tag, just above the Stencil chip.
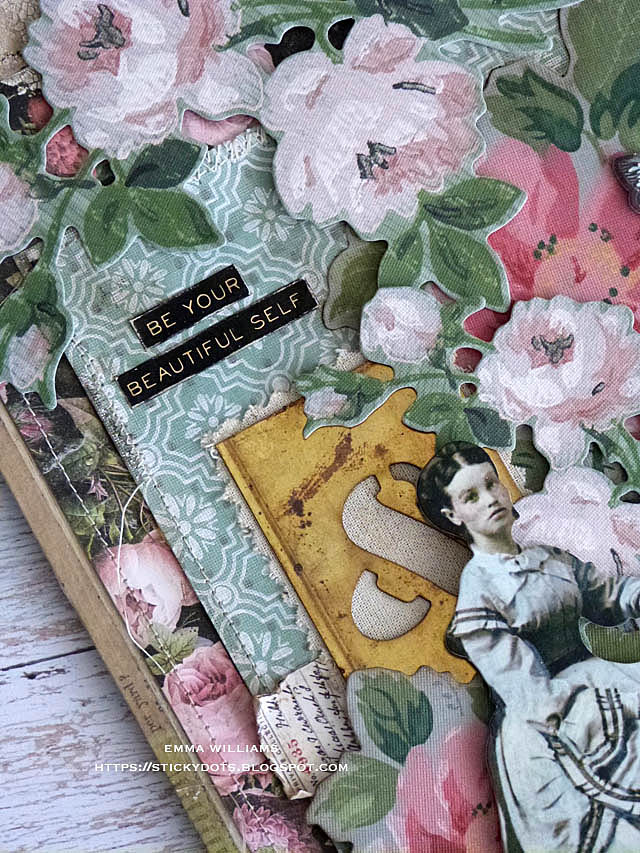
I attached the paper doll and frame and then added some Ephemera pieces, tucking them into the floral arrangement. I also added some small butterflies, again from the Field Notes Ephemera set and after shaping the wings, I attached these on and around the flowers.

For the final embellishment, I added some Floral Adornments. I coloured the metal with Alcohol Inks, Foundry Alloy and Mushroom and then attached them with Matte Collage Medium, arranging them with a Quote Flair and some baubles that I coloured with the Mushroom Alcohol Ink.
 ...and that final arrangement completes this tag!


I hope you've enjoyed how I put this piece together and as always, if you're inspired by any of my makes, then I would love to see them. So, just tag me on any of my social media platforms or leave a message here and I'll pop over to take a look!
Before I love you and leave you, I've had lots of questions about my Sizzix Chapter 2 projects that Tim shared on his recent YouTube live launch and thank you so much for all the love and support you’ve shown these projects which are coming to the blog very soon! So, watch this space!

Thank you so much for taking the time to stop by today and hope you love this piece!
Stay safe and keep well!
Love Emma xxx
Recipe for project:
Tim Holtz Idea-ology: Scraps Worn Wallpaper, Backdrops Volume 2, Quote Flair, Metallic Stickers, Cool Velvet Trims, Field Notes Ephemera, Label Frames, Keepsakes, Floral Adornments, Baubles, Paper Dolls Solo, Plaquettes, Stencil Chips, Hardware Heads, Design Tape, Mummy Cloth
Distress Paint: Black Soot, Evergreen Bough, Rusty Hinge, Ground Espresso and Vintage Photo
Distress Crayons: Walnut Stain, Gathered Twigs
Distress Spray Stain: Frayed Burlap, Pumice Stone
Alcohol Inks: Mushroom, Foundry Alloy
Stampers Anonymous: Pinked Etcetera Trims, Medium Etcetera Tag


I've been waiting for this post!! This was my favorite make of that live. I've gone back to Tim's web site a number of times to just stare at the photo of it. It's absolutely beautiful and it's the reason why I bought the paper dolls -- this lady is beautiful! As a shabby chic person, this project is right in my wheel house and I fell in love with it instantly. I've been hoping you'd post how you made it. Thank you so much for sharing this oh-so-femine project. Much appreciated.
ReplyDeleteI LOVE this piece! I love how you were able to swirl the flowers around the wallpaper...that is brilliant!
ReplyDeleteSo many layers and so, so, so beautiful!
ReplyDeleteThank you as always for sharing the instructions to create this feminine tag.
I really enjoyed your tutorial on how you created your BEAUTIFUL idea-ology project ,Thank You so much for sharing your talent with us all !!!
ReplyDelete