
Hope you, and your families are all safe and well! Before I let you all know about this week's brand new Simon Says Stamp Monday Challenge, I just wanted to say a huge thank you to everyone who has messaged me about my Aunt. Aunty Margaret, my Mum's big sister, sadly passed away from Coronavirus last Monday, she fought so hard but in the end it was all too much and she lost the battle against this horrendous virus! As you can imagine, our family are devastated and at the moment, my Uncle has now been admitted to hospital and two of my cousins are also fighting the virus ~ so please, keep them in your thoughts and if you can, PLEASE STAY HOME, it will save lives!
Now for all the details of this week's new challenge theme, which is called "CREATE A SCENE". We really hope you'll join us and play along and can't wait to see how you might interpret the theme. For my project, I created a vintage style canvas panel using the amazing Sizzix Baggage Claim Die by Tim Holtz and built up a scene all about travel and included a message to you all ~ "Let us imagine for a moment, the light of hope"

So, let's get started because it's time to share all the details of how I added some texture...


To begin with I stated by creating the background...
I took a canvas panel, 24 x 18cm and applied neutral paint colours over the background ~ Antique Linen Distress Paint, combined with a hint of Weathered Wood and Pumice Stone.
Once the surface was dry, I then used a band of Travel Collage Paper across the centre of the panel, adhering it into place by applying Matte Collage Medium to the panel and then placing the collage paper over the top, smoothing any wrinkles out and then adding a further layer of medium over the top to seal the paper.
 After a quick blast of gentle heat to dry the canvas thoroughly, I then wanted to add some more layers and detail and for this I chose to use the plain white collage paper which I stamped directly onto using stamps from the Field Notes and the Professor 2 stamp sets. Firstly, I stamped the "Baggage Check' wording using Barn Door Archival Ink onto the collage paper, gently heat set the ink and then using a water brush, dampen around the stamped image by drawing a line of water with the brush and then tearing the paper along that water line.

 This technique creates a seamless finish when you attach the collage paper, and won't create any harsh lines, it will just look like you've stamped directly onto the canvas. Apply some more medium direct to the canvas panel and place the stamped imagery over the the medium, attaching it to the bottom left hand corner, again smoothing out any crinkles and adding a coat over the top to seal it. Stamp the postmark and the 'stamp here' imagery onto more of the plain collage paper and after tearing it away, adhere it to the top right hand corner, together with some torn pieces of Design Tape.


I then applied some Crackle Paste around the edges to add that touch of vintage texture. Allow for the paste to dry and then add some colour using the Walnut Stain and Pumice Stone Distress Crayons, scribbling it over the top of the crackle and blending it out with either a damp water brush or dampen your finger.
As a finishing touch to the piece, I had some offcuts of "metal" (metallic kraft stash) from a previous project that I had embossed with the Foundry 3D Texture Fade. I cut these into small strips and attached them to the edges of my panel. Once in place, I added Hardware Heads, rusted with a combination of Rust, Pitch Black and Patina Alcohol Inks.
Okay, I now have the background ready and it's time to create the scene, starting with the shelf for the baggage to sit on...
The shelf is made up from two of the longest Bracket Etcetera Trims and painted with a solid coverage of Evergreen Bough, before I dry brushed Walnut Stain and Antiqued Bronze Distress Paints over the top. After layering the two trims over the top of one another, and attaching them to my panel...
 ...I then added a handle, again given the vintage look with Distress Paints and adding two Hardware Heads to give the appearance that the handle is screwed onto the trim.


For the luggage, and as I mentioned at the beginning, I used the Baggage Claim die to die cut all the separate pieces to make up the three suitcases.
Once I'd cut the luggage from chipboard, I then covered each piece with my various textures of cardstock. The top two suitcases are covered with Distress Cracked Leather Cardstock, which has to be the coolest card ever, the texture is to die for and it takes the ink so beautifully... I just love this stuff. The third and final case is cut from a combination of embossed card on the bottom and linen on the top both of these pieces were actually from my box of offcuts and were perfect for using on this piece.
For the yellow and green cases I used Distress Inks to colour the leather cardstock suitcase, the top one with a combination of Mustard Seed, Fossilized Amber and Vintage Photo Distress Inks and the middle case with Peeled Paint, Crushed Olive and Vintage Photo Distress Ink. I then inked the edges of all three cases with a touch of Walnut Stain. The handles, locks, corner pieces and straps are all cut from card and metallic kraft stash and are all inked with various Distress Inks and alcohol inks to add colour before being attached to the luggage pieces.

Now to start building the scene and telling the story of this distinguished gentleman, the travelling salesman...

I used foam pads to attach my suitcases and just behind the cases, I placed a ticket stub from Tim's Ticket Book, that I crumpled up in my hand, unfolded and then attached to the panel.
I also added some more ephemera pieces around the cases, a Specimen label, postcard and the Union Jack, all of which are taken from Tim's Ephemera packs ~ Field Notes and Snippets. To complete the shelf I attached various sized Sprocket Gears...
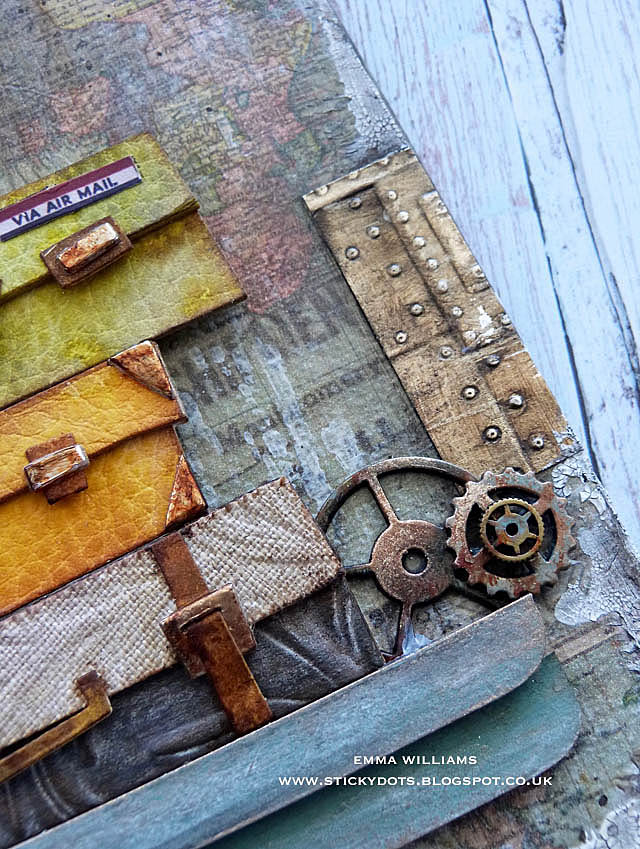
...and a strip of ruler ribbon, tucked behind an ephermera piece.

We're nearly there and all that was left to add were the hats which are both stamped onto Mixed Media cardstock using images from the stamp set. After fussy cutting each hat, I swiped the Embossing Dabber over the stamped images, giving an even coverage to each hat and then sprinkled with clear embossing powder before heat embossing each one to create a beautiful shine, which you can just about see in the photo below.
 Attach the hats to the scene with foam pads.

Finally, I added Clippings Stickers to create the quote...

...and attached some Index Clips, complete with Hardware Heads to the edges of the panel.
I hope you've enjoyed my walk through the creative process of this piece and love the project I've made, it was so much fun to create this scene!
As you may know the lovely Heidi, and all the people working behind the scenes at the Simon Says Stamp Store are running on limited operations ~ they are still accepting orders but due to the current Coronavirus (Covid-19) situation, shipping times are going to be slightly longer than usual!
But due to the outbreak we have made the very difficult decision to suspend the $50 vouchers for now but we know that many people are staying safe at home and we would love it if you would continue to enter the challenges and have fun! We are all in this together!


Thank you so much for taking the time to stop by today and see you again soon.
Stay safe everyone and take care of yourselves and your loved ones...
....love, care, believe ~ Emma
xxx
Recipe for project:
Tim Holtz/Sizzix: Baggage Claim, Foundry 3D Texture Fade
Tim Holtz/Stampers Anonymous: Bracket Etcetera Trims, Field Notes, The Professor 2, Distinguished
Distress Paint: Weathered Wood, Antique Linen, Pumice Stone, Evergreen Bough, Antiqued Bronze, Walnut Stain
Distress Ink: Mustard Seed, Fossilized Amber, Vintage Photo, Peeled Paint, Crushed Olive, Walnut Stain
Distress Crayons: Walnut Stain, Pumice Stone
Alcohol Inks: Rust, Patina and Pitch Black
Archival Ink Pads: Barn Door, Black Soot


I'm so sorry to hear how this virus has affected your family. Please be safe. I'm thinking of you and your family. Sending virtual hugs.
ReplyDeleteLove this. As usual, everything you do is "just my style". I just love your work! Thank you.
ReplyDeleteEmma, my heart is breaking for you and your family. You all will be in my prayers, especially your Uncle and cousins. Thank you for sharing your tragic news with us, it helps make it easier to stay at home. When I’m feeling down or the kids are driving me bonkers, I will remember you and know we are doing the right thing by staying home. Hugs from KY, USA.
ReplyDeleteMy heart goes out to you and your family, such a sad and worrying time . Thank you for sharing your art work . stay safe 💕Take care x
ReplyDelete